background image

-11-

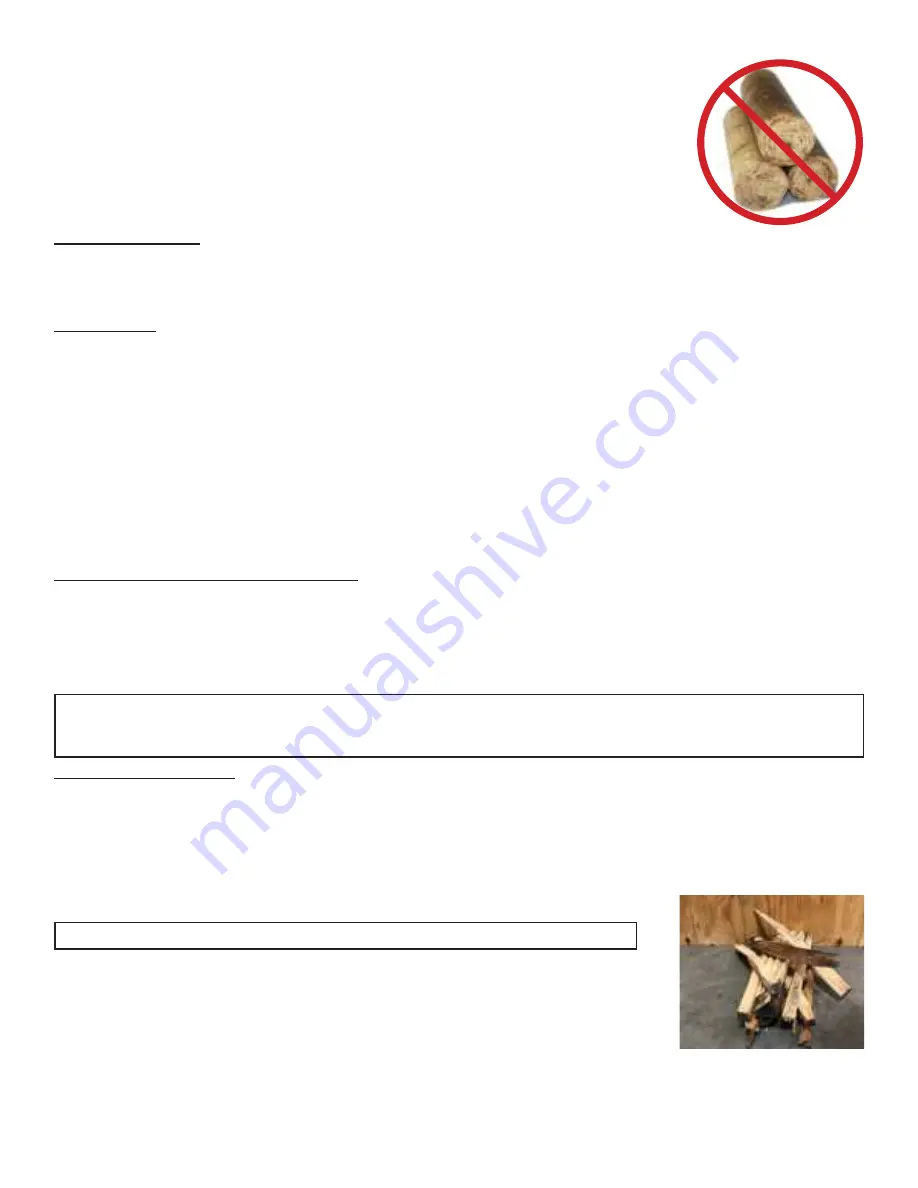
Do not burn manufactured logs made of wax impregnated sawdust or logs with any 

chemical  additives.  Manufactured  logs  made  of  100%  compressed  sawdust  can  be 

burned, but be careful burning too much of these logs at the same time. Start with one 

manufactured log and see how the stove reacts. You can increase the number of logs 

burned at a time to making sure the temperature never rises higher than 475°F (246°C) 

on a magnetic thermometer for installation on single wall stove pipes or 900°F (482°C) 

on a probe thermometer for installation on double wall stove pipe. The thermometer 

should be placed about 18” (457 mm) above the stove. Higher temperatures can lead 

to overheat and damage your stove.

TAMPER WARNING

This wood heater has a manufacturer-set minimum low burn rate that must not be altered. It is against federal 

regulations to alter this setting or otherwise operate this wood heater in a manner inconsistent with operating 

instructions in this manual.

EFFICIENCIES

Efficiencies can be based on either the lower heating value (LHV) or the higher heating value (HHV) of the fuel. 

The lower heating value is when water leaves the combustion process as a vapor, in the case of woodstoves the 

moisture in the wood being burned leaves the stove as a vapor. The higher heating value is when water leaves 

the combustion process completely condensed. In the case of woodstoves this would assume the exhaust gases 

are room temperature when leaving the system, and therefore calculations using this heating value consider 

the heat going up the chimney as lost energy. Therefore, efficiency calculated using the lower heating value of 

wood will be higher than efficiency calculated using the higher heating value. In the United States all woodstove 

efficiencies should be calculated using the higher heating value. The best way to achieve optimum efficiencies 

is to learn the burn characteristic of you appliance and burn well-seasoned wood. Higher burn rates are not 

always the best heating burn rates; after a good fire is established a lower burn rate may be a better option for 

efficient heating. A lower burn rate slows the flow of usable heat out of the home through the chimney, and it 

also consumes less wood.

NOTICE - INITIAL BURNS TO CURE PAINT

BECAUSE OF THE HIGH OPERATING TEMPERATURES, THIS APPLIANCE IS COATED WITH A SPECIAL HIGH TEMP PAINT 
WHICH REQUIRES A SERIES OF LOW TO MEDIUM BURNS TO FULLY CURE FOR DURABILITY AND A LIFETIME OF SERVICE.

Proper curing of the high-temp paint requires a series of three initial burns. The appliance should be allowed to 

cool off between each burn. The first two burns should be small fires and low temperatures (250°F) for a duration 

of 20 minutes each. The third fire should be at a temperature of approximately 500°F for 20 minutes. Provide 

adequate cross ventilation to clear any smoke or odor caused by initial firings.

Notice: Use solid wood fuel only! Do not burn garbage , or flammable fluids. Do not use coal. This appliance 

is not designed to accommodate the air flow (draft) required to properly burn coal or coal products. Do not 

elevate the fire using grates or irons. Build the fire directly on the firebrick.

FUELING INSTRUCTIONS

This wood stove has been certified by the US EPA to meet strict 2020 guidelines. To ensure this unit produces 

the  optimal  minimum  emissions  it  is  critical  that  only  well-seasoned  cordwood  is  burned  (see  the  “Fuel 

Recommendations” section of this manual). Burning unseasoned wet wood only hurts your stoves efficiency and 

leads to accelerated creosote buildup in your chimney. Be considerate of the environment and only burn dry 

wood

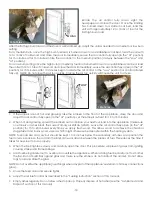
For a cold start-up, place 3 to 4 pieces of newspaper into the firebox. On top 

of the newspaper, lay 2 lbs of kindling in random placement to ensure airflow 

through the kindling. On top of the kindling, place approximately 3 to 4 lbs of 

small pieces of cordwood. NOTE: Use smaller pieces of wood during start-up and 

a high burn rate to increase the stove temperature.

CAUTION: DO NOT LEAVE APPLIANCE UNATTENDED THE WITH DOOR OPEN.

3 to 4 lbs

Summary of Contents for US1800E

Page 1: ...s This manual will help you to obtain efficient dependable service from the heater and enable you to order repair parts correctly Keep in a safe place for future reference U S Environmental Protection...

Page 2: ...UL 103 HT U S Listed Residential Type and Building Heating Appliance Chimney Use a 6 diameter chimney that is high enough to create sufficient draft 11 Be sure your chimney is safely constructed and i...

Page 3: ...ning Systems for Existing Masonry or Factory Built Chimneys and Vents or CAN ULC S640 Standard for Lining Systems for New Masonry Chimneys 24 Permanently seal any opening between the masonry of the fi...

Page 4: ...acement if the appliance is ever removed The removal of any parts that render the fireplace unusable for burning solid fuel requires a permanent label to be affixed by the installer that states the fi...

Page 5: ...ng fuel fired equipment shows evidence of back puffing smoke roll out inefficient operation or excessive smell in the living area b Opening a window or door alleviates any of the above problems or sym...

Page 6: ...e with a metal warning label Permanently attach the warning plate to a visible location in the fireplace After choosing a visible location in the fireplace permanently attach the warning plate by scre...

Page 7: ...f your stove and radiates heat more evenly If firebricks were removed to position appliance replace them before firing appliance See figure 7 for proper orientation and positioning Install the back ro...

Page 8: ...must meet the three minimum height requirements detailed in figure 8 A minimum draft of 0 05 w c measured in water column is required for proper drafting to prevent back puffing smoke spillage and to...

Page 9: ...ns Under extreme conditions it may rot instead of drying This point cannot be over stressed the vast majority of the problems related to the operation of a wood stove is caused by the fact that the wo...

Page 10: ...chemicals or waste in this appliance could result in damages to the heater or result in bodily injury It will also void any warranty on the appliance This heater is designed to burn natural wood only...

Page 11: ...seasoned wood Higher burn rates are not always the best heating burn rates after a good fire is established a lower burn rate may be a better option for efficient heating A lower burn rate slows the...

Page 12: ...ance overfiring is when any part of the appliance s exterior or chimney connections glow 5 Close the feed door and secure tightly 6 Adjust the air inlet control as described in the Fueling Instruction...

Page 13: ...ld up Ignition of creosote or overfiring could cause a chimney fire Chimney fires burn extremely hot and may ignite surrounding combustible materials In case of a chimney fire call the fire department...

Page 14: ...rom all combustible materials pending final disposal The ashes should be retained in the closed container until all cinders have thoroughly cooled SMOKE AND CO MONITORS Burning wood naturally produces...

Page 15: ...nspection 5 Replace new gasket starting at the bottom of glass working along edges being sure to center gasket channel on glass 6 Trim to length and butt ends together 7 Replace glass into door being...

Page 16: ...CORD NEAR OR ACROSS HOT SURFACES CAUTION THE BLOWER ASSEMBLY MUST BE DISCONNECTED FROM THE SOURCE OF ELECTRICAL SUPPLY BEFORE ATTEMPTING ANY MAINTENANCE MALE BLACK BLACK BLACK WHITE BLACK WHITE MALE B...

Page 17: ...2 3 12 11 IN ORDER TO MAINTAIN WARRANTY COMPONENTS MUST BE REPLACED USING ORIGINAL MANUFACTURERS PARTS PURCHASED THROUGH YOUR DEALER OR DIRECTLY FROM THE APPLIANCE MANUFACTURER USE OF THIRD PARTY COM...

Page 18: ...sket Clamp 1 13 29228 Bottom Glass Retainer 1 Key Part Description Qty 1 891414 Half Firebrick 2 2 89066 Firebrick 4 1 2 x 9 9 3 891989 2 Firebrick 1 1 4 x 2 1 4 1 4 893010 Half Firebrick Notched 1 5...

Page 19: ...19 Notes...

Page 20: ...07 Date _____________________ Engineer Name ________________________________ License No ____________________________________ Company _____________________________________ Telephone No _______________...

Page 21: ...ult rieure Lors d une correspondance donnez toujours le num ro de mod le complet qui est inscrit sur la plaque attach e l appareil de chauffage Lors de la commande de pi ces de rechange donnez toujou...

Page 22: ...____________________________ Service de 07 Date _____________________ Nom de l ing nieur ____________________________ N de licence _________________________________ Compagnie _________________________...

Page 23: ...rieure 1 Cl Partie Description Qt 1 891414 Demi brique r fractaire 2 2 89066 Brique r fractaire 4 1 2 x 9 9 3 891989 2 Brique r fractaire 1 1 4 x 2 1 4 1 4 893010 Demi brique r fractaire entaill 1 5...

Page 24: ...4 611008 Cabinet droit 1 5 893261 Glissi re d amortisseur 1 6 29301 Accolade coulissante 2 7 893261 Manche en bois 1 8 29300 Couverture 1 9 29298 Amortisseur 1 10 611007 Cabinet gauche 1 10 1 13 8 15...

Page 25: ...u sur des surfaces chaudes Mise en garde Le ventilateur doit tre d connect de la source d alimentation lectrique avant de tenter toute op ration de maintenance M le Noire Noire Noire Blanche Noire Bla...

Page 26: ...r une tanch it correcte si les cordons deviennent effiloch s ou us s remplacez les tout de suite La porte ce cette unit utilise un joint de corde de 1 po de diam tre LE REMPLACEMENT DU CORDON D TANCHE...

Page 27: ...t naturellement des missions de fum e et du monoxyde de carbone CO Le CO est un gaz poison lorsque l exposition se fait des concentrations lev es pour une p riode de temps prolong e Bien que les syst...

Page 28: ...ance calorifique d passant les sp cifications de conception du chauffage peut lui causer des dommages permanents ainsi qu au catalyseur de postcombustion s il est pr sent 7 Videz les cendres r guli re...

Page 29: ...les b ches rouler et heurter la vitre REMARQUE Ne surchauffez pas l appareil une surchauffe se produit lorsqu une partie des connexions ext rieures ou de la chemin e de l appareil brille 5 Fermez la p...

Page 30: ...es meilleurs taux de combustion apr s qu un bon feu est tabli un taux de combustion plus bas peut tre la meilleure option pour un chauffage efficace Un taux de combustion plus bas ralentit la sortie d...

Page 31: ...aibles r sultent g n ralement lors de la combustion de bois durs s ch s s ch s l air par rapport aux r sineux ou aux bois durs verts ou fra chement coup s NE PAS BR LER 1 Des ordures 2 Coupures de gaz...

Page 32: ...m me pourrir au lieu de s cher On ne saurait trop soulign que la vaste majorit des probl mes li s au fonctionnement d un insert bois est caus e par le fait que le bois utilis tait trop humide ou avai...

Page 33: ...ges de dos les d versements de fum e et pour maximiser les performances Des jauges pour mesurer le tirage sont facilement disponibles dans les magasins de po les et sont conomiques louer ou acheter De...

Page 34: ...er l appareil Voir figure 7 pour la bonne orientation et le positionnement correct Installez en premier la rang e de briques situ e l arri re suivie par celle de chaque c t et enfin les briques r frac...

Page 35: ...quer et pr percer les trous n cessaires pour fixer l tiquette 7 Positionnez l appareil dans l ouverture du foyer jusqu ce que la l vre sup rieure de la chemise d air soit align e avec la fa ade du foy...

Page 36: ...e sommet de la chemin e est exig Un adaptateur en acier inoxydable est recommand pour attacher la gaine conduit d acier inoxydable la buse La partie m le ou ondul e de l adaptateur doit tre install e...

Page 37: ...doivent tre stock es pr cautionneusement si l appareil est d plac Le d montage de n importe quelle pi ce qui rend la chemin e inutilisable pour br ler des combustibles solides implique qu une tiquett...

Page 38: ...x sp cifications CAN ULC S635 Classe 3 norme pour les conduits existants de chemin es industrielles ou de ma onnerie ou CAN ULC S640 norme pour les conduits de nouvelles chemin es de ma onnerie 24 Sce...

Page 39: ...eautrepi ce unespaceconfin legrenier ou l int rieur d un b timent Ne connectez pas cet appareil un conduit de chemin e d j utilis par un autre appareil 10 NE connectez pas un appareil de chauffage au...

Page 40: ...les conditions d installation et les restrictions N utilisez pas cet appareil dans un mobile home une maison pr fabriqu e une caravane ou une tente U S Environmental Protection Agency Certifi pour se...

Reviews: