background image

2

EN

Safety Information

WARNING:

• Live parts inside. Do not remove any screws.
• To avoid fire or electric shock, do not expose 

this unit to rain or moisture.

• Dangerous voltage inside
• As soon as the unit is connected to the power 

supply, some components are in constant 
operation. To power off the unit completely you 
must disconnect it from the mains or power it 
off with the main switch.

Precautions

• Use only cassettes with the VHS mark with this unit.
• Do not attempt to open the cabinet. There are no parts you 

can service inside. Refer all servicing to qualified service 
personnel.

• Slots and openings in the cabinet and the sides or bottom 

are provided for ventilation. To ensure reliable operation 
and to protect the unit from overheating, these openings 
must not be blocked or covered.

• Avoid installation in enclosed spaces such as bookcases 

unless proper ventilation is provided.

• Keep the unit away from radiators and other heat sources.
• Avoid use near strong magnetic fields.
• Do not push objects of any kind into the unit through the 

cabinet slots or openings as they could touch electrically 
live parts or short circuit parts resulting in a fire or electric 
shock.

• Never spill liquid on this unit. If liquid is spilled and 

penetrates into the unit, consult qualified service personnel.

• Use this unit in a horizontal (flat) position only.
• Do not place any combustible objects on the device 

(candles, etc.).

Dew Warning

Moisture condensation may occur inside the unit when it is 
moved from a cold place to a warm place, after heating up a 
cold room, or under conditions of high humidity. Do not use 
the unit for at least 2 hours until it is dry inside.

Before Using This Product

Video Cassette Tape

This unit will operate with any cassette that bears the VHS 
mark. For best results, we recommend the use of high-quality 
tapes. Do not use poor quality or damaged tapes.

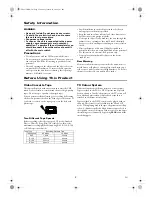
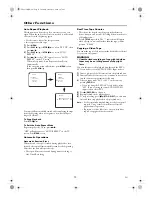
You can prevent accidental erasing of a recording by breaking 
off the erase-prevention tab on the back edge of the cassette. If 
you decide to record on the tape again, cover the hole with 
plastic tape.

Two Different Tape Speeds

Before recording, select the tape speed : SP mode (Standard 
Play) or LP mode (Long Play). The table below shows the 
maximum recording/playback time using E-60, E-120, E-180 
or E-240 tapes in each mode.
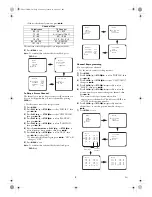
TV Colour System

Different countries use different television colour systems. 
Tapes recorded in the PAL or NTSC system can be played 
back on this unit. Usually, the picture on the TV screen will 
be in black and white when you play back a tape that is 
recorded in a different colour system.

Tapes recorded in the NTSC system can be played back on 
this unit. This feature is only available in the SP and SLP 
mode. When playing back such tapes, the picture may roll up 
or down, shrink vertically and black bars may appear both at 
the top and bottom of the screen.  If this occurs, you can adjust 
the tracking control manually by pressing 

PROG +/-

 until the 

streaks disappear. 

Tape Type

Recording/Playback Time

Tape Speed

SP Mode

LP Mode

E-60

1 hour

2 hours

E-120

2 hours

4 hours

E-180

3 hours

6 hours

E-240

4 hours

8 hours

Tab

T6627SH(EN).fm  Page 2  Thursday, January 22, 2004  1:27 PM

Summary of Contents for TVC5044

Page 1: ...r use of broadcast television programming video tape film or other copyrighted material may violate applicable copyright laws We do not take responsibility for the unauthorised duplication use or othe...

Page 2: ...ed from a cold place to a warm place after heating up a cold room or under conditions of high humidity Do not use the unit for at least 2 hours until it is dry inside Before Using This Product Video C...

Page 3: ...RD button 14 RECORD indicator 15 HEADPHONE jack Rear Panel 1 EXT1 AV1 scart socket 2 Power cord 3 AERIAL socket Caution If you power off by pressing the main power switch TIMER recordings are IMPOSSIB...

Page 4: ...ton Blue button TEXT button REVEAL button EXPAND button SUBCODE button HOLD button INDEX button To insert the batteries Install two R6 batteries matching the polarity indicated inside the battery comp...

Page 5: ...can connect an additional device such as decoder satellite receiver camcorder etc to the EXT1 AV1 scart socket The scart socket to be connected is usually marked AV or TV on the decoder or satellite...

Page 6: ...K or STOP C p to select INITIAL then press D B 3 Press PLAY B K or STOP C p to select LANGUAGE then press D B 4 Press PLAY B K or STOP C p repeatedly to select your desired language 5 Press MENU to ex...

Page 7: ...ch off the decoder press D B to select OFF 8 Press MENU to exit The decoder has now been allocated to this TV channel Manual Channel Preset In some cases it can occur that some TV channels are not fou...

Page 8: ...or STOP C p to select CH TUNING then press D B 4 Press PLAY B K or STOP C p repeatedly to select MOVE then press D B 5 Press PLAY B K or STOP C p repeatedly to select the position number you want to...

Page 9: ...t PICTURE then press D B 3 Press PLAY B K or STOP C p to select an item and then modify with h s or D B 4 Press MENU to exit TINT appears only when receiving NTSC signals from an additional device con...

Page 10: ...igh speed in either a forward or reverse direction In this mode the sound will be muted 2 Press the button again the unit will now search in super high speed This function will not operate for a casse...

Page 11: ...length appears To stop an OTR before recording is finished Press STOP C p To cancel the OTR but continue recording Press RECORD repeatedly until I appears without the recording length Assemble Functi...

Page 12: ...t another timer programme repeat steps 3 to 8 9 Press MENU to exit 10 Press STANDBY ON y to activate the timer The RECORD indicator on the front panel flashes slow If STANDBY ON y is not pressed the T...

Page 13: ...ing or playback time in hours minutes and seconds Nothing is shown in the case of blank portion Press STATUS repeatedly The indication will appear when the tape is rewound further than the tape counte...

Page 14: ...blurred or interrupted even if the TV programme received is clear This does not mean that the recorded programme has been erased This problem is caused by dirt accumulated on the head after long peri...

Page 15: ...ording on the cassette Poor picture quality when you play a cassette The cassette is badly worn out or of poor quality Use a new cassette Tracking is not properly adjusted Turn to section Tracking Adj...

Page 16: ...cherstrasse 11 22767 Hamburg Germany declare that the TV Video Combi TVC5044 are in compliance with following norms EN 55013 2001 EN 55020 2002 EN 61000 3 2 2000 EN 61000 3 3 1995 A1 2001 EN 60065 199...

Reviews: