GO1 User Manual
Copyright © 2021 Unitree Robotics. All Rights Reserved
16
to complete the charge.
6.After the robot is running, the battery pack temperature may be high. The battery pack must be
charged after the battery pack temperature drops to room temperature.
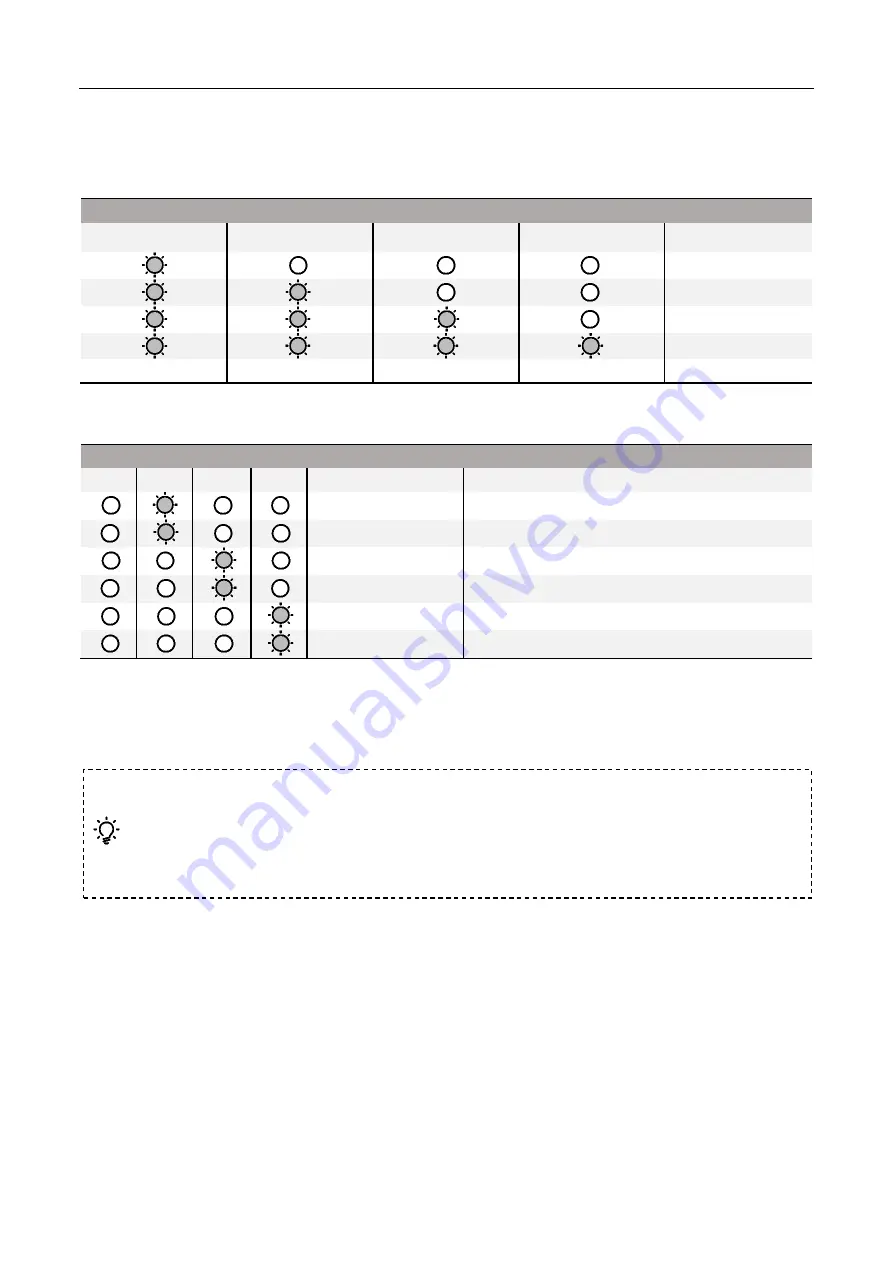
Charging Indicator
LED1
LED2
LED3
LED4
Current Battery
0%-25%
25%-50%
50%-75%
75%-100%
Full
Charging Protection Indication
The LED can display information about battery protection triggered by abnormal charging.
Charging Indicator
LED1 LED2 LED3 LED4
Display Rule
Protection Project
LED2: 2 times/sec
Excessive charging current
LED2: 3 times/sec
Short circuit
LED3: 2 times/sec
Overcharge causes battery voltage be too high
LED3: 3 times/sec
Charger voltage is too high
LED4: 2 times/sec
Charging temperature is too low
排除
LED4: 3 times/sec
Charging temperature is too high
Troubleshoot (charge current is too large, charge short circuit, charge overcharge causes battery voltage
is too high, charging voltage is too high), please re-plug the charger to resume charging. If the charging
temperature is abnormal, please unplug the charger first. After the charging temperature returns to
normal, plug in the charger and recharge.
Foot Assembly
Introduction
The foot assembly adopts a new design. The movement of the robot will compress the air in the foot
pad and send the pressure signal through the air pipe to the pressure sensor in the shoulder, so as to
judge the environment the robot is in and adjust the movement of the robot accordingly.
Foot end components include foot end base, bottom curved rubber pad, air needle and other
For safety reasons, the battery needs to be discharged during transportation. The discharge
mode is divided into active discharge and passive discharge:
1.
Active discharge: Run the robot until the battery is at a low battery (eg 50% or less).
2.
Passive Discharge: The battery is stored in self-discharge protection. For details, please
refer to the chapter "Battery Pack" - "Battery Pack Function".


