background image

8700 

 8701 TITANIUM 


7


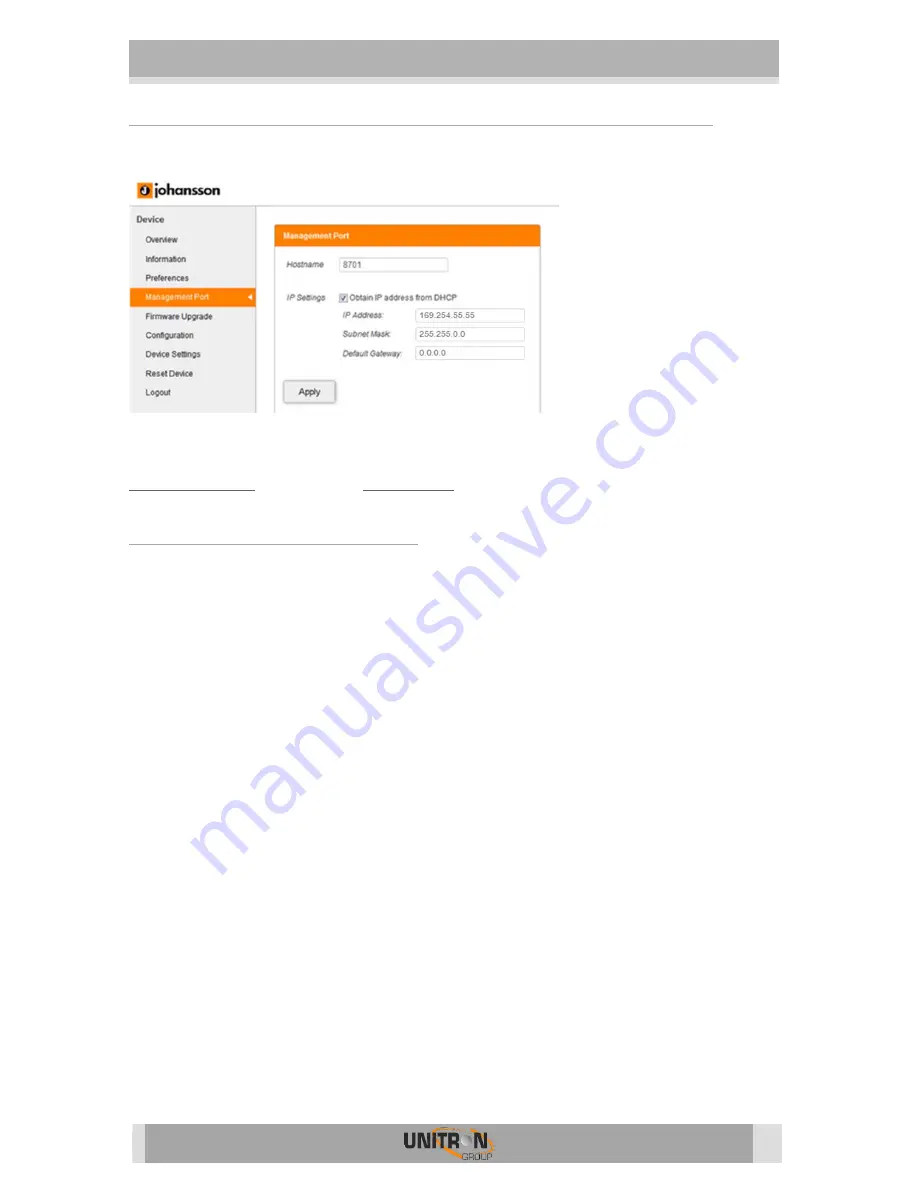
Connecting the module(s) to a network with DHCP 

To connect the module(s) to a network, go to the Management Port in the web 

interface. 


Tick Obtain IP address from DHCP

  and give each Titanium a unique hostname (for 

instance: http://8701). Click apply to confirm. Now the module can be accessed via 

http://hostname

 (for instance: 

http://8701

) or check your DHCP server for IP address. 


DEVICE CONFIGURATION 

It is of utmost importance that your device is configured in a right way in order to make the 
Titanium installation successful. To do so, follow the below mentioned steps carefully. 

1.


Login  

5.


After the web interface opens (see previous step), the home page with an 
overview of active services appears. On this screen, you see information about 
the output MUXs, the CAM status and the chosen TV services. 

6.


In the top right corner, you will see the device status. If the status “LED” is 

green, there are no alarms. When you move your cursor ov

er the status “LED”, 

the alarm status will appear.  

7.


By clicking on login, you can log in to the module. Use the password “admin”.


8.


! change the password as soon as you log in to the module via 

Management Port”!


9.


After logging in, the Overview window will appear again. The menu structure of 
the web interface can be found in the left column.  

Summary of Contents for Johansson TITANIUM 8700

Page 1: ...User Manual TITANIUM COMPACT SATELLITE HEADEND Ref 8700 8701 ...

Page 2: ...nical Specifications 15 4 Safety Instructions 16 5 Conditions of warranty 17 No part of this manual may be copied reproduced transmitted transcribed or translated into any language without permission Unitron reserves the right to change the specifications of the hardware and software described in these manuals at any time Unitron cannot be held liable for any damages resulting from the use of this ...

Page 3: ...ed For ventilation purposes leave a minimum of 15 cm around all sides of the module 1 2 Typical installation The Titanium can be used to provide high quality satellite television in a wide range of projects both in the hospitality as in the residential market Typical buildings or infrastructures where the Titanium can be used include but are not limited to Hotels hostels bed and breakfasts holiday...

Page 4: ...8700 8701 TITANIUM 3 1 3 Package contents 1 x Titanium ref 8700 or 8701 1 x 75 Ohm terminators 1 x Mains cable 1 80 m 1 4 Product dimensions ...

Page 5: ...able insert a 75 Ohm terminator in the RF IN port Connect the coaxial TV network to the RF out port If the Titanium is configured to read CAM cards insert 1 or 2 CAM cards and smart cards in the slots on the backside of the Titanium Not included with the Titanium Power the Titanium with the mains cable Once it is powered a RED POWER LED will start blinking When the LED stops blinking and turns BLU...

Page 6: ...owered and fully booted the module is reachable and ready to be configured For a more reliable WebGUI connection we advise to use fixed IP or DCHP Therefore carefully follow the steps below 1 Set the computer to obtain an automatic IP address as explained in the following procedure for Microsoft Windows10 o Navigate to the Control Panel Start Control Panel o Enter the Network and Sharing Center an...

Page 7: ...68 55 55 o Press Apply 3 Go back to Local Area Connection Properties select Internet Protocol Version 4 TCP IPv4 to enter the IP settings of your adapter o Tick Use the following IP address o Fill in the IP address you chose in the Titanium Management Port but make sure that the last group of digits is different for instance 192 168 55 10 4 Open your webbrowser and go to http start Now a stable co...

Page 8: ...ful To do so follow the below mentioned steps carefully 1 Login 5 After the web interface opens see previous step the home page with an overview of active services appears On this screen you see information about the output MUXs the CAM status and the chosen TV services 6 In the top right corner you will see the device status If the status LED is green there are no alarms When you move your cursor...

Page 9: ...ur password to secure your module for unauthorized users o Dynamic DNS configuration for remote access to register a fixed IP address 13 Firmware Upgrade o Click on the Browse button and open the upgrade file upg Click Upgrade to send the file to the device this will install the new firmware on the device 14 Configuration o Choose the configuration of your Titanium DVB T or DVB C Press APPLY to con...

Page 10: ...tanium between the power and alarm LEDs By pressing this button less than 2 seconds LED above control port will turn RED the device will reboot By pressing this button longer than 5 seconds LED above control port will blink GREEN the device will reboot the IP settings will be reset and the password will be reset to the default password admin Logout o When you are finished configuring the Titanium ...

Page 11: ...larization 18V Horizontal polarization o Extended Voltage Add 1V to the LNB voltage to compensate the cable losses for long coaxial cables o Tone LNB tone to select low high band ON high band OFF low band o DiSEqC control of a DiSEqC switch A B C D o Band Satellite band Ku band C band o Enable do not forget to enable the LNB input this is disabled by default o Press APPLY to confirm the parameters...

Page 12: ... the tuner this is disabled by default o Check the lock status signal level signal quality and signal to Noise to see if the tuner locks on the selected transponder o Press APPLY to confirm the parameters o The module will now set the tuner to this frequency Wait until the correct parameters are loaded When the tuner is able to lock on the frequency the services list from this transponder will be ...

Page 13: ...te of services can fluctuate in time Select another multiplex by clicking on the tabs on top of the page 17 Service Settings o Tuner choose the input stream you set in INPUT o Name choose the service o CI choose the routing of the service FTA Free to Air CAM 1 CAM 2 o Priority provides the possibility to prioritize some services e g Primetime services to guarantee better quality on TV in case of s...

Page 14: ... identifier of a network check the spreadsheets on http www dvbservices com to find your correct ONID o NID Choose your Network ID o Network Name Set your network name o Version set the version of the network value between 0 and 31 o Private Data Specifier choose between EACEM ITC NORDIG o Press APPLY to confirm the parameters ...

Page 15: ...of the CAM module to try to restore the descrambling of the service s Important Activate this feature only once all services are properly descrambled by the CAM module o Enable Click ENABLE to activate the CAM default Press APPLY to confirm the parameters 20 Reference Transponder o Reference Transponder It is necessary to enable and select a reference transponder in the CAM menu for each CAM indiv...

Page 16: ... 18 V 22 kHz Integrated multiswitch Yes allows flexible routing of satellite programs to multiplexes QAM or QOFDM Configuration Built in webserver accessible via management port Encoded programs From all 4 or 8 tuners Can be routed through 1 or 2 CAMs and can be decoded using multi service CAMs Output RF Outputs 1 with 4 MUXs DVB T or DVB C DVB T output Mbps Up to 31 7 MUX DVB C output Mbps Up to ...

Page 17: ...aratus Do not install the product in a dusty place Use the apparatus only in moderate climates not in tropical climates Respect the minimum and maximum temperature specifications To avoid any risk of electrical shocks Connect apparatus only to socket with protective earth connection The mains plug shall remain readily operable Pull out power plug to make the different connections of cables To avoi...

Page 18: ...ations Installation or use in a manner inconsistent with the technical or safety standards in force in the country where the product is used Use of non suitable accessories power supply adapters Installation in a defect system External cause beyond the control of Unitron N V such as drop accidents lightning water fire improper ventilation THE WARRANTY IS NOT APPLIED IF Production date or serial num...

Reviews: