13
Measurement Function
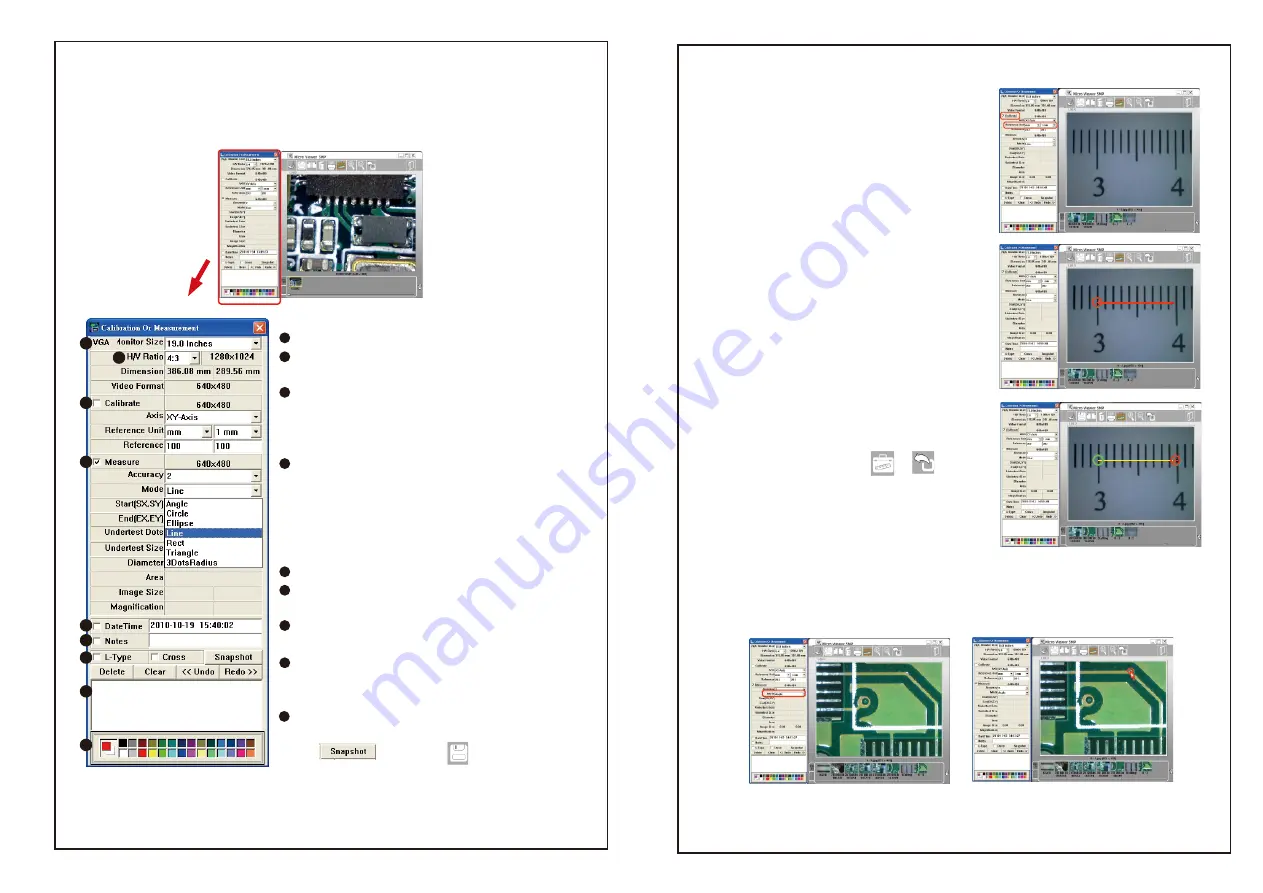
Click the Measurement button, and the measurement window will appear. The image will
be frozen. You can calibrate or measure the frozen image.
1
2
3
4
5
6
7
8
9
Instructions for the Measurement window:
VGA monitor size
:
Please select the monitor size.
H/V ratio
:
Select your monitor’s correct aspect ratio
to insure that correct measurements can be made.
Calibrate
:
Adjust the calibration
.
Calibrate axis
:
X axis /Y axis /X-Y axis
.
Reference Unit
:
Please select a unit of measurement
for calibration.There are three units: mm/inch/mil
Measure
:
Choose the measurement type.
Accuracy
:
The number is accurate up to nine decimal
points.
Mode
:
Select a measurement mode from the following
options: Angle / Circle / Ellipse / Line / Rectangle /
Triangle / 3DotsRadius.
Data of the measurement.
Remarks
:
The mode supports DateTime and Notes
for a measured image.
Ruler guides
:
Check the L-type or Cross if you want
this function.
Record history
:
Record the measurement actions. It
allows the user to delete a record or clear all history
records.
Choose the color of the line and words.
After finishing the measurement, click the Snapshot
button or save key to save the
measured picture.
1
2
3
4
5
6
7
8
9
14
Measurement-Calibrate
1. Place the camera on a ruler and adjust the
focus knob untill the image is sharp.
2. Click the „Snapshot“ button to capture a
picture, then double click this picture in the list
bar.
3. Click the “Measurement” button, and the
“Calibration or Measurement” window will appear.
Note: You must calibrate again if you change the
distance, magnification, or resolution.
4. Check “Calibrate”, and choose the “Reference
Unit” that is the largest dimension visible on your
snapshot. EX: The largest dimension available
between 3 centimeter and 4 centimeter is 10
millimeter. Therefore, we choose the 10 mm as the
“Reference Unit”.
5. Hold the right button of the mouse at the 3
centimeter line and drag to the 4 centimeter line.
6. Release the right button of the mouse, and the
calibration is done. Click the or to go back.
1. Mark the “Measure” box. Then select the “Angle” Mode. Set the “Accuracy” to the
number of decimal points you want to use.
2. Hold the right button of the mouse at the first point.
Measurement-Angle
7. Now you can begin measuring. Double click the
picture in the list bar or just place the microscope
on the object and click the “measurement” button.


