background image

Z730 STEREO MICROSCOPE 

UNITRON

®     

5

ASSEMBLY 

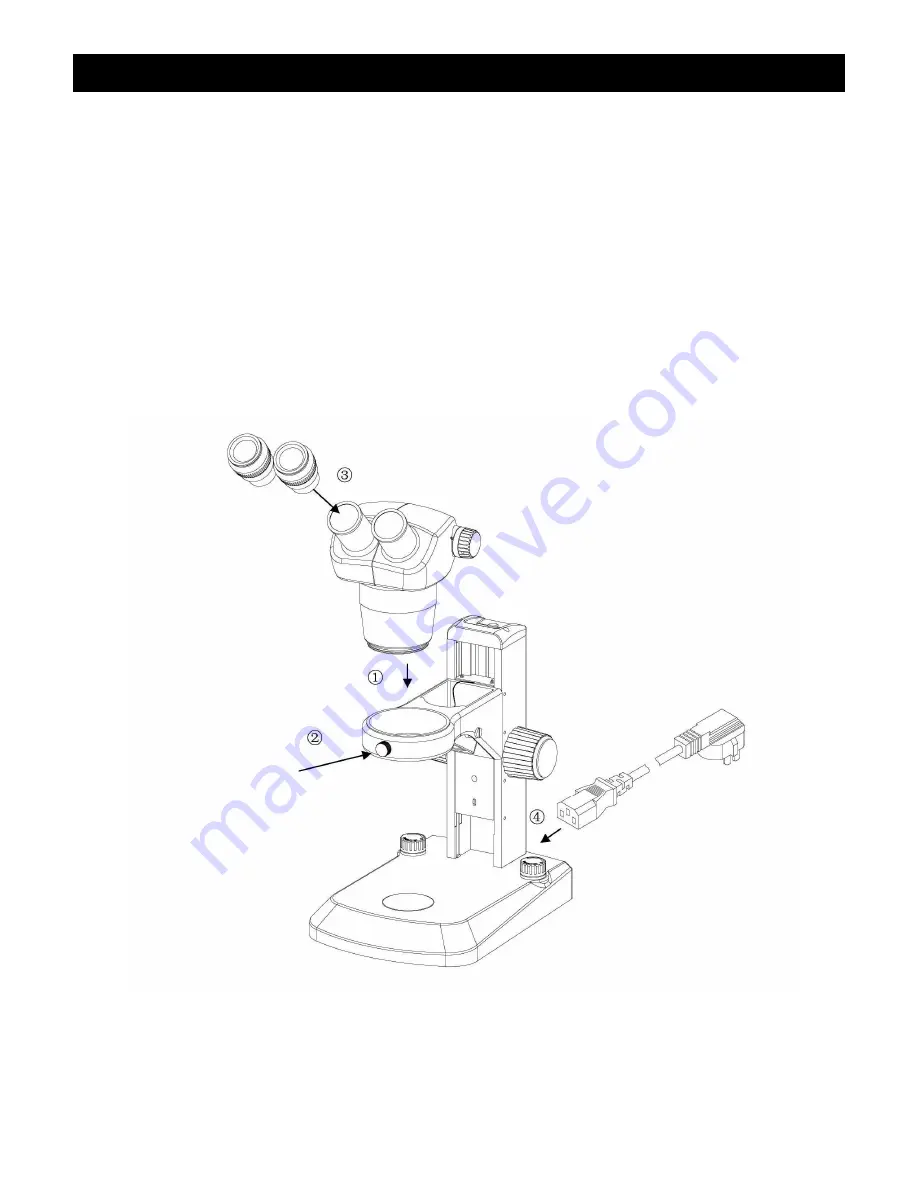
The diagram below shows how to assemble the various modules. The numbers indicate the order of 
assembly. 

When assembling the microscope, make sure that all parts are free of dust and dirt, and avoid scratching 
any parts or touching glass surfaces. 

Eyepieces 

Binocular Head & Zoom Body 

Power Cord 

Lock-screw 

Summary of Contents for Z730 series

Page 1: ...Distributed By ...

Page 2: ...AINTENANCE 3 INTRODUCTION 4 UNPACKING AND COMPONENTS 4 COMPONENTS DIAGRAM 4 ASSEMBLY 5 DETAILED ASSEMBLY PROCEDURE 6 ADJUSMENT AND OPERATION ADJUSTING BINOCULAR VIEWING HEAD 8 FOCUS ADJUSTMENT 9 SPECIFICATIONS 10 TROUBLESHOOTING 11 MAINTENANCE 12 SERVICE 12 WARRANTY 12 ...

Page 3: ...ope power cord into a suitable grounded electrical outlet A grounded 3 wire cord is provided CARE AND MAINTENANCE 1 Do not attempt to disassemble any component including eyepieces objectives or focusing assembly 2 Keep the instrument clean remove dirt and debris regularly Accumulated dirt on metal surfaces should be cleaned with a damp cloth More persistent dirt should be removed using a mild soap...

Page 4: ...ighest quality prior to shipment UNPACKING AND COMPONENTS Your microscope arrived packed in a molded shipping carton Do not discard the carton the shipping carton should be retained for reshipment of your microscope if needed Avoid placing the microscope in dusty surroundings or in high temperature or humid areas as mold and mildew can form Carefully remove the microscope from the shipping carton ...

Page 5: ...to assemble the various modules The numbers indicate the order of assembly When assembling the microscope make sure that all parts are free of dust and dirt and avoid scratching any parts or touching glass surfaces Eyepieces Binocular Head Zoom Body Power Cord Lock screw ...

Page 6: ...e the eyepiece dust caps Fig 1 and gently insert the two adjustable eyepieces Fig 2 into the eyepiece sleeves until they stop as shown in Fig 3 IMPORTANT ENVIRONMENT REQUIREMENTS 1 Ambient temperature 5 C to 40 C 41 F to 104 F Maximum R H 85 2 High temperature will result in moisture and mildew and could damage instrument 3 Avoid placing the instrument in a dusty environment When not in use cover ...

Page 7: ...ight brightness adjusting switches clockwise until it stops the off position before connecting the power cord Insert the power plug into the power jack of the microscope make sure the connection is snug Plug the power cord into the power supply receptacle Adjustable illumination for both top and bottom Input Rating 100V 240V Optional trinocular head is available for camera or imaging accessories V...

Page 8: ...r Ring Fig 7 Set the diopter rings of both eyepieces to 0 zero position Do this when users change because different users will have different diopter settings Place an easy to observe specimen on the stage plate i e a coin Rotate the zoom knob to the highest magnification 3x then turn the focusing knob to focus the specimen Rotate the zoom knob to the lowest magnification 0 7x looking only into th...

Page 9: ...will change the magnification of the specimen image Total Magnification Magnification of zoom body x magnification of eyepiece i e 0 7 x 10 7x NOTE If using the optional auxiliary 0 5x objective then the above magnification would be multiplied by auxiliary objective magnification i e auxiliary 0 5 x 7 3 5x FOR MICROSCOPES PURCHASED WITH ILLUMINATION Adjustable illumination for both LEDs top and bo...

Page 10: ...m Adjustable illumination for both LEDs top and bottom Auxiliary Objective Working Distance mm Eyepiece 10X 20 15X 16 20X 12 5 Total Magnification Visual Field mm Total Magnification Visual Field mm Total Magnification Visual Field mm 97 7 30X 25 7 6 10 5 45X 20 0 4 7 14 60X 15 7 3 7 0 5X 180 3 5 15X 51 4 12 5 2 22 5X 40 0 9 4 7 30X 31 4 7 4 0 63X 140 4 4 18 9X 43 9 10 6 6 6 28 3X 31 7 7 4 8 8 37 ...

Page 11: ...mplete diopter adjustment 2 Dirt is visible in field of view Dirt on specimen Clean specimen 3 Care Maintenance Dirt on eyepiece Clean eyepiece 3 The visibility of the image is poor Dust on objective front lens Clean lens surface 3 Care Maintenance 4 Specimen image blurs when zoom magnification is changed Diopter ring is not correctly adjusted Adjust it correctly 8 Fig 7 Not in complete focus on s...

Page 12: ...and workmanship for a period of five 5 years for mechanical and optical components and one 1 year for electrical components from the date of invoice to the original end user purchaser This warranty does not cover damage caused in transit misuse neglect abuse or damage resulting from improper servicing or modification by other then UNITRON approved service personnel This warranty does not cover any...

Reviews: