background image

         MODEL U405 


1)  Remember to turn the control panel switches to '0' position when plates are not in use.  

 
2)  To operate the oven turn the temperature control knob to the desired setting. When the 

pilot light goes out the oven has reached temperature. The pilot light will continue to go 
on and off during the period of use in a set range.  

3)  To  grill  turn  the  temperature  control  knob  until  it  reaches 

“Grill”. 

NOTE 

- The grill is not thermostatically controlled.


     MODELS   U116/126


1)  Turn the temperature control knob to the required setting when using your oven for 

baking or grilling. Remember to select which elements you want to use on the selector 
switch, otherwise the oven will not work. Both pilot lights will go out when the oven has 
reached temperature and will continue to go “ON” & “OFF” as the thermostat cycles.  

 
2)  Warmer drawer (126) has an element fitted with a symbol on the selector switch. 
3)   Utility drawer (116) has a selector switch for 60 minute ringer. 
4) 

Set all switches to ‘0’ position when not in use.  

 
5)  Controls and glass panels should be easy to clean with a damp cloth.  

 
6)  Plates may be wiped with a thin layer of cooking oil after use to prevent rusting.  


Kindly contact your nearest dealer for further information.


E - UTILITY DRAWER (WHERE FITTED)


Do not store combustible materials in your utility or warmer drawer (if fitted) as these could 

ignite. The oven can also be used to heat up plates or keep food warm.


F - 

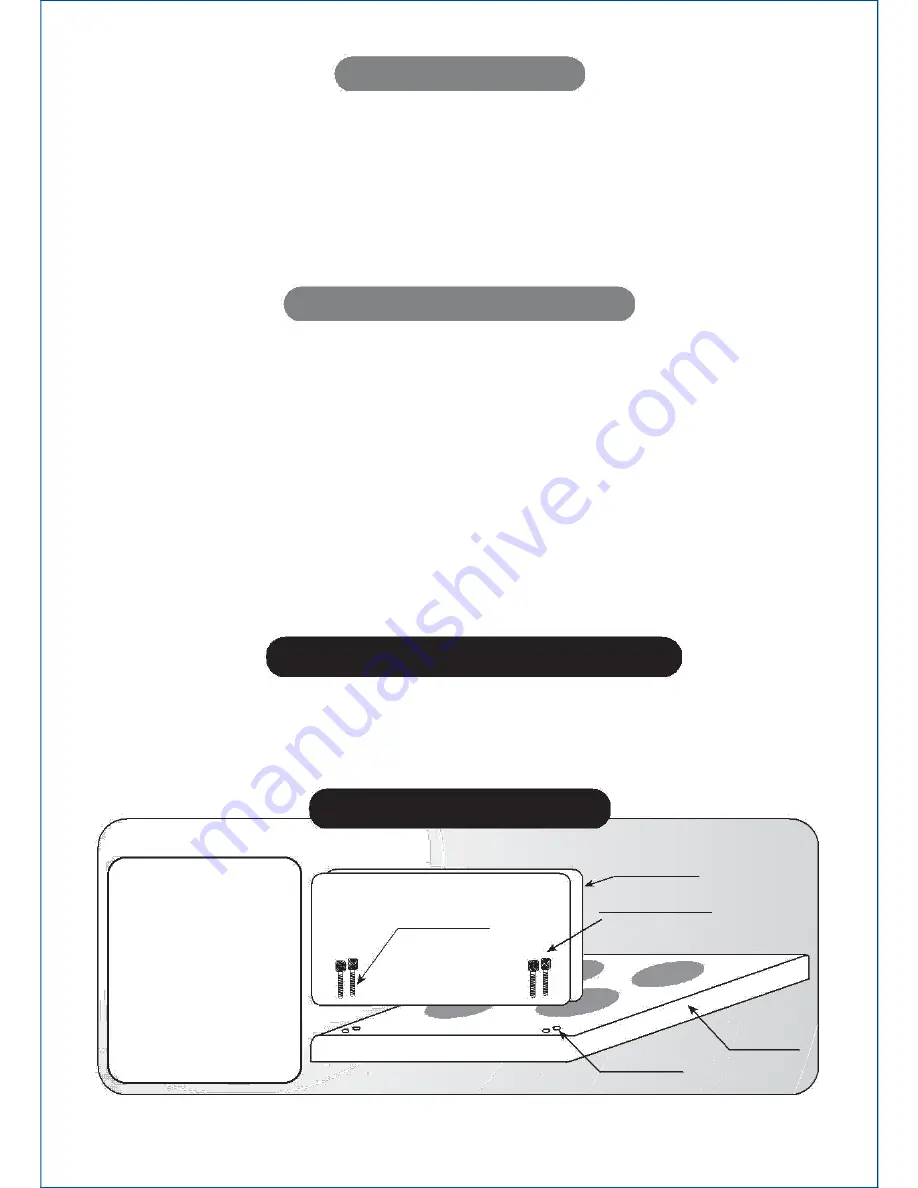
SPLASHBACK MOUNTING


500 mm Stove


SPLASHBACK


SPLASHBACK MOUNTING


PROCEDURE


KNURLED NUT ASSY


THREADED ROD


1)


Position holes in splashback


over captive nuts in top plate


2)


Screw threaded rod into


captive nut.


3)


Tighten splashback down


with knurled nut assy until firm.


TOP PLATE


CAPTIVE NUT


Summary of Contents for U116

Page 1: ...e instructions carefully before installing and operating the oven Keep them for further reference 2 Record in the space below the MODEL NUMBER and the SERIAL NUMBER found on the nameplate on your oven and retain this information for future reference MODEL NO SERIAL NO ...

Page 2: ...CATIONS ARE SUBJECT TO CHANGE WITHOUT PRIOR NOTICE CONTENTS A SAFETY INSTRUCTIONS B SAFETY INSTRUCTIONS C INSTALLATION D OPERATING INSTRUCTIONS E UTILITY WARMER DRAWER F SPLASH BACK PANEL G GENERAL HINTS AND CLEANING NOTES H INSTALLATION DIMENSIONS I USEFULL HINTS J WARRANTY A SAFETY INSTRUCTION PLUGS ONLY FOR PLUG IN STOVES CAUTION IF THE SUPPLY CORD IS DAMAGED IT MUST BE REPLACED BY THE MANUFACT...

Page 3: ...on the control panel 2 Start by setting the control switch to 6 and reduce when the contents boils Reduce to 3 3 Experience will soon dictate the setting between 1and 6 for the cooking purpose required 4 The following symbols are indicated on your oven depending on your model Oven Light stays on when oven is in use Grill Thermostatically controlled grilling Preheat Reduces oven heat up time Rememb...

Page 4: ... either bake or grill depending on your selection but will not bake and grill simultaneously 4 To bake turn the thermostat to the required temperature and select bake on the selector switch 5 To grill turn the selector switch to grill the grill element will come on 6 Plates may be wiped with a thin layer of cooking oil after use to prevent rusting 7 Set all switches to 0 position when not in use ...

Page 5: ... and will continue to go ON OFF as the thermostat cycles 2 Warmer drawer 126 has an element fitted with a symbol on the selector switch 3 Utility drawer 116 has a selector switch for 60 minute ringer 4 Set all switches to 0 position when not in use 5 Controls and glass panels should be easy to clean with a damp cloth 6 Plates may be wiped with a thin layer of cooking oil after use to prevent rusti...

Page 6: ...not use fats or oils that have been used for cooking or any other purpose Repeat this rubbing regularly during the first three or four weeks of service immediately after each plate has been used It is most important that this should be done while the plate is still warm so that the oil can soak into the microscopic pores of the metal When the plate is next switched on the heat carbonises the oil a...

Page 7: ...OVEN COOKER HOOD BUILT IN OVEN 600 530 120 590 568 606 600 575 565 MIN HOB FOR BUILT IN OVEN 510 610 OVEN CUT OUT 30 DIMENSIONS HEIGHT 600mm WIDTH 568mm DEPTH 590mm 525 445 HOB CUT OUT DIMENSIONS WIDTH 525mm DEPTH 445mm 470 152 600 ...

Page 8: ...ng switch on the hotplate to dry off any dampness TEMPERATURE 250 F 120 C 300 F 150 C 325 F 165 C 350 F 175 C 400 F 205 C 425 F 220 C 450 F 230 C 475 F 245 C 500 F 260 C PINTS TO LITRES 1 4 PINT 142 ml 1 2 PINT 284 ml 1 PINT 568 ml 1 75 PINT 1 Litre 1 Quart 1 14 Litre 1 Gall 4 5 Litre J CONVERSION TABLES OVEN TEMPERATURES Cool under 120 C 250 F Slow 120 175 C 250 350 F Moderate 175 190 C 250 350 F...

Page 9: ...material or in respect of defective workmanship only UNIVA authorised service dealer shall have no liability if in its opinion the defect or fault was caused through faulty installation accidental damage incorrect usage misuse or abuse or failure to follow the operating instructions and any acts of God or force majeure UNIVA shall not be obliged to replace light bulbs fuses vitreous enamelware bur...

Page 10: ...UNIVA PTY LTD Tel 011 3150015 WWW UNIVA CO Z A ...

Reviews: