Installation & Set-up Guide
6
Electrical Power Source (User Supplied)
For your system’s electrical requirements, please refer to the “INPUT POWER” label near the
1.
power inlet.
CAUTION:
2.
Never remove the ground lead to the electrical cord and plug
the ILS system into a non-grounded outlet.
A laser system that is not properly
grounded is hazardous and has the potential to cause severe or fatal electrical shock. Without
proper grounding, the laser system may exhibit sporadic or unpredictable behavior. Always
plug the system into a properly grounded (earthed) outlet.
Noisy or unstable electricity and voltage spikes may cause interference and possible damage
3.
to the electronics of the laser system. If electrical power fluctuations, brown outs or constant
power outages are a problem in your area, please contact your local Electrician to supply a
power isolation and regulation module. Electrically noisy equipment, such as equipment with
large motors, can also cause interference if plugged into the same outlet. It may be necessary
to attach the laser system to a dedicated electrical line to resolve the problem.
The laser system is designed as a Class I, Group A, pluggable device. It is also designed for
4.
connection to IT power systems which provide the most flexibility to the user.
Exhaust System (User Supplied)
We recommend you consult with a licensed contractor to meet local safety and building code
1.
requirements.
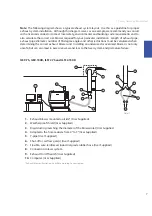
The exhaust system must be capable of supplying a minimum of:
2.
ILS9.75, ILS9.150D, ILS12.75 and ILS12.150D -
t
700 CFM (cubic feet per minute)
of airflow
while under a load
of 6 inches of static pressure (1190m3/hr at 1.5kPa)
Do not install forward incline, backward incline, in-line or ventilator fans because these types
3.
of air handlers are inadequate and inappropriate for this type of installation. A high-pressure
blower must be used to meet minimum airflow requirements.
For personal safety and noise control, we recommend that the exhaust blower be mounted
4.
outside the building.
Rigid tubing should be used for the majority of the connection between the blower and
5.
the laser system. The tubing should be smooth-walled and have as few 90-degree bends as
possible.
Install an exhaust gate to adjust airflow and to close off the exhaust when the laser is not in use.
6.
Place this gate near the laser system within 5 to 10 feet (1.50 to 3.00 meters).
Use a short piece of industrial grade, wire-reinforced rubber tubing to connect the laser
7.
system’s exhaust port to the exhaust gate and secure with a hose clamp. This will provide some
mobility for your laser system and will isolate exhaust blower vibrations from your laser system.
Wire the exhaust blower electrically to a wall switch in the same room for easy ON/OFF control.
8.
Summary of Contents for Industrial ILS12.150D
Page 1: ...www ulsinc com Installation Set up Guide ILS9 75 ILS9 150D ILS12 75 ILS12 150D...
Page 2: ......
Page 8: ......
Page 28: ......
Page 32: ...Notes...
Page 33: ...Notes...
Page 35: ......

