Define Job (material only)
Add a sub-material record underneath the main record. This sub-material record captures all user-defined
settings in the materials tab GUI which are normally not part of a standard material record, including
fixture type, material thickness, printing direction, vector sliders and intensity adjustments.
Hide
Hide the selected material or category. This function is useful to hide materials which you do not
commonly process. To un-hide materials, push CTRL-F2.
Rename
Rename the selected material or category. This is only allowed for custom materials and categories.
Delete
Delete the selected material or category. This is only allowed for custom materials and categories.
Cancel
Exits the right-click menu. You can also click outside the menu to exit the menu.
Intensity Adjustments
Intensity Adjustments allows you to adjust the nominal material settings for raster, vector mark and vector cut
operations up to +/-50%. Increasing the intensity gives you deeper results. Decreasing the intensity gives you
shallower results. In most cases the default material settings will be sufficient and it will not be necessary to
adjust intensities. Always start with intensity adjustments at zero on a scrap piece of material and make any
necessary changes after a trial run
Which Laser (Dual Laser Systems Only)
If your laser system is dual laser capable and you have two lasers installed, you can choose to use only one
of the lasers for an application by deselecting the top or bottom laser. If both lasers are selected, the materials
database will calculate the laser settings based on the combined power of both lasers. If only one laser is
selected the materials database will calculate the laser settings required based on the laser selected.
SuperSpeed (optional accessory)
If the optional SuperSpeed accessory is installed a switch will be present to turn activate the feature. This
feature uses a beam splitter to separate the laser beams from the top and bottom lasers by a controlled
amount so that they will focus, one above the other on the material processing table with a distance between
them equal to the density selected. Each laser is pulsed separately, to allow two lines of raster data to be
engraved simultaneously which will cut job completion time in half.
Computer Controlled Air Assist
These controls allow you to configure air assist settings for the print job if desired. You can activate air for
raster objects, vector cuts or vector marks individually and select the desired flow rate in 25% increments.
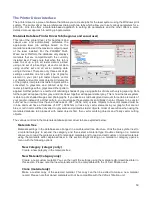
Print Special Effects
Select the print mode for your custom material, normal for most materials and application, or one of the other
modes for special applications. The modes work as follows:
Normal mode:
In this mode all raster data is converted to grayscale and then a dither pattern is applied to it. Laser
processing of the raster data is then done at a fixed laser job setting (laser power level and processing)
calculated from the materials database. This is the default recommended mode of operation.
51
Summary of Contents for PLS4.75
Page 1: ...PLS User Guide PLS4 75 PLS6 75 PLS6 150D PLS6MW www ulsinc com Revision August 2012...
Page 5: ...Chapter 1 Specifications 5...
Page 8: ...Chapter 2 Safety 8...
Page 14: ...Tamper Proof Labels Safety Labels...
Page 15: ...ULS Fiber Laser Cartridge Labels 15...
Page 16: ......
Page 17: ...PLS4 Back View 17...
Page 18: ...PLS6 Front View 18...
Page 19: ......
Page 22: ...Chapter 3 Installation 22...
Page 40: ......
Page 48: ...Chapter 4 Operation 48...
Page 83: ...Chapter 5 Accessories 83...
Page 99: ...Example Connection for PNP mode Example Connection for NPN mode 99...
Page 111: ...Chapter 6 Maintenance 111...
Page 119: ...www ulsinc com...

