38
1.
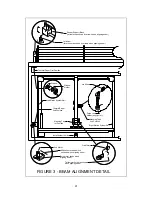
A first mirror cleaning and beam alignment will be necessary as part of replacing the laser.
Begin with the procedure for first mirror cleaning and replace the laser by following the
steps below before proceeding with beam alignment.
2.
Laser Removal
a.
Unplug the small mini-jack connector at the end of the laser opposite the shutter
support block.
b.
Remove green, white and black power wires for the laser from the terminal block
noting there positions on the terminal block for installation and push them through
grommet on vertical plate.
c.
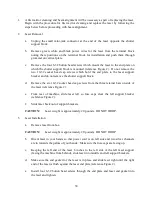
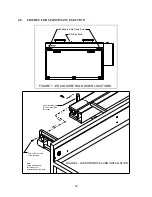
Remove the four 6-32 button head screws which mount the laser to the end plate on
which the shutter support block is mounted (reference Figure 2). Do not remove the
two 10-32 socket head cap screws which hold the end plate to the laser support
bracket and do not remove the shutter support block.
d.
Remove the six 10-32 socket head cap screws from the three retainer bars on side of
the laser (reference Figure 2).
e.
From rear of machine, slide laser left so fuse caps clear the left support bracket
(reference Figure 2).
f.
Slide laser back out of support brackets.
CAUTIO:
Laser weight is approximately 20 pounds. DO NOT DROP.
5.
Laser Installation
a.
Remove laser from box.
CAUTIO:
Laser weight is approximately 20 pounds. DO NOT DROP.
b.
Orient laser in your hands so that power cord is on left side and two silver channels
are in towards the palms of your hands. Make sure the fuse caps are facing up.
c.
Keeping the left end of the laser 6 inches to the left side of the left laser support
(facing the machine from behind), slide laser into middle and left support brackets.
d.
Make sure the end gasket for the laser is in place and slide laser right until the right
end of the laser is flush against the laser end plate (reference Figure 2).
e.
Install four 6-32 button head screws through the end plate and laser end gasket into
the laser and tighten.

