46
5.
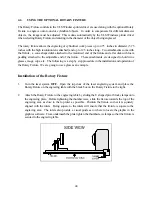
Before loading the glass into the fixture, measure the diameter of the glass in the area where the
engraving is to be located by using a caliper or similar measuring device. Remember this number
or write it down.
6.
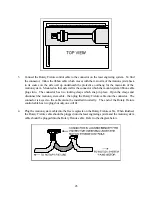
Place the open end of the glass on the right side of the Rotary Fixture. Lift the lever on the
adjustable end of the fixture and slide it up against the other end of the glass so the glass rests
firmly against the padded foam disk. Do not to apply too much pressure, especially with glass.
Lower the lever on the adjustable end of the fixture to secure it in place.
7.
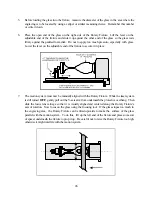
The motion system must now be manually aligned with the Rotary Fixture. While the laser system
is still turned
OFF
, gently pull out the Y-axis arm from underneath the protective overhang. Then
slide the focus lens carriage so that it is visually aligned and centered along the Rotary Fixture’s
axis of rotation. Now focus on the glass using the focusing tool. If the glass slopes too much in
the engraving area, the Rotary Fixture can be tilted upwards to make the surface of the glass
parallel with the motion system. To do this, lift up the left end of the fixture and place some sort
of spacer underneath the fixture to prop it up. Be careful not to raise the Rotary Fixture too high,
otherwise it might interfere with the motion system.
Summary of Contents for ULS-25
Page 3: ...3 APPENDIX E SOFTWARE ANOMALIES E...
Page 14: ...14 Sample Exhaust System Layouts...
Page 62: ...62...
Page 82: ...A APPENDIX A WARRANTY...

