(11)
Main Moving Parts
♦
♦
♦
♦
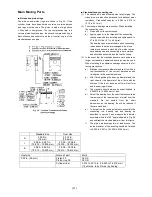
Pistons and piston rings
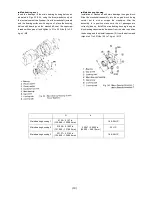
The pistons and piston rings are shown in Fig. 26. If the
cylinder liners have been bored oversize, oversize pistons
and rings must be used. The piston is made of high silicon
J-Alloy and is cam ground. The top compression ring is a
chrome plated keystone type, the second compression ring is
discontinuous and undercut and the oil control ring is of the
standard expansion type.
♦
♦
♦
♦
Crankshaft and connecting rod
(1) The crankshaft is a heat treated steel alloy forging. The
crank pins are induction hardened for additional wear
resistance. Crankshaft endplay is 0.006 to 0.012 in.
(0.15 to 0.31 mm).
(2) The crankpin bearings are aluminum. When installing
the connecting rods:
a) Clean both surfaces thoroughly.
b) Apply engine oil to the threads of the connecting
rod capscrews before installing and tighten each to
27 to 30.4 ft-lbs. (.3.7 to 4.2 kg-rn).
The bearing caps are matched to each connecting
rod and should not be interchanged. Also, since
there are variations in machining from side to side,
each bearing cap and connecting rod are marked
and should be assembled so that marks line up.
(3) In the event that the crankpins become worn and are no
longer serviceable, undersized hearings may be used.
When installing the undersize bearings observe the fol-
lowing precautions:
a) Machine the crankpin diameter and radii to within a
few thousandths of the correct dimensions and
finish grind to the exact dimensions.
b) After finish grinding the bearing diameter and the
radii, chamfer the diameter of the oil hole with an
oilstone. If this is not done an oil film will not form
and the bearing will seize.
c) The crankpin should always be super-finished to
0.000016 in. (0.0004 mm) or less.
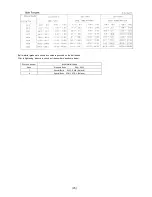
d) Select the bearing from the chart that necessitates
the removal of the least amount of metal from the
crank-pin. Do not deviate from the chart
dimensions as the bearing life will be reduced if
they are machined.
e) To determine the running clearance, assemble the
connecting rod, bearing cap and bearing as
described in section 2 and measure the diameter
anywhere within the 120
o
angle indicated in Fig. 28
and subtract the crankpin diameter from this figure.
f)
The piston pin bushings are of lead bronze. The
inside diameter of the bushing should be finished
to 0.906 to 0.907 in. (23.025 to 23.040 mm).
Standard size
Over size
A
2.992 in.
(76 mm)
3.012 in.
(76.5 mm)
I
2.986 – 2.987 in.
(75.839 – 75.859 mm)
3.005 – 3.006 in.
(76.339 – 76.359 mm)
E
2.989 – 2.990 in.
(75.915 – 75.935 mm)
3.008 – 3.009 in.
(76.415 – 76.435 mm)
Over size
Name of part
Mark
0.02 in. (0.5 mm)
Piston 05
Piston ring 05
05 OS
05 OS
Cylinder liner
3.012 to 3.013 in. (76.500 to 76.519 mm)
(1.2
✙
R max. to 2
✙
R max.) by honing.
Summary of Contents for Universal diesel 5416
Page 21: ...19...

