background image

MX-500™
Operating
Manual

Home Theater Master

LCD Screen

Preprogrammed and Learning

Remote Control 

R

Summary of Contents for Home Theater Master MX-500

Page 1: ...MX 500 Operating Manual Home Theater Master LCD Screen Preprogrammed and Learning Remote Control R...

Page 2: ...the MX 500TM to Control Your Components A Using Preprogrammed Codes 1 Three Digit Code Number 2 Auto Scan With Three Digit Number B Learning Method 1 Programming The Function Buttons 2 Programming Th...

Page 3: ...To Create or Edit Text for Favorite Channel Buttons 10 Recalling the Preprogrammed Three Digit Number 11 Setting Backlight 12 Cloning MX 500TM 13 Adjustment of LCD contrast 14 Caution On Handling LCD...

Page 4: ...rms used in this manual Your MX 500TM can operate up to ten home entertainment and home automation components by using the preprogrammed code library in the remote control by teaching up to 530 comman...

Page 5: ...heatermaster com for FAQs For any questions or comments about the MX 500TM please visit our website www hometheatermaster com or contact us at Universal Remote Control Inc 500 Mamaroneck Avenue Harris...

Page 6: ...Under normal operating conditions the batteries will last approximately six months If the batteries are running low you will notice reduced range from the remote commands that are not sent properly or...

Page 7: ...s of commands and you can change the name of any LCD button using up to five alphabet characters numbers and symbols to customize the unit to fit your audio video devices Please refer to LCD Button Ed...

Page 8: ...ailable on your original remote control or in the preprogrammed database can be added to a macro to completely automate what you would normally do by pushing buttons one at a time It can be as simple...

Page 9: ...hese device buttons can send out a series of up to 20 programmed commands when pressed for more than one second These buttons are commonly used in sending audio input codes when you press the button t...

Page 10: ...anual for details H Cloning The MX 500TM The MX 500TM is capable of sending all the programmed codes and operations from one MX 500TM to another MX 500TM Please refer to page 43 in the manual for deta...

Page 11: ...ion names LIGHT button MACRO buttons MAIN DEVICE menu button LCD Page change button POWER MUTE VOLUME CHANNEL Previous channel button TRANSPORT functions PLAY STOP REWIND and FF for VCR DVR CD and DVD...

Page 12: ...MAIN button Important When using the Preprogramming method starting on page 13 always use the appropriate button as shown in the illustration above when asked FROM TABLE You may have already changed t...

Page 13: ...ivity based configuration A Device based configuration centers on each Device with its two LCD pages controlling one component All of the functions that your original remote control has on it would be...

Page 14: ...ns to your DVD device such as surround sound controls the receiver s DVD input code the TV s power code etc Everything that you need for watching a DVD on your TV without having to jump back and forth...

Page 15: ...ortant If you have already relabeled your device keys your LCD screen will not look like the illustration above Select the appropriate LCD button for the FROM TABLE using the labels as shown in the il...

Page 16: ...digit code make note of the code It will have at least some of the functions in it that are needed to control your device 8 Confirm that it is the right code by pressing the Power button The device s...

Page 17: ...if you replaced your old TV with a new one 2 Auto Scan With Three Digit Number You can also program your remote control by sending out a series of Power Off commands for different brands stored in th...

Page 18: ...the FROM TABLE using the labels as shown in the illustration on page 11 of this manual For example if you have relabeled AUX as LIGHTS you would still push the bottom left button to access the AUX Cod...

Page 19: ...r component by pressing other functional buttons If any of the buttons do not operate as they should please repeat from Step 1 9 Continue to program other components by repeating from step 1 above 10...

Page 20: ...that can be assigned a command to control a particular action for your device Commonly used function buttons include the two pages of sub commands within each of the 10 devices channel up and down vo...

Page 21: ...mode by pressing both the MAIN and ENT buttons simultaneously for three seconds 2 Press the LEARN button next to the LCD screen 3 Select the DEVICE that contains the function button you wish to progr...

Page 22: ...page If it flashes Fail repeat from Step 4 until it learns successfully 8 Return to Step 3 until you have programmed all of the buttons that you require 9 Once you complete the programming and wish to...

Page 23: ...h the MX 500TM about 2 inches apart on a flat surface 5 Select any of the ten device buttons you wish to program on the MX 500TM Press the button on your original remote control you wish to program in...

Page 24: ...For example You program the AMP s TV input code on the TV device and are in the DVD device pages because you are controlling the DVD player The AMP s input is set to DVD Now you want to quickly adjus...

Page 25: ...ss the device button that corresponds to the component that your FAV channel will control For example pressing the TV device will only send out the type of code that the TV responds to Pressing the Ca...

Page 26: ...n Tip You can use the following buttons 0 9 ENTER DISPLAY POWER SYSTEM OFF and INFO PAUSE in your FAV macro Tip For Advanced Users To make even more powerful FAV macros you can learn codes from your o...

Page 27: ...sed for more than 1 second while on the MAIN page of the remote control Important If you program the POWER or SYSTEM OFF buttons with a macro they will no longer function as ON and OFF buttons for you...

Page 28: ...end your macro on the Device page that you would like it to remain on when the macro is sent in normal use 6 Store the commands you programmed into the macro button by pressing the Channel Up button...

Page 29: ...e up to 20 commands Important Do not press the MAIN button at the beginning of your macro or it will not work You can use the MAIN button at any other step in your macro 6 Be sure to end your macro on...

Page 30: ...en using a macro remember to keep the remote pointed toward your components until the macro is finished being transmitted You will notice the Sending icon flash in the upper right corner of the LCD sc...

Page 31: ...ning to this page because most receivers and amps take time to cycle up and can t receive any commands such as input until the device is ready So we have had the other steps of the macro running while...

Page 32: ...9 Press MAIN twice Press M1 to test your macro It should turn on your Audio device receiver for example then your TV then your Cable box then change the input to Cable on your receiver then change the...

Page 33: ...he SETUP mode by pressing the MAIN and ENTER buttons simultaneously for three seconds 2 Press the PUNCH button next to the LCD screen 3 Press the VOL button on the LCD for Volume Punch Through the PLA...

Page 34: ...other devices 8 Once you complete the programming and wish to exit from this mode press the MAIN button Exit from the SET UP mode by pressing the MAIN button once again Tip When using Punch Through th...

Page 35: ...in a single device or an individual button in the device press the DEVICE button 6 Press the device button TV VCR Audio etc to erase the button s from the device Tip Press the PAGE button and then pr...

Page 36: ...o to the SETUP mode by pressing both the MAIN and ENTER buttons simultaneously for three seconds 2 Press the ERASE button next to the LCD screen 3 Press the FAV button 4 If you wish to erase all the f...

Page 37: ...MACRO button 4 If you wish to erase all of the macro buttons in the MX 500TM press the ALL button and then press the SURE button at the next LCD screen 5 If you wish to erase just one of the macros p...

Page 38: ...the ten DEVICE buttons from which you wish to erase the macro function and then press the SURE button at the next LCD screen 6 Exit from Macro mode by pressing the MAIN button and then exit from SETUP...

Page 39: ...button from which you wish to erase punch through 5 Press the same DEVICE button once again 6 Punch through is erased when the same device button is pressed the second time 7 Repeat from Step 2 to era...

Page 40: ...t DEVICE button text skip Steps 3 4 and press the PAGE button before selecting the Device button 6 The character to be changed will blink and you can change the character using the number pad buttons...

Page 41: ...ess the FAV button and then the favorite channel button on which you wish to write text There are five LCD pages of favorite channels Select the page you wish to write on by pressing the PAGE button 4...

Page 42: ...essing the MAIN and ENTER buttons simultaneously for three seconds 2 Press the RECAL button next to the LCD screen 3 The LCD display will alternately flash device names and the three digit code number...

Page 43: ...the LCD screen 3 Using the number pad buttons enter the desired backlight time in seconds It can go up to 99 seconds Save the time by pressing the button at the right side of the time you just assign...

Page 44: ...tton If it is to be copied to press the RECV button 4 If you wish to clone the entire device press the ALL button If you wish to clone only one device at a time press the DEVIC button 5 If you press t...

Page 45: ...om the Cloning mode by pressing the MAIN button and then exit from the SETUP mode by pressing the MAIN button once again Pressing the MAIN button and Up on the joystick simultaneously will make the LC...

Page 46: ...TM is not waterproof Never immerse it in water Don t expose the MX 500TM to extreme temperatures Keep it away from any heat sources Avoid dropping the remote control Clean the LCD screen with a soft c...

Page 47: ...meric codes needed to program a preprogrammed remote control or the actual infrared signals transmitted by remote controls to devices Component See device Contrast Either an arbitrary description of h...

Page 48: ...ples of devices would be televisions DVD players receivers or VCRs Some devices such as receivers or dual cassette decks may be treated by some remotes as more than one device Also known as components...

Page 49: ...t pointing at the desired device Emitters are also partially responsible for any limits on the range of frequencies that can be controlled Emitters are always placed at the top of a remote control and...

Page 50: ...tes for later use Some factors which can affect the ability of one remote to learn another would be code length signal frequency type of signal and the amount of learning memory available The MX 500TM...

Page 51: ...t represents entering a standby mode after a certain length of inactivity The MX 500TM uses very little power with the LCD screen on so the screen remains on at all times Preprogrammed Indicates a lib...

Page 52: ...ommon term for the group of VCR LD DVD DVR media operation controls such as fast forward rewind play stop pause etc Two way Some devices actually send information back to a remote control during use T...

Page 53: ...e from misuse neglect or acts of nature Products that have been modified or incorporated into other products Products purchased more than 12 months from the current date Units purchased in AS IS condi...

Page 54: ...UP REAR DN CENTER DN CENTER UP MENU Surr GUIDE Center EXIT Delay INFO 1 2 3 4 5 6 7 8 9 0 DISPLAY SHIFT Button Name Functions SAT System OFF POWER VOL UP VOL DN CH UP CH DN MUTE PRE CH UP DN LEFT RIGH...

Page 55: ...P CH DN MUTE PREV CH UP DN LEFT RIGHT SELECT MEMU GUIDE CANCEL INFO 1 2 3 4 5 6 7 8 9 0 DISPLAY ENTER Button Name Functions VCR System OFF POWER VOL UP VOL DN CH UP CH DN MUTE PRE CH UP DN LEFT RIGHT...

Page 56: ...CH UP CH DN MUTE PREV CH UP DN LEFT RIGHT SELECT PLAY STOP REW FF MENU GUIDE EXIT INFO 1 2 3 4 5 6 7 8 9 0 DISPLAY ENTER Button Name Functions DVD LD System OFF POWER VOL UP VOL DN CH UP CH DN MUTE PR...

Page 57: ...7 8 9 0 DISPLAY ENTER OFF ON OFF PLAY A STOP A REW A FF A R PLAY A Rec MUTE A RECORD A PAUSE A Button Name Functions CD System OFF POWER VOL UP VOL DN CH UP CH DN MUTE PRE CH UP DN LEFT RIGHT SELECT...

Page 58: ...CH DN MUTE PREV UP DN LEFT RIGHT SELECT MENU GUIDE EXIT INFO 1 2 3 4 5 6 7 8 9 0 DISPLAY ENTER Button Name Functions DVR System OFF POWER VOL UP VOL DN CH UP CH DN MUTE PRE CH UP DN LEFT RIGHT SELECT...

Page 59: ...CURTIS MATHES 076 DENON 002 034 109 215 229 230 027 037 234 259 330 340 341 349 350 DELPHI 419 EIGER 149 ELAN 057 290 ENLIGHTENED AUDIO 099 098 ESCIENT 368 FISHER 047 214 180 182 297 FOSGATE 062 231 3...

Page 60: ...045 050 069 159 168 116 035 078 198 POLKAUDIO 029 PROCEED 144 268 RCA 010 048 117 156 067 288 REALISTIC 019 056 073 075 095 REVOX 162 ROTEL 074 083 085 SAMSUNG 016 SANSUI 040 048 110 119 065 228 SANYO...

Page 61: ...L INSTRUMENT 148 GOI 122 HITACHI 139 140 HTS 122 HUGHES 068 154 161 162 165 166 JVC 122 MAGNAVOX 136 MEMOREX 136 MITSUBISHI 068 154 MOTOROLA 148 NEXT LEVEL 148 PANASONIC 142 PAYSAT 136 PHILIPS 152 153...

Page 62: ...ECH 062 EIKI 187 ELECTROHOME 143 024 076 196 EMERSON 028 048 043 155 005 197 004 047 050 051 076 096 143 151 153 154 FISHER 007 057 FUJITSU 198 246 FUNAI 028 043 FUTURETECH 043 GATEWAY 242 268 GE 160...

Page 63: ...168 169 178 179 180 181 182 183 073 157 SAMPO 197 058 004 202 SAMSUNG 050 089 101 105 004 127 143 160 211 228 229 253 254 SANYO 166 007 020 053 057 082 187 SCOTT 028 043 004 048 143 SEARS 015 030 004...

Page 64: ...PLAY 031 JCL 031 JCPENNY 012 013 015 040 066 101 JENSEN 043 JVC 048 043 130 150 055 060 012 031 050 152 166 KENWOOD 014 048 034 047 LLOYD 034 LXI 034 003 009 017 106 MAGIN 040 MAGNAVOX 067 031 034 068...

Page 65: ...INTOM 024 SIGNATURE 034 SONY 056 057 058 077 052 003 078 076 031 149 154 SOUNDESIGN 034 STS 013 SYLVANIA 031 034 059 067 SYMPHONIC 034 TANDY 010 034 TATUNG 039 043 TEAC 034 039 043 TECHNICS 031 070 TE...

Page 66: ...E 020 030 040 EASTERN 057 066 ECHOSTAR 106 ELECTRICORD 032 GEMINI 008 054 GENERAL ELECTRIC 072 GENERAL INSTRUMENT 074 103 104 GNC 099 GOLDEN CHANNEL 030 HAMLIN 049 050 055 HITACHI 103 055 INSIGHT 074...

Page 67: ...4 SIGECOM 043 SONY 096 108 SPRUCER 047 078 STARCOM 002 004 008 009 STARGATE 008 030 097 104 SUSQUEHANNA 043 074 TIME WARNER 043 074 TOCOM 039 040 056 TOSHIBA 052 UNITED CABLE 004 053 UNIVERSAL 005 007...

Page 68: ...5 LG GOLDSTAR 091 057 074 MAGNAVOX 066 096 MARANTZ 083 095 MEMOREX 163 MINTEK 111 MITSUBISHI 017 MYRYAD 102 134 NAD 088 NAKAMICHI 103 ONKYO 076 035 PANASONIC 021 042 138 PHILIPS 066 083 095 PIONEER 02...

Page 69: ...18 033 047 208 HITACHI 042 175 INKEL 130 143 144 JC PENNY 014 061 092 141 JENSEN 158 JVC 004 022 136 163 213 214 242 243 KENWOOD 185 007 023 055 071 072 142 137 KOSS 061 KRELL 241 KYOCERA 005 LOTTE 10...

Page 70: ...SHARP 026 031 051 066 SHERWOOD 003 019 051 096 112 115 119 166 SIGNATURE 033 SONY 048 081 097 126 133 177 225 226 164 SOUNDESIGN 251 SUMO 155 SYLVANIA 044 107 SYMPHONIC 052 181 TAEKWANG 195 085 TANDY...

Page 71: ...de Number DENON 206 207 MAGNAVOX 032 121 MARANTZ 211 MITSUBISHI 121 NAD 121 PANASONIC 113 PHILIPS 032 PIONEER 106 107 108 121 RCA 002 RUNCO 127 SONY 053 110 TECHNICS 113 THETA DIGITAL 032 TOSHIBA 106...

Page 72: ...DENON 105 227 HARMAN KARDON 233 JVC 239 240 KENWOOD 013 023 145 LUXMAN 035 MAGNAVOX 027 MARANTZ 027 MITSUBISHI 242 243 NAKAMICHI 244 245 ONKYO 012 018 019 PHILIPS 027 PIONEER 003 039 050 066 SANSUI 0...

Page 73: ...72 Set Up Code Table Manufacturer Brand Set Up Code Number HUGHES 117 PHILIPS 090 117 RCA 109 REPLAY NETWORKS 075 SONY 104 105 TIVO 090 117 DVR...

Page 74: ...209 JERROLD 153 JVC 185 HUNTER DOUGLAS 219 KENWOOD 185 LITE TOUCH 208 212 LUTRON 158 159 077 MAKITA 186 201 MINDPATH 205 NILES 160 187 NSM 161 PIANO DISC PLUS 085 POLKAUDIO 162 RUSSOUND 081 SCIENTIFIC...

Page 75: ...74 Notes...

Page 76: ...75 Notes...

Page 77: ...76 Notes...

Page 78: ...77 Notes...

Page 79: ......

Page 80: ...OCE 0016H Rev03...
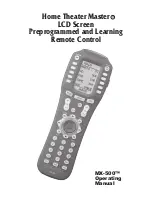
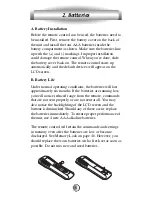
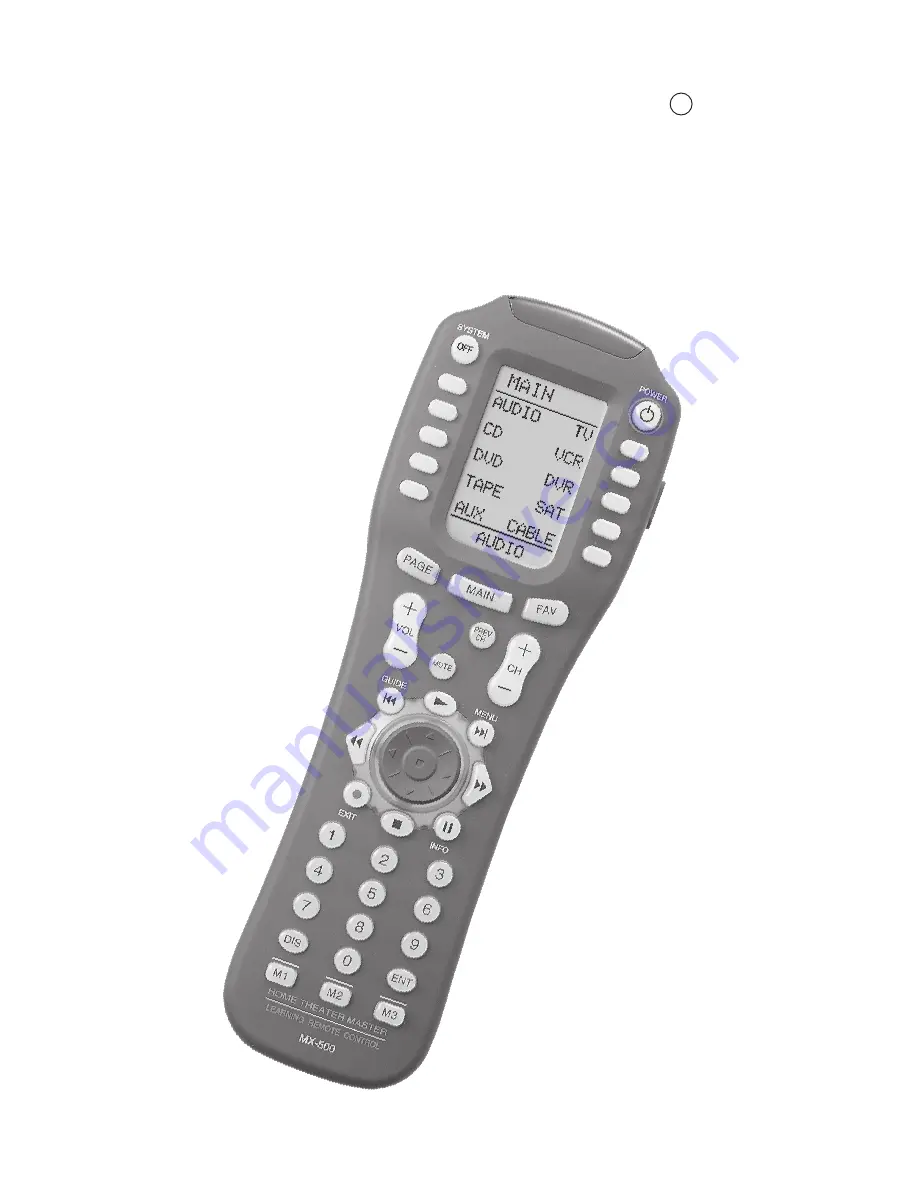
Reviews: