


Page 6
• Less than 12 inches (306mm) away from fluorescent lights. Electrical noise can interfere
with the operation of the alarm .
• In the kitchen, some gas appliances can emit a short burst of CO or gas upon startup . This
is normal . If this alarm is installed too close to these appliances, it may sound often and
become a nuisance .
• Less than 20 feet (6m) from the sources or combustion particles such as a stove, furnace,
water heater, non-electric space heater. In areas where a 20 foot (6m) distance is not
possible i .e . modular, mobile or smaller homes, it is recommended the alarm be placed as
far from these fuel-burning sources as possible .
• Where heavy furniture drapes or other objects will not block the sensor.
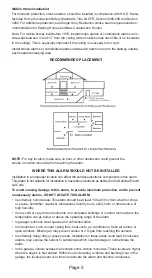
• Peaks of vaulted ceilings, “A” frame ceilings or gabled roofs.
• Alarms are not to be used with detector guards unless the combination has been evaluated
and found suitable for that purpose .
NOTES:
Good ventilation is recommended when household cleaning supplies or similar
contaminants are used .
Excessive spillage or reverse venting of fuel-burning appliances caused by outdoor ambient
conditions, such as: (1) Wind direction and/or velocity, including high gusts of wind; (2) Heavy
air in the vent pipes with cold/humid air with extended periods between cycles; (3) Negative
pressure differential resulting from the use of exhaust fans; (4) Simultaneous operation of several
fuel-burning appliances competing for limited internal air; (5) Vent pipe connections vibrating
loose from clothes dryers, furnaces or water heaters; (6) Obstructions in or unconventional vent
pipe designs which can amplify the above situations .
These placement recommendations are intended to keep alarms at a reasonable distance
from a fuel-burning source and reduce unwanted/nuisance alarms. Nuisance alarms may
occur if an alarm is placed directly next to a fuel-burning source. Ventilate these areas as
much as possible.
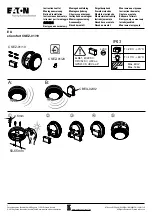
MOUNTING INSTRUCTIONS
To use the optional Alarm Tamper Resistant Mounting Feature, refer to the next section for
further instructions .
1 . Be sure to select the proper location for this alarm as described in the placement instruc-
tions . This alarm should be mounted either on the ceiling or a wall .
2 . To identify the replacement date for this alarm, a label has been placed on the side of the
alarm cover . With permanent marker, write the date of installation in the space provided .
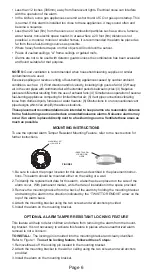
3 . Remove the mounting bracket from the back of the alarm by holding the mounting bracket
and twisting the alarm in the direction indicated by the “TWIST TO REMOVE” arrow on the
top of the alarm base .
4. Attach the mounting bracket using the two screws and wall anchors provided .
5 . Install the alarm on the mounting bracket .
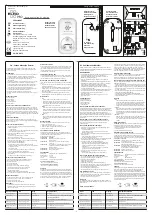
OPTIONAL ALARM TAMPER RESISTANT LOCKING FEATURE
This feature will help to deter children and others from removing the alarm from the mount-
ing bracket . It is not necessary to activate this feature in places where unauthorized alarm
removal is not a concern .
TO INSTALL:
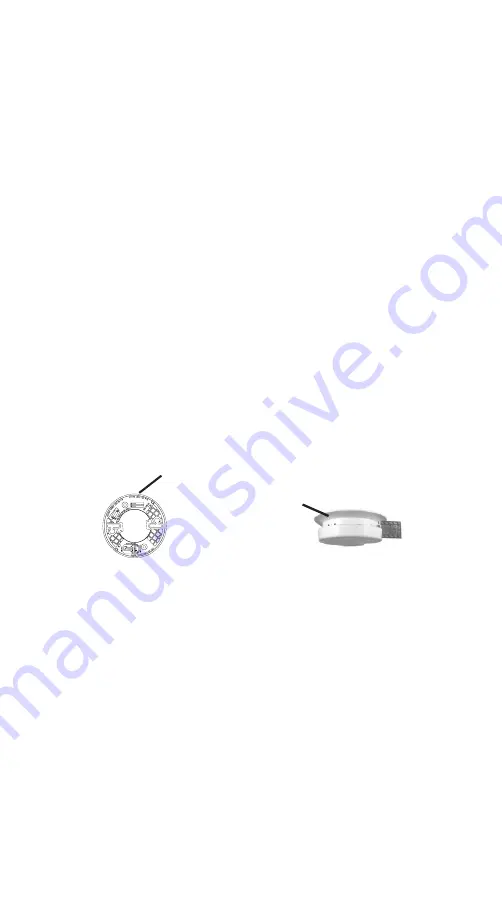
The locking pin is molded into the mounting bracket and clearly identified.
Refer to Figure 1 .
To use the locking feature, followed these 5 steps:
1 . Remove/break off the locking pin located in the mounting bracket .
2 . Attach the mounting bracket to the wall or ceiling using the two screws and wall anchors
provided .
3 . Install the alarm on the mounting bracket .
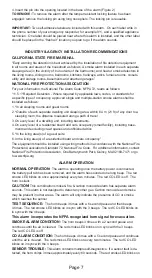
INSERT ALARM
LOCKING PIN
HERE
ALARM/BRACKET
LOCKING PIN
FIGURE 2
Summary of Contents for MPC322S
Page 14: ...Page 14...