background image

39 


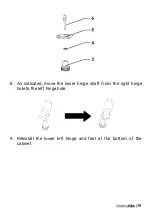
8.


As indicated, move the lower hinge shaft from the right hinge 

hole to the left hinge hole. 


9.


Reinstall the lower left hinge and feet at the bottom of the 

cabinet. 

Summary of Contents for UBCO2100-20

Page 1: ...ES INSTRUCTION MANUAL UBCO2100 20 UBCO2101 20 www universalblue es Congelador 1 puerta blanco Congelador 1 puerta inox White larder freezer Inox larder freezer P I Media Legua C Decenio 1 30565 Las Torres de Cotillas Murcia ...

Page 2: ...IMIENTO 10 4 INSTALACIÓN 10 5 DISPLAY 19 6 ALMACENAMIENTO DE ALIMENTOS 21 7 LIMPIEZA Y MANTENIMIENTO 22 8 SERVICIO POSTVENTA 23 9 INFORMACION INHERENTE AL MEDIOAMBIENTE 26 ENGLISH 1 IMPORTANT SAFEGUARDS 28 2 PRODUCT PARTS FEATURES 32 3 PACKING AND MOVING 34 4 INSTALLATION 34 5 DISPLAY 43 6 USING YOUR APPLIANCE 45 7 CLEANING AND MAINTENANCE 45 8 AFTER SALES SERVICE 46 9 ENVIRONMENTAL INFORMATION 49...

Page 3: ... que el producto es para uso doméstico 1 INSTRUCCIONES DE SEGURIDAD POR FAVOR LEA TODAS LAS INSTRUCCIONES CON CUIDADO ANTES DE UTILIZAR EL PRODUCTO ESTE APARATO HA SIDO DISEÑADO PARA USO DOMÉSTICO EXCLUSIVAMENTE Avisos Importantes Antes de poner el aparato en funcionamiento por favor no lo utilice si se cayó al suelo y nota algún vestigio de daño Tampoco lo utilice en el case de que surja alguna a...

Page 4: ...zación del aparato de un modo seguro Los niños no deben jugar con el aparato La limpieza y mantenimiento no deben ser realizados por niños sin supervisión ENERGIA DE ALIMENTACIÓN Compruebe que el voltaje de la red eléctrica es compatible con el que viene indicado en el aparato este aparato se deberá conectar a red eléctrica de 220 240V 50Hz 230V 60Hz En caso de que no sean compatibles consulte a s...

Page 5: ...n lugares húmedos No deje que su aparato se moje puede ser peligroso PARA EVITAR PELIGRO DE INCENDIO O DESCARGA ELÉCTRICA NO EXPONGA EL APARATO AL AGUA O A HUMEDAD No sumerja su aparato por ejemplo para lavarlo AVISOS No dañe el circuito de refrigeración Mantenga las ranuras de ventilación desobstruidas incluso cuando el aparato sea empotrado No utilice otros dispositivos electrónicos o medios que...

Page 6: ...latas de aerosol con un propelente inflammable en este dispositivo Para hacer hielo cubitos de hielo use solamente agua potable Mantenga la abertura de ventilación en el gabinete del aparato o en la estructura incorporada libre de obstrucciones Antes de tirar su viejo refrigerador o congelador quite las puertas y déje los estantes en algún lugar donde los niños no tengan acceso Cuando haya fugas d...

Page 7: ...vez retire las cintas adhesivas de los cajones botelleros y otras partes del aparato No tire ni empuje los cajones y botelleros con fuerza durante el uso Ajuste el control de temperatura tan alto como pueda aceptar con el objetivo de ahorrar energía No abra la puerta del congelador continuamente de lo contrario la temperatura se verá alterada Mantenga la combinación de cajones y otros accesorios d...

Page 8: ...8 2 PARTES DEL PRODUCTO Y CARACTERISTICAS Estanterías de cristal 1 Cajones de plástico 2 Cestas de plástico de la puerta 3 Tirador de la puerta 4 Puerta 5 ...

Page 9: ...ioso 42 dB Refrigerante R600a 40g Clase de protección contra las descargas eléctricas Clase I Tensión y frecuencia nominal 220 240V 50Hz Corriente nominal 2 5A Potencia de la luz MAX 2W Consumo energía anual 302kW año Consumo energético 0 827kWh 24h Peso neto 62kg UBCO2101 20 Congelador de 1 puerta Dimensión alto x ancho x profundo 185 x 59 5 x 66 cm Color Inox Eficiencia energética A Capacidad to...

Page 10: ...omento posterior No levante ni tire de la puerta o de la manija de la puerta durante el transporte ni la utilice como soporte Al moverse el aparato no puede inclinarse más de 45 grados el ángulo con respecto a la dirección vertical Por favor evita vibraciones fuertes y golpes al aparato ya que podrían afectar al funcionamiento del mismo Nunca coloque el aparato en horizontal o al revés colóquelo s...

Page 11: ...la temperatura interior del aparato puede variar con respecto a lo establecido por el usuario Si el aparato se vuelca por cualquier razón espere 10 minutos antes de volverlo a poner en su posición original Esto permite que la presión del Sistema refrigerante se equilibre antes de volverlo a encender Para mover el aparato desconectelo de la red eléctrica y retire toda la comida de su interior Su ap...

Page 12: ...ue necesitará Llave de tubo 8mm Destornillador de estrella Destornillador plano Llave inglesa 8mm Partes que necesitará Cubierta de la bisagra superior izquierda Freno izquierdo de la puerta Tapón izquierdo de la puerta Nota antes de comenzar apoye el congelador sobre la parte trasera del mismo para tener un mejor acceso a la base Debe poner algo esponjoso en la parte trasera para evitar daños Par...

Page 13: ...ierdo 3 Retire el interruptor de luz cilíndrico 1 fijado en la tapa de la bisagra superior derecha 4 Abra el tapón 2 de la parte superior derecha ponga el arnés del terminal de cables de la puerta en la ranura de la cubierta de la puerta y cierre el agujero de la tapa 5 Levante la puerta hacia arriba para desengancharla de la bisagra del medio ponga la puerta a un lado y déjala suavemente sobre un...

Page 14: ...zquierdo y la bisagra inferior derecha 7 Desenrosque las patas 3 y luego desenrosque la tuerca 4 Retire el eje de la bisagra 5 de la derecha e insertelo en el agujero izquierdo 6 Apriete la tuerca y luego apriete las patas ...

Page 15: ... indica mueva el eje de la bisagra inferior desde el agujero de la bisagra derecha al agujero de la bisagra izquierda 9 Vuelva a colocar la bisagra inferior izquierda y los pies en la parte inferior del frigorífico ...

Page 16: ...de la puerta y colóquelo en el lado izquierdo 11 Coloque la puerta en la bisagra inferior y asegurese que se ha insertado correctamente el eje en la parte inferior A continuación coloque la bisagra superior y fijela con los tornillos ...

Page 17: ... los cables del congelador uno por uno A continuación vuelva a colocar el tapón en su lugar para tapar el agujero 13 Coloque la tapa de la bisagra superior izquierda Después instale el interruptor y apriete el tornillo 14 Coloque la tapa del agujero superior de la bisagra derecha y apriete todos los tornillos ...

Page 18: ...que la puerta es reversible podrá colocar el tirador en la derecho o la izquierda según la instalación de la puerta que haya elegido Para instalar el tirador Alinee los agujeros del 1 tirador con los agujeros de la puerta Coloque los tornillos en los 2 agujeros y apriételos Encaje las tapas que 3 esconden los tornillos en el tirador ...

Page 19: ...ato por primera vez el display emitirá un sonido durante 3 segundos Este mismo sonido se escuchará cada vez que presione un botón del display Como se muestra en la imagen hay cuatro botones en el panel de control Pantalla donde se muetsra la temperatura 1 Botón para subir la temperatura 2 Botón para bajar la temperatura 3 Botón de super congelación 4 Botón de bloqueo 5 ...

Page 20: ...asados 5 segundos que el digito dejará de parpadear MODO SUPER CONGELACIÓN Con esta función la temperatura del congelador se reducirá rápidamente para que los alimentos se congelen de forma rápida y eficaz sin perder las vitaminas y nutrientes Presione el botón para activar el modo de super congelación La pantalla mostrará FF este modo funcionará durante 26 horas Pasadas las 26 horas el modo de co...

Page 21: ... un embalaje hermético para evitar que se sequen o tengan mal olor Los alimentos calientes deben enfriarse antes de introducirse en el refrigerador De lo contrario la temperatura y por tanto el consumo eléctrico aumentarán Las verduras deberán situarse en las cajoneras del refrigerador En ningún caso congele frutas y verduras frescas ya que no estarán aptas para el consumo una vez descongeladas Re...

Page 22: ... del aparato con agua limpia o con un limpiador neutro Seque a continuación con un paño seco Limpie las juntas de la puerta cuidadosamente En cuanto al mantenimiento externo limpie el polvo con un paño seco y límpielo con un aroma neutro si es necesario La Luz LED no puede ser reemplazada por el usuario final Si se ha dañado o no enciende póngase en contacto con el proveedor del aparato Los compon...

Page 23: ...e aparato está concebido para garantizar la máxima fiabilidad No obstante en caso de que surja algún problema podrá conseguir determinar su causa si sigue las indicaciones sugeridas en este capítulo No abra el equipo corre peligro de electrocución Si no consigue resolver el problema contacte con el vendedor o con el fabricante Todos los usuarios deben familiarizarse con este capítulo El hecho de s...

Page 24: ...gua de la descongelación esparcida dentro del aparato y por el suelo Certifíquese de que el tubo y la manguera de drenaje no están bloqueados Certifíquese de que el compartimento de drenaje está correctamente colocado Se formó condensación en el exterior del aparato Esto puede suceder cuando la humedad es elevada durante las estaciones frías por ejemplo El fenómeno es el mismo cuando se coloca agu...

Page 25: ...aciones reformas o intervenciones por cualquier persona no autorizada por Universal Blue Esta garntía solo tiene validez si el product ha sido utilizado para uso doméstico Para hacer uso de la garantía acuda al centro donde compró este producto o bien contacte con nosotros de cualquiera de las siguientes formas A través del email sat universalblue es adjuntando la factura de compra e indicando sus...

Page 26: ...s reglamentos medioambientales locales vigentes Para informaciones más detalladas inherentes al tratamiento la eliminación o el reciclado de este producto rogamos contacten el servicio local de eliminación de desechos o a la tienda donde compró el aparato No tirar el embalaje del aparato a la basura sino seleccionar los diversos materiales como poliestireno cartón bolsas de plástico etc de acuerdo...

Page 27: ...27 cumplir con sus obligaciones legales y contribuir a la protección de nuestro medio ambiente Puedes descargar este manual en nuestra página web www universalblue es ...

Page 28: ...STIC PURPOSES ONLY Important notice Before putting the unit into operation please do not use if the unit has fallen to the floor if you note any damage on the appliances or if any anomaly arising during operation This device should not be used for purposes other than those specified in the instruction manual Your safety is intended for domestic use and not for commercial use Misuse automatically o...

Page 29: ...ted The area of cross section of wire must be larger than 0 75mm 2 The power plug should have its own socket the socket must be ground as adapter may cause the socket to overheat Check that the mains voltage is compatible with whatever it is indicated on the device this device must be connected to mains 220 240V 50Hz 230V 60Hz If they are not compatible please ask to your seller or customer suppor...

Page 30: ... slots unobstructed even when the device is built Do not use electronic devices or other measures to accelerate the defrosting process that have not been recommended by the manufacturer Do not use electrical appliances inside the food storage compartments of the appliance unless they have been recommended by the manufacturer If the fluctuation of voltage in your home exceeds the one mentioned in t...

Page 31: ...our old refrigerator or freezer remove the doors and leave the shelves somewhere where children can not access When there is gas leaking from your container do not pull the plug out nor inwards as it could cause sparks or fires Do not place bottled drinks in the freezer to prevent them from break Do not place objects on top of the appliance The freezer in this product is R600a which is flammable T...

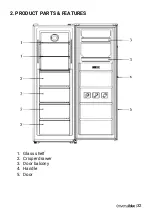
Page 32: ...32 2 PRODUCT PARTS FEATURES Glass shelf 1 Crisper drawer 2 Door balcony 3 Handle 4 Door 5 ...

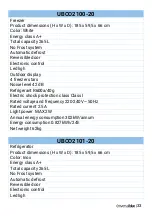
Page 33: ...level 42 dB Refrigerant R600a 40g Electric shock protection class Class I Rated voltaje and frequency 220 240V 50Hz Rated current 2 5A Light power MAX 2W Annual energy consumption 302kW annum Energy consumption 0 827kWh 24h Net weight 62kg UBCO2101 20 Refrigerator Product dimensions H x W x D 185 x 59 5 x 66 cm Color Inox Energy class A Total capacity 265 L No Frost system Automatic defrost Revers...

Page 34: ...gle with respect to the vertical direction Please avoid strong vibrations and blows to the device as they could affect its operation Do not place the good horizontally or upside down Please place it on its base and move it using the castors 4 INSTALLATION Before connecting your fridge to the power supply check that the voltage stated on the rating label of your appliance corresponds to the voltage...

Page 35: ...allow the pressures in the cooling system to equalize before restarting Turn off the appliance and unplug it from the main socket Remove all food Your appliance uses isobutane R600a as a refrigerant Although R600a is an environmentally friendly and natural gas it is explosive Therefore you should be careful during shipment and installation to prevent your appliance s cooler elements from being dam...

Page 36: ...ch Parts you will need Left upper hinge cover Door stop left side Door stopper left ref Note before starting hold the refrigerator on the back of the refrigerator to have better access to the base You should add something soft on the back to avoid damage To change the door follow the steps below 1 Put the freezer in an upright position Remove all baskets from the door to prevent damage and then cl...

Page 37: ...hinge cover 4 Open the door cover hole plug place the door wire harness terminal in the door cover slot and close the door cover hole plug 5 Lift the door upwards to disengage it from the middle hinge put the door to one side and lay it down gently on a padded surface ...

Page 38: ... 6 Remove left feet and right lower hinge 7 Unscrew feet 3 and then unscrew nut 4 Remove the hinge shaft 5 from the right hole 6 and insert it into the left hole Tighten the nut and then tighten the feet ...

Page 39: ...39 8 As indicated move the lower hinge shaft from the right hinge hole to the left hinge hole 9 Reinstall the lower left hinge and feet at the bottom of the cabinet ...

Page 40: ... place the stopper on the left side of the door and secure it 11 Place the door on the lower hinge making sure to insert the hinge pin into the hole at the bottom of the door then place the supplied upper left hinge on the door and fix the screws ...

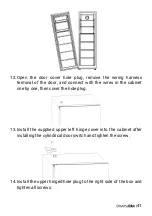
Page 41: ...nect with the wires in the cabinet one by one then cover the hole plug 13 Install the supplied upper left hinge cover into the cabinet after installing the cylindrical door switch and tighten the screw 14 Install the upper hinged hole plug to the right side of the box and tighten all screws ...

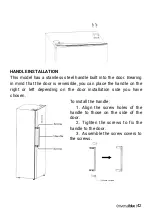
Page 42: ...e door is reversible you can place the handle on the right or left depending on the door installation side you have chosen To install the handle Align the screw holes of the 1 handle to those on the side of the door Tighten the screws to fix the 2 handle to the door Assemble the screw covers to 3 the screws ...

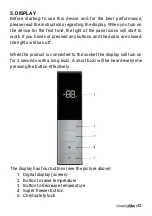
Page 43: ... have not pressed any buttons and the doors are closed the lights will turn off When the product is connected to the socket the display will turn on for 3 seconds with a long buzz A short buzz will be heard everytime pressing the button effectively The display has four bottons see the picture above Digital display screen 1 Button to raise temperature 2 Button to decrease temperature 3 Super freeze...

Page 44: ... result the food freezes quickly without losing the vitamins and nutrients Press the button to turn on super freezer mode Under temperature setting mode press Super Freezer button to enter fast cooling mode Display shows FF working time for this mode is 26 hours After 26 hours fast cooling mode automatically turns off temperature returns to the setting value before fast cooling mode were turned on...

Page 45: ... fish in the freezer to keep the vitamins and flavours as much as possible Food to be frozen must be placed on aluminium paper transparent kitchen paper or in a hermetic box Do not place fresh foods in contact with frozen food If you buy frozen foods take them home and place them in the freezer as quickly as possible Do not freeze any food that has been previously defrost Do not store liquids in b...

Page 46: ...rigerator as they can damage the painted cover and plastics Disconnecting the appliance Power failure After an interruption of the power supply the appliance can store food for several hours even if it is summer To keep the temperature cavity please Do not put on the fridge more food Do not open the door frequently If you disconnect the appliance from the power supply please wait unless 5 minutes ...

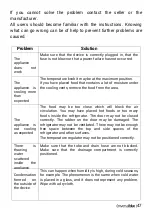
Page 47: ...e food may be too close which will block the air circulation You may have placed hot foods or too many foods inside the refrigerator The door may not be closed correctly The rubber on the door may be damaged The refrigerator may not be ventilated There may not be enough free space between the top and side spaces of the refrigerator and other surfaces The temperature regulator may not be positioned...

Page 48: ...the invoice or purchase ticket Damage caused during transportation negligence incorrect installation or installation and external influences such as atmospheric or electric rays floods humidity etc are not covered by the guarantee This warranty will finish when it is discovered that they have been subjected to repairs alterations or interventions by any person not authorized This warranty is only ...

Page 49: ...ay The symbol on the product indicates that it may not be treated as normal household waste It should be taken to a collection point for the recycling of electrical and electronic goods This appliance requires specialist waste disposal For further information regarding the treatment recover and recycling of this product please contact your local council your household waste disposal service or the...

Page 50: ...containing batteries or rechargeable batteries these parts must be removed and disposed of in clearly marked recycling bins Please go to the nearest recycling bin in your location or common store Please comply with your legal obligations and contribute protecting our environment Download this manual in our web site www universalblue es ...

Page 51: ...51 www universalblue es ...

Reviews: