background image

UNO

R

XCH 030

15-10-04

ENGLISH

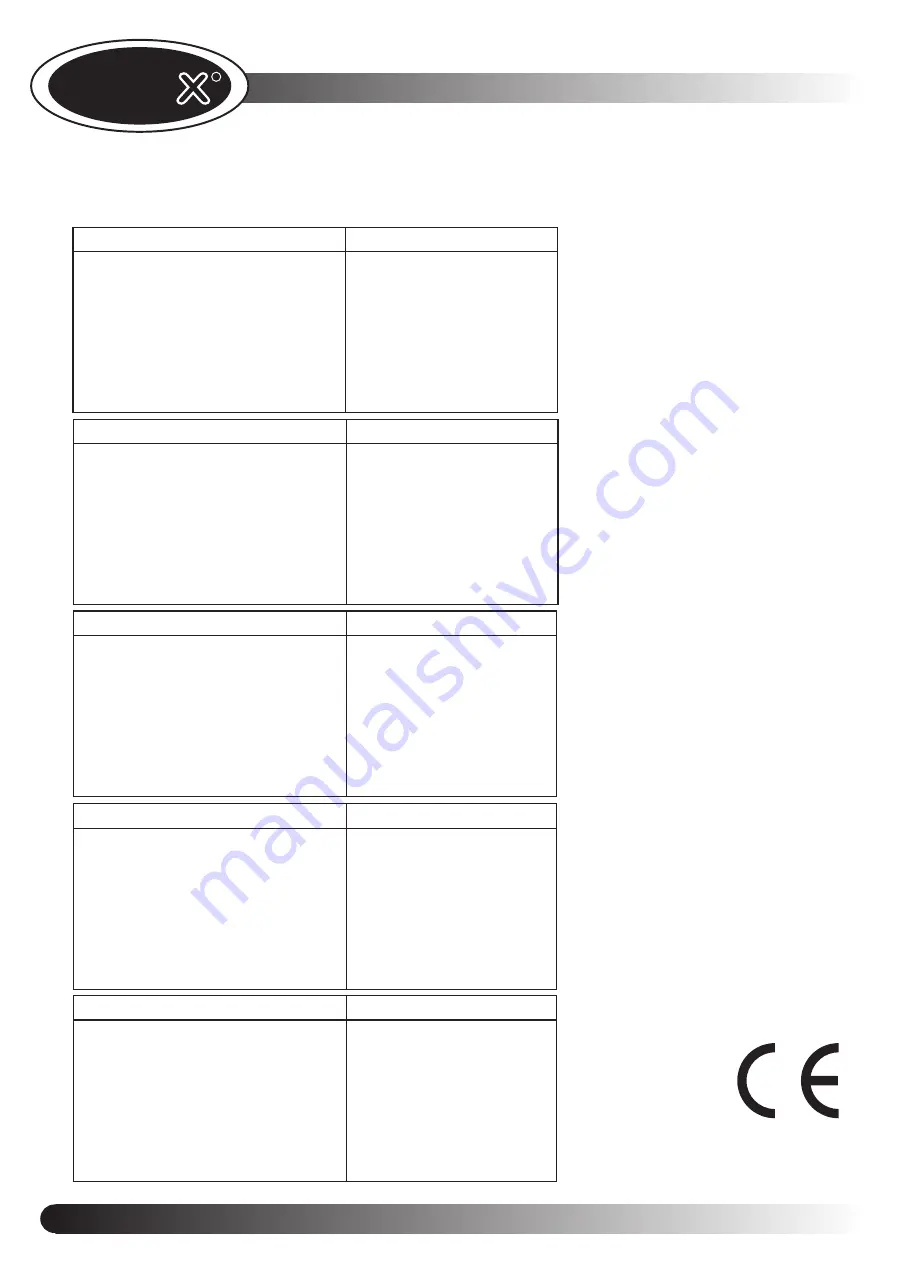
TECHNICAL  DATA


ELECTRICAL POWER   
FREQUENCY
POWER SUPPLY CABLE TYPE
POWER SUPPLY CABLE EXTERNAL Ø
VOLTAGE / CABLE SECTION

MAX FOOD LOAD
NOISE LEVEL

kW   0,76

50  Hz 

H07RNF

10 ÷ 16 mm

230 V~    3G x 1,5 mm

2

Kg 15

<70 db (A)

DEUTSCH                      

TECHNISCHE DATEN

ELEKTRISCHE LEISTUNG
FREQUENZ
VERSORGUNGSKABELTYP
AUSSENDURCHMESSERVERSORGUNGSKABEL
KABELQUERSCHNITT / VERSORGUNGSSPANNUNG

MAX.SPEISENFASSUNGSVERMOGEN
GERÄUSCHENTWICKLUNG        

kW   0,76

50  Hz 

H07RNF

10 ÷ 16 mm

230 V~    3G x 1,5 mm

2

Kg 15

<70 db (A)

ITALIANO


DATI TECNICI

POTENZA
FREQUENZA
TIPO DI CAVO ALIMENTAZIONE
Ø ESTERNO CAVO DI ALIMENTAZIONE
TENSIONE / SEZIONE CAVI ALIMENTAZ.

CARICA MAX CIBO
LIVELLO DI RUMORE

kW   0,76

50  Hz 

H07RNF

10 ÷ 16 mm

230 V~    3G x 1,5 mm

2

Kg 15

<70 db (A)

ESPAÑOL

DATOS TECNICOS

POTENCIA
FRECUENCIA
TIPO CABLE DE ALIMENTACION
Ø EXTERNO CABLE DE ALIMENTACION
TENSION / SECCION CABLE DE ALIMENT.

CARGA MAX ALIMENTO
NIVEL DE RUIDO

kW   0,76

50  Hz 

H07RNF

10 ÷ 16 mm

230 V~    3G x 1,5 mm

2

Kg 15

<70 db (A)

FRANÇAIS

INFORMATIONS TECHNIQUES

PUISSANCE ELECTRIQUE
FREQUENCE
TYPE CABLE D’ALIMENTATION
Ø CABLE EXTERNE D’ALIMENTATION
TENSION / SECTION CABLE D’ALIM.

CHARGE MAXI ALIMENTS
LEVEL DE BRUIT 

kW   0,76

50  Hz 

H07RNF

10 ÷ 16 mm

230 V~    3G x 1,5 mm

2

Kg 15

<70 db (A)

CaldoLux

CaldoLux

TM

TECHNICAL  DATA - INFORMATIONS TECHNIQUES -  TECHNISCHE DATEN - DATI TECNICI - DATOS TECNICOS

TECHNICAL  DATA - INFORMATIONS TECHNIQUES -  TECHNISCHE DATEN - DATI TECNICI - DATOS TECNICOS

Summary of Contents for CaldoLux XHC030

Page 1: ...ATAS MANUEL DES INSTRUCTIONS ET DES DONNÉES TECHNIQUES BEDIENUNGSANWEISUNG MANUALE DI ISTRUZIONI E DATI TECNICI MANUAL ISTRUCIONES Y DATOS TECNOCOS O V E N S P L A N E T CaldoLux CaldoLux TM COOK HOLD OVEN FOUR COOK HOLD COOK HOLD OEFEN FORNO COOK HOLD HORNO COOK HOLD 10 2004 XHC030 ...

Page 2: ...2 DESCRIPTION AND USE OF THE DIGITAL CONTROL PANEL 6 4 MAINTENANCE CLEANING OF THE APPLIANCE 7 4 1 FIRST USE OF THE OVEN 7 4 2 CAVITY CLEANING 7 4 3 CLEANING OF THE EXTERNAL PART OF THE OVEN 7 5 TURNING OFF IN CASE OF BREAKING 7 III COOKING VARIABLES 7 1 TEMPERATURE 7 2 TIME 8 3 QUANTITY OF FOOD 8 4 USE OF TRAYS WIRE GRIDS 8 IV MAINTENANCE 8 1 ORDINARY MAINTENANCE 8 2 SPECIAL MAINTENANCE 8 3 MORE ...

Page 3: ...xact position of the electrical connections looking at the pictures on the attached file TECHNICAL DATA 3 2 POSITIONING Place the appliance respecting the safety standards in force that you find here following described 1 Place the appliance so that its back and sides can be easily reached in order to make electrical connections and provide the needed service 2 The appliance is not suitable for bu...

Page 4: ... by more than 10 b The appliance must be connected to the ground line of the network Moreover the appliance must be included in equipotential system whose efficiency must be properly checked according to the current law This connection must be done between the different appliances using the terminal marked with the symbol The equipotential conductor must have a minimum section of 10 mm2 5 REVERSAL...

Page 5: ... oven in the horizontal position and plug the oven back to the net II INSTRUCTIONS FOR THE USER WARNING The appliance cannot be cleaned with a jet of water Never wash the cavity with acids or aggressive detergents Use only water and soap The appliance is made for a specific professional use and must be used by qualified personnel only 1 INSTRUCTIONS FOR THE OPERATOR WARNING Carefully read this use...

Page 6: ...G10 Starting The lighting and the extinction of the control are made by pushing the button ON OFF When the control is in state of OFF the relative LED placed to the right of the push button is lighted in order to signal the presence of the grid voltage when the control comes lighted the LED is extinguished Cooking COOK At the lighting the electronic control goes in the phase of baking COOK and the...

Page 7: ...g time to end baking count down according to the parameter selected in the positioning phase By pressing the SELECT button during this phase the established parameters can be shown and can be possibly changed the baking chamber temperature and the core temperature time After 15 during which you press no button to modify the electronic control turns to the normal visualization temperature read in t...

Page 8: ...to a not uniform baking c Avoid to touch the products put on the pan 1 TEMPERATURE The exact setting of the temperature guarantees the a proper cooking of the food from the inside and the outside A lower temperature than the proper one dries the food rather than cook it A higher temperature than the proper one burns the surface and the inside remains uncooked sometimes this is desired especially f...

Page 9: ...zed technician has to control the complete machine 2 SPECIAL MAINTENANCE All the maintenance operations must be done only by qualified staff Before starting any maintenance operation you should disconnect the appliance from the electric power supply and wait for the appliance to cool down The parts that need special maintenance can be reached by removing the front control panel and the back of the...

Page 10: ...rature during the baking LED indicating the product s core temperature LED indicating the time LED indicating the chamber temperature during the maintenance Button to select the modality Button to increase the established data Button to reduce the established data Button and LED for START STOP ENGLISH ENGLISH 10 ...

Page 11: ..._____________________________________________________ ___________________________________________________________________________________ ___________________________________________________________________________________ ___________________________________________________________________________________ ___________________________________________________________________________________ __________...

Page 12: ...RIPTION ET UTILISATION DU TABLEAU DE COMMANDE 6 4 MAINTENANCE NETTOYAGE DU FOUR 7 4 1 PREMIÈRE UTILISATION DU FOUR 7 4 2 NETTOYAGE DE LA CHAMBRE DE CUISSON 7 4 3 NETTOYAGE EXTERNE DU FOUR 7 5 ÉTEINGNEMENT EN CAS DE DÉGAT 7 III VARIABLES DE CUISSON 7 1 TEMPÉRATURE 7 2 TEMPS 8 3 QUANTITÉ D ALIMENT 8 4 USAGE DES PLAQUES GRILLES 8 IV MAINTENANCE 8 1 MAINTENANCE ORDINAIRE 8 2 MAINTENANCE EXTRAORDINAIRE...

Page 13: ...STALLATION Avant de positionner l appareil vérifiez les mesures d encombrement et l exacte position des branchements électriques selon la figure rapportée dans le dossier ci joint Données Techniques 3 2 POSITIONNEMENT Positionnez l appareil en respectant les normes de sûreté indiquées comme suit 1 disposez l appareil en mode que les parties postérieures et latérales soient facilement accessibles p...

Page 14: ...pportée sur l étiquette donnés du four de 10 b L appareillage doit être lié à la ligne de terre du réseau En outre l appareillage doit être inclu dans un système équipotentiel duquel l efficacité doit être opportunément vérifiée selon combien rapporté dans la réglementation en vigueur Cette liaison doit être effectuée entre les différents appareillages avec la borne marquée du symbole Le conducteu...

Page 15: ... spécifique et doit être utilisé seulement par des personnes qualifiées 1 INSTRUCTIONS POUR L UTILISATEUR ATTENTION Lisez attentivement le présent livret puisqu il vous fournit des importantes indications en ce qui concerne la sûreté de l installation de l emploi et de la maintenance Conservez avec soin ce livret pour chaque ultérieure consultation des divers opérateurs Pour une éventuelle réparat...

Page 16: ... une température égale à 000 en pressant le bouton sur le display on passe directement à 120 ºC Une fois qu on a établi la température dans la chambre on doit décider si utiliser la sonde à coeur ou bien le temps pour déterminer la durée de la cuisson En utilisant la sonde à coeur la phase de cuisson COOK termine lorsque la température mesurée par la sonde à coeur rejoint la valeur établie En util...

Page 17: ... DU FOUR NOTICE Toutes les opération de maintenance doivent être effectuées seulement par des personnes qualifiées Avant d effectuer n importe quel intervention d entretien ou nettoyage débranchez l alimentation électrique et attendez le refroidissement de l appareil 4 1 PREMIÈRE UTILISATION DU FOUR Avant d utiliser l équipement pour la première fois il est obligatoire nettoyer la partie interne e...

Page 18: ...ects ne permettent pas une cuisson complète des aliments Des temps plus longs par rapport à ceux corrects créent des phénomènes de brûlure extérieure des aliments 3 QUANTITÉ D ALIMENT La quantité des aliments influence le temps de cuisson Quantités plus élevées des aliments signifient durées de temps plus longues et vice versa 4 USAGE DES PLAQUES GRILLES On vous conseille l emploi de Plaques en ac...

Page 19: ...UNO R FRANÇAIS FRANÇAIS 9 ...

Page 20: ... en phase de cuisson LED indiquant la température à coeur du produit LED indiquant le temps LED indiquant la température de maintien dans la chambre Bouton sélection modalité Bouton pour augmenter les données établies Bouton pour diminuer les données établies Bouton et LED pour le START STOP départ arrêt FRANÇAIS FRANÇAIS 10 ...

Page 21: ...______________________________________________________ ___________________________________________________________________________________ ___________________________________________________________________________________ ___________________________________________________________________________________ ___________________________________________________________________________________ _________...

Page 22: ...AUSSSETZUNG 6 3 2 BESCHREIBUNG UND BENUTZUNG DER DIGITALEN STEUERUNG 6 4 REINIGUNG PFLEGE 7 4 1 ERSTE OFENSBENUTZUNG 7 4 2 BACKKAMMERPFLEGE 7 4 3 AUSSERE OFENSPFLEGE 7 5 AUSSERBETRIEBNAHME BEI STÖRUNGEN 7 III BETRIEBSARTEN 7 1 TEMPERATUR 7 2 ZEIT 8 3 SPEISENMENGE 8 4 VERWENDUNG VON GN BEHÄLTERN UND BLECHEN 8 IV WARTUNG 8 1 ALLGEMEIN 8 2 SPEZIELLE WARTUNG 8 3 STÖRUNGEN UND DEREN BEHEBUNG 9 ANHANG 1...

Page 23: ...sgeführt werden 3 1 PRÜFEN DES PLATZEN ZUR AUFSTELLUNG DES GERÄTES Vor dem Aufstellen des Gerätes prüfen Sie bitte alle Masse elektrische Anschlüsse Wasseranschlüsse entsprechend des Beiblattes Technische Daten 3 2 AUFSTELLUNG Die Aufstellung des Gerätes muss nach den folgenden Sicherheitsstandards erfolgen 1 Plazieren Sie das Gerät so dass die Rückseite und die Aussenseiten für die Elektroinstall...

Page 24: ...erät muss mit einem allpoligen Netztrennschalter z b Magnet Thermoschalter mit den folgenden Kennzeichen getrennt werden zugänglich nach der Aufstellung mit einer Kontaktöffnung von mindestens 3mm vom Netz mit einer passenden Leistung z b Magnet Thermoschalter Wenn das Gerät arbeitet darf die Versorgungsteilspannung nicht mehr als 10 vom Wert der Nennspannung abweuchen s Typenschild b Der Schutzle...

Page 25: ...elagen wird 10 Schneiden Sie den Bügel durch zwei passenden Schrauben ab 11 Legen Sie den Ofen eben und stellen Sie die Spannung wiederher II ANWEISUNGEN FÜR DEN BENUTZER WARNUNG Das Gerät darf nicht mit einem Dampfstrahler gereinigt werden Niemals den Innenraum mit chlorhaltigen oder aggressive Reinigern säubern Verwenden Sie nur Wasser und Seifenwasser Das Gerät ist für die Benutzung in Grossküc...

Page 26: ... des Ofens werden gekocht Halten Funktion HOLD die gekochten Speisen werden auf einer gegenständigen Temperatur erhaltet Nach dem halten Funktion der elektronischen Steuerung wird die Temperatur der Backkammer durch die Widerstandssteuerung und die Leistungmodulation mit einer TRIAC Elektronikschaltung reguliert Innerhalb des Garraumes gibt es keinen Luftloch 3 2 BESCHREIBUNG UND BEDIENUNG DER STE...

Page 27: ...hase HOLD ist es möglich nur die Temperatur des Garraumes einzustellen Bei dieser Einstellung bleibt die Temperatur der Backkammer ständig Zur Handausschaltung betätigen Sie bitte die START STOP Taste Nachdem Sie alle Parameter eingegeben haben drücken Sie die Taste START STOP zum Starten des Programms Wenn Sie das Programm mit dem Knopf START starten entzündet sich das dazugehörige LED auf der li...

Page 28: ...dienst autorisiert von UNOX der Ihnen mit Fachpersonal weiterhilft III KOCH PARAMETER ACHTUNG a Vor jedem Kochen heizen Sie den Ofen auf eine Temperatur 30 C höher als die vorgesehene Kochtemperatur auf Dies erlaubt beste Kochergebnisse b Die Nutzung von höheren Backtemperaturen als notwendig fuhrt zu ungleichmässigen Backerergebnissen c Verhindern Sie dass das enzelne Stücke auf dem Blech in Berü...

Page 29: ...is das Gerät abgekühlt ist Das Gerät muss einmal im Jahr von einem Kundendienstfachmann kontrolliert werden 2 SPEZIELLE WARTUNG Jede Wartung muss von einem qualifizierten Fachmann durchgeführt werden Vor dem Beginn einer Wartung muss das Gerät vom Stromnetz getrennt werden und abgewartet werden bis das Gerat abgekühlt ist Die Teile die einer normalen Wartung bedürfen sind von der Vorderseite oder ...

Page 30: ...UNO R DEUTSCH DEUTSCH 10 ...

Page 31: ...re dans la chambre en phase de cuisson LED indiquant la température à coeur du produit LED indiquant le temps LED indiquant la température de maintien dans la chambre Bouton sélection modalité Bouton pour augmenter les données établies Bouton pour diminuer les données établies Bouton et LED pour le START STOP départ arrêt ...

Page 32: ...ESSA 6 3 2 DESCRIZIONE ED USO DEL PANNELLO COMANDI 6 4 MANUTENZIONE PULIZIA FORNO 7 4 1 PRIMO UTILIZZO DEL FORNO 7 4 2 PULIZIA CAMERA DI COTTURA 7 4 3 PULIZIA ESTERNA FORNO 7 5 SPEGNIMENTO IN CASO DI GUASTO 7 III VARIABILI DI COTTURA 7 1 TEMPERATURA 7 2 TEMPO 8 3 QUANTITA DI CIBO 8 4 USO DI TEGLIE GRIGLIE 8 IV MANUTENZIONE 8 1 MANUTENZIONE ORDINARIA 8 2 MANUTENZIONE STRAORDINARIA 8 3 GUASTI PIU FR...

Page 33: ...zionare l attrezzatura rispettando le norme di sicurezza indicate qui di seguito 1 disporre l apparecchio in modo che la parete posteriore e laterale siano facilmente accessibili per effettuare l allacciamento elettrico e per consentire la manutenzione dell apparecchiatura 2 L apparecchiatura non è adatta all incasso e al posizionamento in batteria 3 Si consiglia di lasciare una distanza di 10 cm ...

Page 34: ...va in vigore Questo collegamento deve essere effettuato tra apparecchiature diverse con il morsetto contrassegnato dal simbolo Il conduttore equipotenziale deve avere una sezione minima di 10 mm2 5 INVERSIONE DELLA PORTA Per venire incontro alle esigenze del cliente l attrezzatura è dotata di porta reversibile Con questa caratteristica l utente può scegliere in qualsiasi momento in che direzione a...

Page 35: ...ente libretto in quanto fornisce importanti indicazioni riguardanti la sicurezza d installazione d uso e di manutenzione Conservare con cura questo libretto per ogni ulteriore consultazione dei vari operatori Per l eventuale riparazione rivolgersi solamente ad un centro assistenza tecnica ed esigere parti di ricambio originali Il mancato rispetto di quanto sopra può compromettere la sicurezza dell...

Page 36: ...nte esclusive se si imposta la sonda al cuore non si può impostare il tempo e viceversa impostando il tempo non si può impostare la sonda al cuore Premendo il pulsante SELECT si spegne il LED TEMPERATURA CAMERA e si accende il LED TEMPERATURA CUORE Il display in questo caso indica la temperatura impostata per la sonda al cuore Per modificare la temperatura al cuore si agisce sui pulsanti e range t...

Page 37: ...usando prodotti adatti allo scopo al termine di ogni ciclo di cottura Per effettuare la pulizia dell apparecchio si prega di seguire le seguenti indicazioni rimuovere le griglie laterali estraendole dai loro supporti per agevolare la pulizia accendere l apparecchio regolare la temperatura a circa 80 C per circa 30 min lasciare raffreddare e pulire con un panno Non usare per la pulizia dell acciaio...

Page 38: ...imi piatti carni pesce patate Griglie carni da rosolare come bistecche würstel salsicce IV MANUTENZIONE 1 MANUTENZIONE ORDINARIA Qualsiasi lavoro di manutenzione deve essere effettuato solamente da personale qualificato Prima di effettuare qualsiasi tipo di manutenzione è necessario disinserire l alimentazione elettrica e aspettare il raffreddamento dell apparecchio Periodicamente almeno una volta...

Page 39: ...UNO R ITALIANO ITALIANO 9 ...

Page 40: ...in camera in fase di cottura LED indicantela temperatura al cuore del prodotto LED indicante il tempo LED indicantela tempera tura di mantenimento in camera Pulsante sele zione modalità Pulsante incremento dato impostato Pulsante decremento dato impostato Pulsante e led per lo START STOP ITALIANO ITALIANO 10 ...

Page 41: ...______________________________________________________ ___________________________________________________________________________________ ___________________________________________________________________________________ ___________________________________________________________________________________ ___________________________________________________________________________________ _________...

Page 42: ...ESCRIPCION DEL UTILIZO DEL PANEL DE MANDO 6 4 MANTENIMIENTO LIMPIEZA DEL HORNO 7 4 1 UTILIZACION DEL HORNO POR PRIMERA VEZ 7 4 2 LIMPIEZA CAMARA DE COCCION 7 4 3 LIMPIEZA EXTERNA DEL HORNO 7 5 DETENIMIENTO EN CASO DE AVERIA 7 III VARIABLES DE COCCION 7 1 TEMPERATURA 7 2 TIEMPO 8 3 CANTIDAD DE ALIMENTOS 8 4 UTILIZACION DE BANDEJAS PARRILLAS 8 IV MANTENIMIENTO 8 1 MANTENIMIENTO ORDINARIO 8 2 MANTENI...

Page 43: ...s en vigor 3 1 VERIFICACION DEL LUGAR DE INSTALACION Antes de posicionar el equipo verificar el volumen y la correcta posición de la conexión eléctrica según las figuras indicadas en el adjunto fascículo Datos Técnicosi 3 2 COLOCACION Colocar el equipo respetando las normas de seguridad indicadas a continuación 1 Colocar el equipo en modo que la parte posterior y lateral sean facilmente accesibles...

Page 44: ... de la tensión nominal indicada sobre la tarjeta de datos del horno de 10 b El equipo debe estar conectado a la línea de tierra de la red Además el equipo debe estar incluído en un sistema equipotencial donde su eficacia debe estar oportunamente verificada según lo indicado en la normativa en vigor Esta conexión debe ser efectuada entre los diversos equipos con el borne contraseñado del símbolo El...

Page 45: ...con ácidos o productos agresivos sólo con jabón y agua El equipo está destinado para específico uso profesional y debe ser utilizado solamente por personal calificado 1 INSTRUCCIONES PARA EL USUARIO ATENCION Leer atentamente el presente libreto ya que suministra importantes indicaciones referentes a la seguridad de la instalación del uso y de la manutención Conservar cuidadosamente este libreto pa...

Page 46: ...en marcha el LED se apaga Cocción COOK A la puesta en marcha el control electrónico se ubica en la fase de cocción COOK y se ilumina el LED TEMPERATURA CAMARA es por lo tanto posible programar el valor de la temperatura al interno de la cámara de cocción apretando los dos pulsadores y rango de temperatura programable 0 120 C Cuando la pantalla indica la temperatura igual a 000 apretar el pulsador ...

Page 47: ...caciones el control electrónico regresa a la visualización normal temperatura leida en cámara y temperatura leida al corazón count down Durante el funcionamiento en la fase de mantenimiento HOLD se visualiza la temperatura leida en la cámara de cocción Interrupción ciclo Es posible interrumpir el ciclo de cocción apretando el pulsador START STOP en cualquier momento Cuando el ciclo de cocción se i...

Page 48: ...nde más a secar que a cocinar el alimento Una temperatura superior a aquella correcta tiende a quemar la parte externa y dejar el interior no cocido fenómeno a veces deseado por ejemplo en las carnes 2 TIEMPO Esta variable depende de la cantidad de alimentos introducidos en el horno Mayor es la cantidad más se prolongan losi tiempos de cocción y viceversa Tiempos más breves respecto a los correcto...

Page 49: ... por personal calificado Antes de efectuar cualquier tipo de manutención es necesario desenchufar la alimentación eléctrica y esperar el enfriamento del equipo Los componentes que necesitan de manutención extraordinaria son accesibles quitando la cobertera y la parte posterior del horno ...

Page 50: ...a en fase de cocción LED indicador de la temperatura al corazón del producto LED indicador del tiempo LED indicador de la temperatura de mantenimiento en cámara Pulsador para seleccionar modalidad Pulsador para aumentar dato programado Pulsador para disminuir dato programado Pulsador y led para START STOP 10 ESPANOL ESPANOL ...

Page 51: ..._____________________________________ ___________________________________________________________________________________ ___________________________________________________________________________________ ___________________________________________________________________________________ ___________________________________________________________________________________ __________________________...

Page 52: ...ENSIONE SEZIONE CAVI ALIMENTAZ CARICA MAX CIBO LIVELLO DI RUMORE kW 0 76 50 Hz H07RNF 10 16 mm 230 V 3G x 1 5 mm2 Kg 15 70 db A ESPAÑOL DATOS TECNICOS POTENCIA FRECUENCIA TIPO CABLE DE ALIMENTACION Ø EXTERNO CABLE DE ALIMENTACION TENSION SECCION CABLE DE ALIMENT CARGA MAX ALIMENTO NIVEL DE RUIDO kW 0 76 50 Hz H07RNF 10 16 mm 230 V 3G x 1 5 mm2 Kg 15 70 db A FRANÇAIS INFORMATIONS TECHNIQUES PUISSAN...

Page 53: ...SKLEMMEN R HEIZUNGELEMENTEN SIC SICHERHEITS THERMOSTAT SCHEMI ELETTRICI MORS MORSETTIERA R RESISTENZA SIC TERMOSTATO DI SICUREZZA ESQUEMAS ELECTRICOS MORS CAJA CONEXIONES REGLETA R RESISTENCIA SIC TERMOSTATO DE SEGURIDAD ELECTRICAL SCHEMAS SCHEMAS ELECTRIQUES ELEKTRISCHE SCHEME SCHEMI ELETTRICI ESQUEMAS ELECTRICOS TECHNICAL DATA INFORMATIONS TECHNIQUES TECHNISCHE DATEN DATI TECNICI DATOS TECNICOS ...

Page 54: ... AND APPLIANCE PLANS 1 Alimentation 2 Sortie vapeur chaude 3 Borne équipotentiel 4 Étiquette données techniques 5 Poignée du transport 6 Poignée pour l ouverture de la porte PLACER LE FOUR À UNA DISTANCE DE 10 cm DU MUR ZEICHNUNGEN 1 Versorgung 2 Abzug heissen Rauch 3 Sitz äquipotent ausgleichkl 4 Typenschild 5 Griff für Transport 6 Türgriff HALTENSIEEINENSICHERHEITSABSTANDVON10CM VONDERHINTERSEIT...

Page 55: ...______________________________________________ ___________________________________________________________________________________ ___________________________________________________________________________________ ___________________________________________________________________________________ ___________________________________________________________________________________ _________________...

Page 56: ...O V E N S P L A N E T UNO R UNOX S p A Via dell Artigianato 28 30 35010 Vigodarzere PD ITALY Tel 39 049 86 57 511 FAX 39 049 86 57 555 info unox com www unox com ...

Reviews: