background image

this operation manual is provided for plumbing professionals and  
building officials interested in uponor plumbing and radiant heating 
and cooling systems. this manual describes general installation 
recommendations that use uponor aQuaPeX® and hePeX™ plus  
tubing products. be sure to follow local code requirements.

uponor has used reasonable efforts in collecting, preparing and providing 
quality information and material in this manual. however, system 
enhancements may result in modification of features or specifications 
without notice. For the most current technical information, go to the 
uponor website at www.uponor-usa.com.

uponor is not liable for installation practices that deviate from this manual 
or are not acceptable practices within the mechanical trades. refer to 
the uponor aQuaPeX Professional Plumbing installation guide to install 
uponor aQuaPeX tubing in plumbing systems. refer to the uponor 
radiant heating installation guide to install uponor hePeX plus tubing. 

Please direct any questions regarding the suitability of an application or a 
specific design to your local uponor representative. For the name of your 
local representative, please call toll free (800) 321-4739.

i

uponor propex® 201  corded expander tool operation manual

Summary of Contents for ProPEX 201

Page 1: ...operation manual Plumb ing and radian t heating and coolin g S ys tems p rop ex 20 1 cor de d expande r to ol ProPEX 201 Corded Expander Tool Operation Manual...

Page 2: ...al Published by Uponor Inc 5925 148th Street West Apple Valley MN 55124 Phone 952 891 2000 Fax 952 891 1409 www uponor usa com 2008 Uponor Inc All rights reserved First Edition First Printing November...

Page 3: ...thout notice For the most current technical information go to the Uponor website at www uponor usa com Uponor is not liable for installation practices that deviate from this manual or are not acceptab...

Page 4: ...ii www uponor usa com...

Page 5: ...eshooting Table 7 Safety Guidelines 7 Repairs 8 Warranty 8 Section 4 Making ProPEX Connections 9 Tools Needed 9 Important Tips for a Proper ProPEX Connection 11 Disconnecting a ProPEX Brass Fitting 12...

Page 6: ...vi www uponor usa com...

Page 7: ...ludes ProPEX 201 Corded Expander Tool ProPEX 2 H series Expander Head Tool Lubricant Molykote G n Plus Operation Manual Carrying Case Note Please contact your local Uponor sales representative or dist...

Page 8: ...2 www uponor usa com...

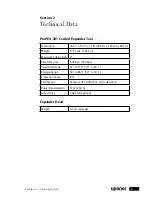
Page 9: ...1mm x 235mm x 81mm Weight 11 57 lbs 5 25 kg Maximum Tubing Size 2 Rated Pressure 5 076 psi 350 bar Operating Range 32 to 130 F 0 to 55 C Storage Range 50 to 86 F 10 to 30 C Protection Level IP21 Certi...

Page 10: ...4 www uponor usa com...

Page 11: ...Tool and Head Maintenance The ProPEX 201 Corded Expander Tool head comes in one size 2 and contains Six segment fingers One attachment ring One spring It is important to keep the head on the tool or i...

Page 12: ...f the tool free from lubricant Note Improper connections may result if you do not properly lubricate the tool Caution Excessive lubrication may result in improper connections Use only a small amount o...

Page 13: ...anything in the vent holes of the tool housing Always wear protective eyewear and clothing when operating the tool Use original replacement parts only Only professional contractors should operate the...

Page 14: ...ord depot First time users must complete a registration form Please note that contractors with existing accounts do not need to re register Warranty For warranty information go to www uponor usa com a...

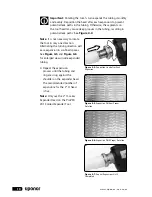
Page 15: ...PEX Ring over the end of the tubing Extend the end of the ring over the end of the tubing no more than 3 8 9mm See Figure 4 2 3 Slide the expander head into the tubing until it stops Full expansions a...

Page 16: ...g direction will ease expansion in confined spaces See Figure 4 5 and Figure 4 6 for enlarged views inside expanded tubing 4 Repeat the expansion process until the tubing and ring are snug against the...

Page 17: ...ely remove it from the tubing and expand the tubing one final time Note To avoid over expanding the tubing do not hold the tubing in the expanded position Experience technique and weather conditions i...

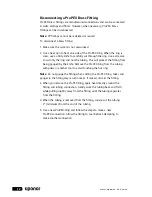
Page 18: ...ed by the knife Remove the ProPEX Ring from the tubing with pliers or another tool to avoid touching the hot ring Note Do not gouge the fitting when cutting the ProPEX Ring Nicks and gouges in the fit...

Page 19: ...se on the segment fingers 4 Examine the fitting for damage Nicks and gouges on the fitting will cause the fitting to leak 5 Ensure the internal driver is not bent or damaged 6 Make sure the last expan...

Page 20: ...escribed in Step 2 Too Many Expansions Needed to Make a Connection If making several more expansions on the tubing than is recommended follow the steps below 1 Ensure the head is hand tightened to the...

Page 21: ...15 Uponor ProPEX 201 Corded Expander Tool Operation Manual Notes...

Page 22: ...16 www uponor usa com Notes 16 www uponor usa com...

Page 23: ...17 Uponor ProPEX 201 Corded Expander Tool Operation Manual...

Page 24: ...el 800 321 4739 Fax 952 891 2008 Web www uponor usa com Uponor Ltd 2000 Argentia Rd Plaza 1 Ste 200 Mississauga ON L5N 1W1 CANADA Tel 888 994 7726 Fax 800 638 9517 Web www uponor ca ProPEX201_P111_Man...

Reviews: