Maintenance
Section
4-6
AB38 Work Platform
2.
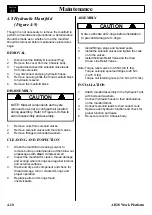
Provide a suitable container to catch the
drained oil. Hydraulic tank has a capacity of 25
Litres (6.5 Gallons US).
3.
Remove the drain plug on the lower side and
allow all oil to drain.
4.
Clean the magnetic drain plug and reinstall.
5.
Disconnect the return hose and hose fitting
from inlet port of the hydraulic return filter.
Loosen and remove the filter cover retaining
bolts. Remove filter (10 micron) assembly.
Replace with a new filter.
6.
Fill the hydraulic reservoir with hydraulic oil
(see Section 1-2) checking level with dipstick.
7.
Recycle used oil as per local environmental
regulations.
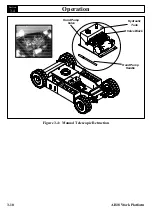
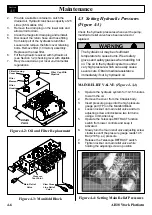
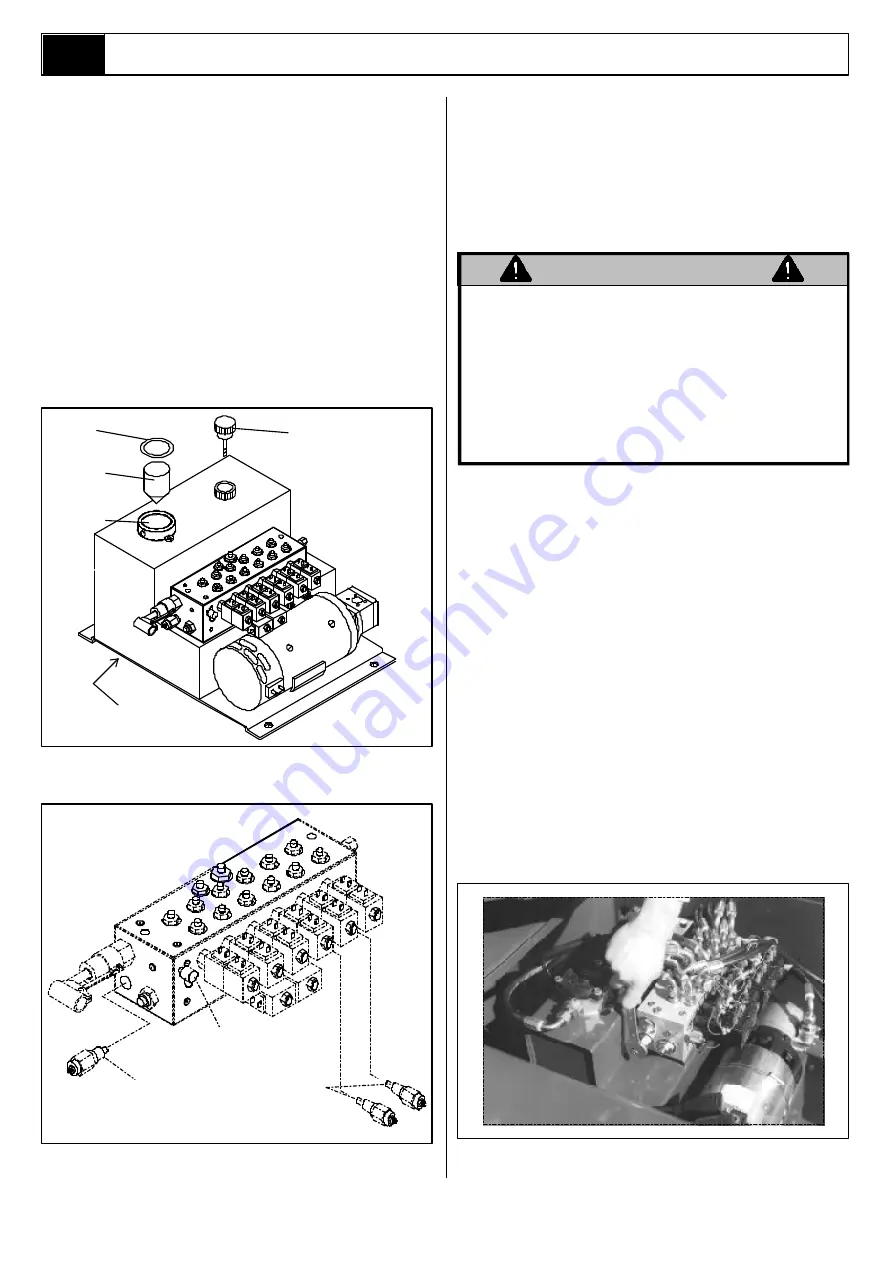
Figure 4-2: Oil and Filter Replacement
4.5 Setting Hydraulic Pressures
(Figure 4-3)
Check the hydraulic pressures whenever the pump,
manifold or relief valve have been serviced or
replaced.
The hydraulic oil may be of sufficient
temperature to cause burns. Wear safety
gloves and safety glasses when handling hot
oil. The oil in the hydraulic system is under
very high pressure which can easily cause
severe cuts. Obtain medical assistance
immediately if cut by hydraulic oil.
MAIN RELIEF VALVE
(Figure 4-3,4)
1.
Operate the hydraulic system for 10-15 minutes
to warm the oil.
2.
Remove the cover from the Chassis body.
3.
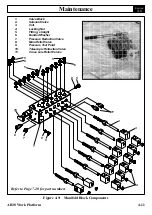
Insert pressure gauge into the high pressure
gauge port (TP) on the Manifold Block.
4.
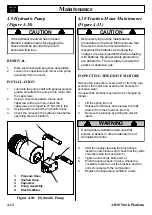
Loosen locknut on main relief valve and turn
adjusting screw anticlockwise two full turns
using a 4 mm Allen key.
5.
Operate the Telescope RETRACT function
switch from lower controls and keep it
activated.
6.
Slowly turn the main relief valve adjusting screw
clockwise until the pressure gauge reads 145
Bar (2105 p.s.i.) pressure.
7.
Release the Telescope RETRACT switch.
8.
Tighten locknut on main relief valve while
holding the adjusting screw in position.
WARNING
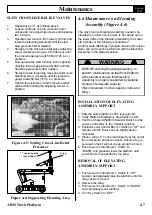
Figure 4-3: Manifold Block
4.5
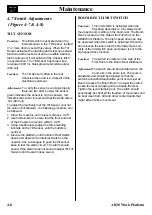
Figure 4-4: Setting Main Relief Pressures
Filler Cap With
Dipstick
Filter Housing
Cover
Filter
Element
Filter
Housing
DRAIN
PLUG
Main Relief
Valve
Slew Cross
Line Relief
Valve
Pressure
Test Point
Summary of Contents for AB38
Page 2: ...ii AB38 Work Platform NOTES...
Page 4: ...ii AB38 Work Platform NOTES...
Page 6: ...iv AB38 Work Platform NOTES Foreword...
Page 10: ...Contents Section IV AB38 Work Platform i NOTES...
Page 14: ...Introduction Specifications Section 1 4 AB38 Work Platform NOTES 1 3...
Page 17: ...Machine Preparation Section 2 3 AB38 Work Platform NOTES 2 7...
Page 18: ...Machine Preparation Section 2 4 AB38 Work Platform 2 7 NOTES...
Page 29: ...Operation Section 3 11 AB38 Work Platform NOTES 3 5...
Page 30: ...Operation Section 3 12 AB38 Work Platform NOTES 3 5...
Page 59: ...Maintenance Section 4 29 AB38 Work Platform NOTES 4 21...
Page 60: ...Maintenance Section 4 30 AB38 Work Platform NOTES 4 21...
Page 66: ...Troubleshooting Section 5 6 AB38 Work Platform 5 7 NOTES...
Page 68: ...Schematics Section 6 2 AB38 Work Platform NOTES 6 0...
Page 72: ...Schematics Section 6 6 AB38 Work Platform 6 1 NOTES...
Page 73: ...Electrical Schematic Schematics 6 7 AB38 Work Platform Section 6 1...
Page 74: ...Electrical Schematic Schematics 6 8 AB38 Work Platform Section 6 1 TOP VIEW...
Page 76: ...Schematics Section 6 10 AB38 Work Platform NOTES 6 2...
Page 78: ...Section 6 2 6 12 AB38 Work Platform Schematics NOTES...
Page 81: ...Illustrated Parts Breakdown Section 7 3 AB38 Work Platform 7 2...
Page 83: ...Illustrated Parts Breakdown Section 7 5 AB38 Work Platform 7 2...
Page 85: ...Illustrated Parts Breakdown Section 7 7 AB38 Work Platform 7 2...
Page 87: ...Illustrated Parts Breakdown Section 7 9 AB38 Work Platform 7 2...
Page 89: ...Illustrated Parts Breakdown Section 7 11 AB38 Work Platform 7 2 22...
Page 91: ...Illustrated Parts Breakdown Section 7 13 AB38 Work Platform 7 2...
Page 93: ...Illustrated Parts Breakdown Section 7 15 AB38 Work Platform 7 2...
Page 95: ...Illustrated Parts Breakdown Section 7 17 AB38 Work Platform 7 2...
Page 97: ...Illustrated Parts Breakdown Section 7 19 AB38 Work Platform 7 2...
Page 99: ...Illustrated Parts Breakdown Section 7 21 AB38 Work Platform 7 2...
Page 101: ...Illustrated Parts Breakdown Section 7 23 AB38 Work Platform 7 2...
Page 103: ...Illustrated Parts Breakdown Section 7 25 AB38 Work Platform 7 2...
Page 105: ...Illustrated Parts Breakdown Section 7 27 AB38 Work Platform 7 2...
Page 107: ...Illustrated Parts Breakdown Section 7 29 AB38 Work Platform 7 2...
Page 109: ...Illustrated Parts Breakdown Section 7 31 AB38 Work Platform 7 2...
Page 111: ...Illustrated Parts Breakdown Section 7 33 AB38 Work Platform 7 2...
Page 113: ...Illustrated Parts Breakdown Section 7 35 AB38 Work Platform 7 2...
Page 115: ...Illustrated Parts Breakdown Section 7 37 AB38 Work Platform 7 2...
Page 117: ...Illustrated Parts Breakdown Section 7 39 AB38 Work Platform 7 2...
Page 119: ...Illustrated Parts Breakdown Section 7 41 AB38 Work Platform 7 2 8 9...
Page 121: ...Illustrated Parts Breakdown Section 7 43 AB38 Work Platform 7 2...
Page 123: ...Illustrated Parts Breakdown Section 7 45 AB38 Work Platform 7 2...
Page 125: ...Illustrated Parts Breakdown Section 7 47 AB38 Work Platform 7 2...
Page 127: ...Illustrated Parts Breakdown Section 7 49 AB38 Work Platform 7 2...
Page 131: ...Illustrated Parts Breakdown Section 7 53 AB38 Work Platform 7 2 NOTES...
Page 133: ...Technician s Print AB38 Work Platform Electrical Schematic...

