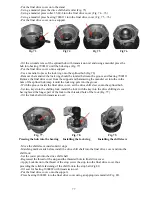
- insert a portion of the tire bead into the rim well and use the tire irons to slip the hole bead
inside, moving it towards the rim shoulder;
- insert the inner tube valve into the hole in the rim, insert the slide valve into the tube valve,
inflate the tube slightly and insert it into the tire casing, making sure that it is spread uniformly
without any wrinkles;
- fit on the second tire bead, beginning from the side opposite to the valve. Make sure that the
first tire bead is settled in the rim well properly. Usually about two thirds of the bead are fitted in
with hands, while the rest, with the help of tire irons.
When using irons, take care not to pinch and injure the inner tube; to facilitate mounting smear
the tire bead with liquid soap.
Having mounted the tire bead, make the valve sink into the tire casing, inflate the inner tube and
tap with a rubber hammer along the tire circumference until the tire is set uniformly in the rim
well.
Inflate the tube to the required pressure, turn on the valve and screw on the valve cap.
Tires pressure, Mpa :
Front wheel and side-car wheel .......
35psi
Rear wheel and spare wheel ....…...
40psi
Check the proper arrangement of the tire on the rim (the check strips should be equidistant from
the rim along the entire periphery of the tire).
Dismantling and Reassembling the Wheel Hub
(with the wheel removed)
The required tool is mandrel 345-324-3 for removing the roller bearing cup.
To dismantle the wheel hub:
- Loosen locknut, undo the seal nut and remove the left-hand distance bushing;
- Insert the mandrel or the wheel axle on the side of the hub splined portion and press the end
roller bearing, the intermediate bushing, the cone of the second roller bearing and the right-hand
distance bushing out of the wheel hub;
- Using mandrel 345-324-3 presses out the thrust washer and the roller bearing cup.
Wash and inspect the dismantled parts. Change all the defective parts. Reassemble the wheel hub
as follows:
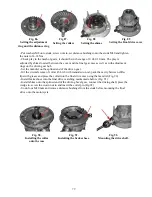
- Fit the thrust washer and the right-hand distance bushing into the hub inserting the shoulder of
the latter into the thrust washer groove;
- Press in the roller bearing, having packed it first with grease Litol-24 so that the wider side of
the cup faces the thrust washer, with the bearing pressing against the washer;
- Insert the intermediate bushing;
- Press in the second roller bearing (also packed with grease Litol-24 so that
the wider side of the
cup faces the oil seal nut (outside):
- Press the rubber collar into the oil seal nut arranging it so that the oil catching edge and the
spring are inside the nut;
- Insert the left-hand bushing into the seal nut from the side facing the bearing, turn in the nut to
the limit, thus tightening the bearings properly;
- Turn off the nut by 1/6 to 1/8 of a revolution and lock with a locknut. The tightening torque
should be 14
.
7
-
17
.
6 Nm.
After reassembling, check the bearings for proper tightening and adjust, if necessary. To perform
this check:
- Insert the rear wheel axle into the reassembled wheel hub, and tighten up all the cones and cups
on the axle with the help of the nut with a set of bushings;
- By turning and rocking the wheel
axle, make sure that it
Turns freely, with neither noticeable play nor squeaks in the bearings. Unscrew the locknut and
adjust it for proper tightening, if necessary.
Remember that overtightening of bearings or excessive play are harmful as they lead to
premature wear of bearings.
With a properly assembled hub, the left-hand distance bushing should protrude from the rubber
collar within 1
.
0
-
2
.
0 mm. If otherwise, change the faulty bushing.
82
Summary of Contents for 750cc Series
Page 1: ...Repair Manual 750cc All Models www imz ural com ...
Page 2: ......
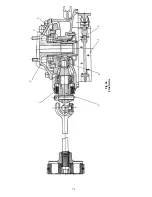
Page 71: ...1 2 3 4 5 6 7 8 Fig 66 Final drive 71 ...
Page 98: ...Fig 11 iring Diagram 9 W 98 ...


