background image

Attaching the Fan 

Blades

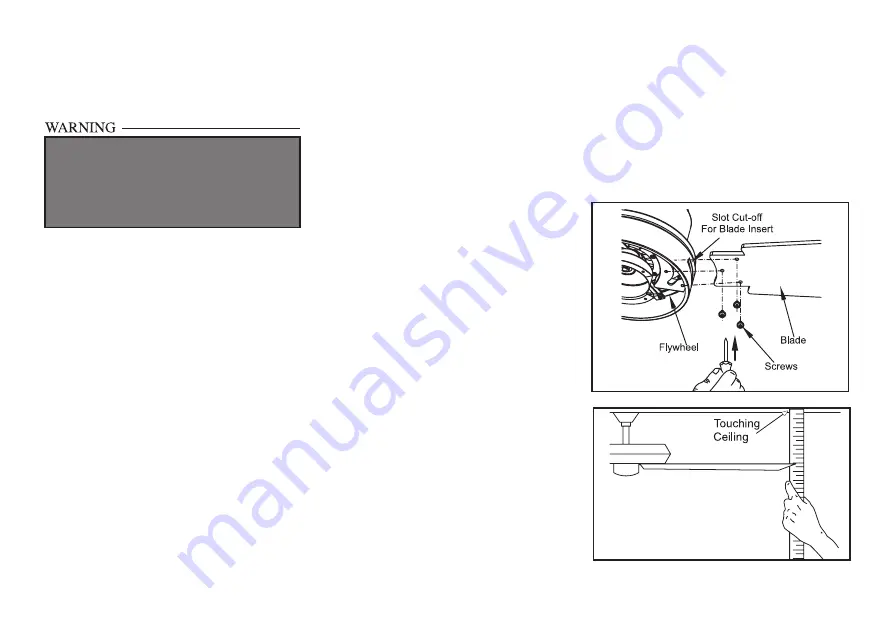
1.  Insert the blade through the slot cut-off in 

the center flywheel, align the three screw 

holes in the blade with the screw holes in 

the flywheel and secure with the screws 

provided. (Figure 11)

2.  Repeat for the remaining blades. 

Figure 11

Figure 12

Blade Balancing

All blades are grouped by weight. Because 

natural woods vary in density, the fan may 

wobble even though the blades are weight 

matched.
The following procedure should correct most 

fan wobble. Check after each step.
1.  Check that all blade screws are secure.
2.  Most fan wobble problems are caused 

when blade levels are unequal. Check this 

level by selecting a point on the ceiling 

above the tip of one of the blades. Measure 

from a point on the center of each blade 

to the point on the ceiling. Measure this 

distance as shown in Figure 12. Rotate 

the fan until the next blade is positioned 

for measurement. Repeat for each blade. 

Measurements deviation should be within 

1/8”. Run the fan for 10 minutes.

Finishing the Fan

Installation

STANDARD CEILING MOUNTING

1.  Align  the  locking  slots  of  the  ceiling 

canopy with the two screws in the mounting 

plate. Push up to engage the slots and turn 

clockwise  to  lock  in  place.  Immediately 

tighten the two mounting screws firmly.

2.  Install  the  remaining  two  mounting 

screws  into  the  holes  in  the  canopy  and 

tighten firmly.

3.  Install  the  decorative  canopy  ring  by 

aligning the ring’s slots with the screws 

in  the  canopy.  Rotate  the  ring  counter- 

clockwise to lock in place.

4.  You  may  now  proceed  to  attaching  the 

fan blades.

WHEN USING THE STANDARD BALL/DOWNROD 

MOUNTING, THE TAB IN THE RING AT THE 

BOTTOM OF THE MOUNTING PLATE MUST 

REST IN THE GROOVE OF THE HANGER BALL. 

FAILURE TO PROPERLY SEAT THE TAB IN THE 

GROOVE COULD CAUSE DAMAGE TO WIRING.

3.  Make sure that canopy is tightened securely 

to ceiling mounting bracket and that the 

ceiling mounting bracket is tightened 

securely to the electrical box.

4.  Interchanging two adjacent blades can 

redistribute the weight and possibly result 

in the smoother operation.

5.  Use the enclosed Blade Balancing Kit if the 

blade wobble is still noticeable.

7.

Summary of Contents for UHP9210

Page 1: ...UHP9210 UHP9211 UHP9212 ...

Page 2: ...Safety Rules Unpacking Your Fan Installing Your Fan Making the Electrical Connections Operating Your Fan Care of Your Fan Troubleshooting Specifications Table of Contents 1 2 3 6 9 10 10 11 ...

Page 3: ...electrical connections spliced conductors should be turned upward and pushed carefully up into electrical box The wires should be spread apart with the grounded conductor and the equipment grounding conductor on one side of the electrical box and ungrounded conductor on the other side of the electrical box 11 Electrical diagrams are for reference only Light kits that are not packed with the fan mu...

Page 4: ...tor Assembly 6 Blades 3 7 Light Kit Fitter Assembly 8 Glass Shade 9 Wall Control 1 Mounting Bracket inside canopy 2 4 5 Ball Downrod Assembly hanger pin and locking pin pre attached 3 Canopy with Canopy Ring attached 4 Decorative Motor Collar Cover 2 Unpacking Your Fan Unpack your fan and check the contents You should have the following items a b ...

Page 5: ...oxes Figures 1 2 and 3 are examples of different ways to mount the electrical box Note You may need a longer downrod to maintain proper blade clearance when installing on a steep sloped ceiling The maximum allowable angle is 30 To hang your fan where there is an existing fixture but no ceiling joist you may need an installation hanger bar as shown in Figure 4 TO REDUCE THE RISK OF FIRE ELECTRIC SH...

Page 6: ...sembly Figure 7 Remove Loosen but Do Not Remove Turn Canopy Ring to Remove Figure 5 Figure 6 5 Loosen but do not remove the set screws on the collar on the top of the motor housing 6 Align the holes at the bottom of the downrod with the holes in the collar on top of the motor housing Figure 7 Carefully insert the hanger pin through the holes in the collar and downrod Be careful not to jam the hang...

Page 7: ...d with the electrical box Note that the flat side of the mounting plate is toward the electrical box Figure 8 3 Tighten the two screws on the electrical box securely 4 Carefully lift the fan assembly up to the ceiling mounting plate Make sure the tab on the mounting plate is properly seated in the groove in the hanger ball Figure 9 Figure 8 Washers 120VWires ULListed Electrical Box Ceiling Mountin...

Page 8: ...ain fuse box or circuit breaker panel remove the existing wall plate and switch 2 Proceed to make the wire connector as follows make sure the fan and light slide switches of the wall control are set in OFF position Connect the solid Black wire from the wall control to the Black with from the fan Connect the Red or Blue wire from the wall control to the Blue wire from the fan Connect the Black with...

Page 9: ... Run the fan for 10 minutes Finishing the Fan Installation STANDARD CEILING MOUNTING 1 Align the locking slots of the ceiling canopy with the two screws in the mounting plate Push up to engage the slots and turn clockwise to lock in place Immediately tighten the two mounting screws firmly 2 Install the remaining two mounting screws into the holes in the canopy and tighten firmly 3 Install the deco...

Page 10: ...hree loosened screw heads fit into the keyhole slots Turn the light kit fitter assembly clockwise tightened the screws Re install the screw that was removed in step 1 and tighten firmly Figure 13 3 Place the glass bowl into the light kit fitter assembly aligning the three flat areas on the top of the glass bowl with the three raised dimples in the light kit pan Turn the glass bowl clockwise until ...

Page 11: ...located at the top of the motor housing refer to figure 7 on page 4 to opposite position and turn fan on again The fan blades will turn in the opposite direction and reverse airflow Figure 15 Figure 16 Warm weather Forward A downward air flow creates a cooling effect as shown in Figure 15 This allows you to set your air conditioner on a higher setting without affecting your comfort Cool weather Re...

Page 12: ...CTION MAKING ELECTRICAL CONNECTIONS Fan will not start Fan sounds noisy 1 Check main and branch circuit fuses or breakers 2 Check line wire connections to the fan and switch wire connections in the switch housing CAUTION Make sure main power is off 3 Check batteries in the transmitter Does the red LED light come on Are you standing close enough to the fan Normal range is 10 20 feet Are the dip swi...

Page 13: ...EED VOLTS FAN POWER CONSUMPTION WITHOUT LIGHTS WATTS AIRFLOW CFM AIRFLOW EFFICIENCY HIGHER IS BETTER CFM WATT NET WEIGHT GROSS WEIGHT CUBE FEET 52 Low 120 11 1425 130 18 08 Lbs 20 72 Lbs 1 7 Med 120 31 3132 101 High 120 64 4742 79 ...

Reviews: