background image

50-001-666 DOC.CLAVIER SAIL.KPAD HF FDI FR/GB/NL/DE.B 


Overview 

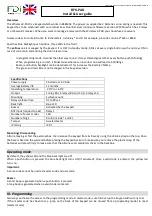
The Wireless K-PAD is a keypad which works in 868MHz. The power is supplied by 2 batteries so no wiring is needed. This 
keypad has to be combined with our product Easy Door Receiver (minimum firmware version FV1050) which has 2 relays 
or a IPassan RF receiver. When you want to manage 4 relays with the Wireless K-PAD you should use 2 receivers.  
 
Access codes can contain from 3 to 8 characters, including * and #. For example, pin codes can be 2*635 or #658. 
 
Kpad has blue backlight push buttons, three LEDs in the front. 
The 

yellow

 one is managed by the keypad. It is OFF in standby mode, blinks at every single button push and stays ON in 

case of correct pin code during the door release time. 
 

-


In programming mode, it works the other way round : it stays ON and goes OFF at every button push (blinking). 

When programming is correct, it blinks twice whereas an incorrect one will lead to 4 blinkings. 

-


Buzzer and button backlight can be deactivated. This increases the battery lifetime. 

-


The green and red LED are not managed in this keypad version. 


Specifications 


Power supply 

2 batteries 1.5V AAA 

Average battery life 

12 months 

Operating temperature 

-20°C to + 60°C 

Output 

1 relay 8A / 2 relays (8A and 1 A) / 4 relays 1A 

Mounting 

Surface mount 

Relays release time 

01 to 99 sec 

Back light 

Blue LED 

Buzzer 

Activated by the keypad 

RTE input (request to exit) 

Relay 1 

Number of access codes 

100 

Number of digit 

3 to 8 (include * and #) 

Tamper 

Accelerometer 

IP rating 

IP 65 


Mounting/ Dismounting

After removing at first the external box, then remove the keypad from its base by using the silicone strap on the top. Once 
the base is fixed on the wall and before placing the keypad back on it, make sure you remove the plastic strap of the 
batteries and press firmly to make sure that the silicone seal completely sticks to the back box. 


Operating mode 

By default, the yellow LED and the blue back light are off. 
When  a  push  button  is  pressed, the  blue  back  light turns  ON  (if activated).  Once  a valid  code  is  entered,  the yellow  led 
turns on. 

Important

A same code cannot be used as master code and user code. 
 

Buzzer

A short beep is generated when a push button is pressed. 
A long beep is generated when a valid code is entered. 
 

III- Programming 

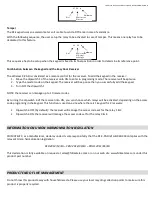
Two ways authorise the access to the programming mode. A master code is useful to setup the keypad without any tool. 
If  the  master  code  has  been  lost,  a  jump  on  the  back  of  the  keypad  can  be  moved  from  op  (operating  mode)  to  mast 
(master mode). 

RF K-PAD 

Install & User guide 

Summary of Contents for FDI K-PAD

Page 1: ... Lorsque l on saisit un code d accès valide sur le clavier c est cet identifiant unique qui est envoyé au récepteur Ainsi ce code doit être ajouté dans le récepteur par la méthode habituelle voir ci après Par contre cette méthode permet de ne pas avoir de nouvelle programmation à faire dans le récepteur quand on ajoute ou modifie un code d accès sur le clavier A noter plusieurs claviers peuvent êt...

Page 2: ...re Description 00 Code maître 3 à 8 termes 35 Suppression de tous les codes d accès 36 Activation désactivation buzzer 37 Activation désactivation retro éclairage 38 Activation désactivation fonction sabotage 101 to 200 Codes d accès 3 à 8 termes Séquence de programmation Modification du code maître Il n existe qu un code maître par clavier Par défaut celui ci est 0000 Il ne peut pas être supprimé...

Page 3: ...quence tous les codes d accès sont supprimés Le code maître ainsi que les temporisations de relais sont conservés Modification temporisation de relais Les temporisations de relais se programment sur le récepteur Activation du rétro éclairage Afin de prolonger la durée de vie des piles il est prévu une séquence de programmation activant désactivant le rétro éclairage des touches Activation du buzze...

Page 4: ...entrales se trouvent les relais 1 et 2 ainsi que les relais 3 et 4 en fonction des codes programmés dans le clavier Si dipswitch 6 sur OFF la centrale gère les codes pour les relais 1 et 2 Si dipswitch sur ON la centrale gère les codes pour les relais 3 et 4 Cette fonction est utile lorsqu un site se compose de 1 clavier pour 2 récepteurs DECLARATION DE CONFORMITE CE La société FDI Matelec fabrica...

Page 5: ...12 months Operating temperature 20 C to 60 C Output 1 relay 8A 2 relays 8A and 1 A 4 relays 1A Mounting Surface mount Relays release time 01 to 99 sec Back light Blue LED Buzzer Activated by the keypad RTE input request to exit Relay 1 Number of access codes 100 Number of digit 3 to 8 include and Tamper Accelerometer IP rating IP 65 Mounting Dismounting After removing at first the external box the...

Page 6: ...e master code There is only one master code per keypad By default it s setup to 0000 There isn t any possibility to remove it only to change it by setting up a new one The first two characters indicate the slot 00 means master code The third digit could be 0 the code is permanent 1 2 not managed The fourth digit sets up the number of characters The next characters are the master code is needed to ...

Page 7: ...y release time are not modified Relay release time Set in the receiver Back light To increase the life time of the batteries it is possible to unactivate the back light The following programming sequence could be entered to turn on off the back light Buzzer On off It is possible to turn off the buzzer so the life time of the batteries is increased The following programming sequence has to be enter...

Page 8: ...turning the dipswitch 6 of the receiver into ON you can choose which relays will be activated depending on the access code programing in the keypad This function is used on a site where there is 1 keypad for 2 receivers Dipswitch 6 OFF by default the receiver will manage the access code set for the relay 1 2 Dipswitch 6 ON the receiver will manage the access code set for the relay 3 4 INFORMATION ...

Page 9: ...dauer möglich ist Die grünen und roten LEDs haben in dieser Version keine Funktion Funktionsweise Das Funk Codeschloss erhält bei der Produktion eine einzigartige Seriennummer Nach der Eingabe eines gültigen Zugangscodes wird die Seriennummer an den Empfänger gesendet Dieser Code muss dann über die übliche Methode im Empfänger gespeichert werden siehe unten wohingegen es nicht erforderlich ist den...

Page 10: ...beendet Summer Zwei kurze Signaltöne ertönen zu Beginn des Programmiermodus Ein kurzer Signalton ertönt bei jedem Tastendruck Zwei kurze Signaltöne zeigen eine richtige Programmierungssequenz an Vier kurze Signaltöne zeigen einen Fehler in der Programmierungssequenz an Speicherorganisation Speicher Bezeichnung 00 Mastercode 3 bis 8 Ziffern 35 Löschen eines Zugangscodes 36 Summer An Aus 37 Tastenbe...

Page 11: ...en eines Türöffnercodes Lediglich der Code in dieser Speicherzelle wird gelöscht Wenn der Türöffnercode in verschiedenen Speicherzellen gespeichert ist muss jede einzeln gelöscht werden Löschen aller Türöffnercodes löschen Mit dieser Sequenz werden alle gespeicherten Türöffnercodes gelöscht Der Mastercode und die eingestellte Dauer der Türöffnung werden beibehalten Änderung der Dauer der Türöffnun...

Page 12: ...eis Ein Funkempfänger verwaltet maximal 10 Mastercodeschlösser oder Masterfunkfernbedienungen Wenn der DIP Schalter 6 des Easy Door Empfängers benutzt wird besteht die Möglichkeit auszuwählen welcher Empfänger als Relais 1 und 2 und welcher Empfänger als Relais 3 und 4 berücksichtigt werden soll Wenn Dip Schalter 6 auf OFF steht verwaltet der Easy Door Empfänger die Codes für Relais 1 und 2 Wenn D...

Page 13: ...avier is het deze identificatie code dat verstuurd wordt naar de ontvanger Deze identificatiecode moet dus worden toegevoegd in de ontvanger bij de in dienst stelling zie verder Deze methode laat toe geen nieuwe programmatie van de ontvanger te moeten doen bij elke nieuw te programmeren toegangscode Noteer dat meerdere klavieren geassocieerd kunnen worden aan een zelfde ontvanger en één klavier ka...

Page 14: ...astercode 3 tot 8 digits 35 Verwijderen van een toegangscode 36 Activering uitschakelen buzzer 37 Activativering uitschakelen retro verlichting 38 Activativering uitschakelen functie sabotage 101 tot 200 Toegangscodes 3 tot 8 digits Programmatie series Wijzigen van de mastercode Er bestaat slechts één mastercode per clavier Standaard is dit 0000 Deze kan niet verwijderd worden alleen gewijzigd wor...

Page 15: ...an de temporisatie van de relais De temporisatie van de relais is instelbaar op de ontvanger Achtergrond verlichting Om de levensduur van de batterijen te verlengen is het mogelijk de achtergrond verlichting uit te schakelen De volgende sequentie dient worden ingebracht om de achtergrond verlichting aan of uit te zetten Buzzer On off Het is mogelijk de buzzer uit te schakelen zodat de levensduur v...

Page 16: ... Tevens kan men bij gebruik van de dipswitch 6 op de Easy Door Receiver kiezen op welke centrale relais 1 en 2 en relais 3 en 4 zich bevinden in functie van de geprogrammeerde toegangscodes Indien dipswitch 6 op OFF staat beheerd de centrale de codes voor relais 1 en 2 Indien dipswitch 6 op ON staat beheerd de centrale de codes voor relais 3 en 4 Deze functie is nuttig wanneer de installatie besta...

Reviews: