


9
E N G L I S H •
User’s manual
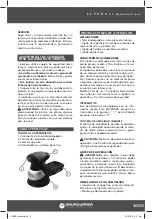
GENERAL FEATURES
This sander is suitable for sanding with coarse,
medium and fine grit sandpaper. It will pro-
duce a fine scratch-free finish when used to
sand on wood surfaces.
This sander has a comfortable palm grip han-
dle that provides maximum one-hand comfort
that reduces operator fatigue during continu-
ous sanding operations.
This orbital sander has a built-in dust collection
that collects dust through punched holes in the
sandpaper and cushion.
NOTE: Before attempting to use the sander,
familiarize yourself with all operating features
and safety requirements.
SWITCH
This tool is equipped with a simple switch con-
trol. To turn the sander ON press the switch to
the “ | “ position. To turn it OFF press switch to
the “ O “ position.
VARIABLE SPEED CONTROL
The variable speed control allows the operator
to adjust speed to meet variety sanding mate-
rial from tough heavy grained timber to deli-
cate veneer.
WARNING: Do not allow familiarity with the
sander to make you careless, always remember
that a careless fraction of a second suffice to
inflict sever injury.
BEFORE OPERATION
WARNING: This sander should never be connect-
ed to power supply when assembling parts,
making adjustments, assembling or replacing
sandpaper, cleaning or when not in use. Dis-
connecting the sander will prevent accidental
starting that could cause serious personal in-
jury.
INSTALLING HOOK & LOOP SANDPAPER
• Inspect sandpaper before installing. DO NOT
use broken or defective sandpaper.
• Unplug the sander.
WARNING: Failure to follow this instruction
could result in accidental starting, causing pos-
sible serious personal injury.
• Holes in sandpaper must line up with holes in
backing pad in order for the dust collection fea-
ture of the sander to function properly.
NOTE: DO NOT use sander without sandpaper.
Doing so will damage the cushion.
DURING OPERATION
WARNINGS
• Be careful not to let your hand completely
cover air vents.
• Secure workpiece. Unsecured work could be
thrown towards operator during sanding caus-
ing injury.
SANDING
Hold the sander in front and away from you,
keeping it clear of the workpiece. Start the
sander and let the motor reach its maximum
speed. Gradually lower the sander on the
workpiece with a slight forward movement.
Move it slowly using forward and backward
strokes.
CAUTION: DO NOT start sander while in
touch with the workpiece. This could make you
lose control of the tool, cause damage to the
operator or the sander itself.
DON’T FORCE!
The weight of the unit supplies adequate pres-
sure, so let the sandpaper and sander do the
work. Applying additional pressure only slows
the motor, rapidly wears sandpaper and great-
ly reduces sander speed.
Excessive pressure will overload the motor
causing possible damage from motor over-
heating and can result in inferior work.
NOTE: Any finish or resin on wood may stolen
from the frictional heat. Do not allow sanding
on one spot too long as the sander’s rapid ac-
tion may remove too much material, making
the surface uneven.
WARNING: Do not wear loose clothing or
jewelry when operating sander. They could
get caught in moving parts causing serious in-
jury. Keep head away from sander and sanding
area. Hair could be drawn into sander causing
serious injury.
CAUTION: Do not touch workpiece right
after sanding operation it will be hot and may
cause burning.
RANDOM ORBITAL MOVEMENT
Orbital movement is ideal for fast cutting ac-
tion when removing old finishes, smoothing
rough wood, cutting stock down to required
dimensions, or for finishing surfaces to be
painted. The sandpaper moves in tiny circles at
a very high speed, allowing the sandpaper to
move easily.
LR905 manual.indd 9
25/02/16 3:07 p.m.


