background image

GENERAL SAFETY RULES

This PRODUCT has features that will make your 
job faster and easier. Safety, comfort and reli-
ability were provided as a priority for its design, 
making its operation easier.

 WARNING: read all safety warnings and all 

instructions. Failure to follow any of the warn-
ings and instructions listed below could result in 
electric shock, fire, and / or serious injury. SAVE 
ALL WARNINGS AND ALL INSTRUCTIONS.
NOTE:  
The term “tool” in the warnings refers 
to the power tool that connects to the power 
source (corded) or the battery-operated tool 
(cordless).

Failure to operate the electric hoist safely can 
lead to dangerous situations.
Potential hazards which, if not avoided, could 
cause serious personal injury or even death.
To avoid such situations, the operator must re-
spect the following recommendations:

-DO NOT put the hoist into operation until you 
have carefully read and understood this Owner’s 
Manual
Operations and maintenance .
-DO NOT use the hoist to lift or transport peo-
ple.
-DO NOT use the hoist, exceeding the rated load 
capacity specified on it.
-DO NOT use the hoist if the load chain is worn, 
damaged, twisted or bent.
-DO NOT lift loads over people.
-DO NOT operate the hoist until the cargo trans-
port area is completely clear.
-DO NOT operate hoist until load is centered on 
hoist.
Protect the hoist load chain from weld spatter 
or other contaminants that could damage it.
-DO NOT use the chain as a sling, or surround 
the load with it to transport it.
-DO NOT place any type of load on the tip of the 
hook or on its fixing device.
-DO NOT leave the hoist loaded without taking 
the necessary safety precautions.
-DO NOT use the load chain or hook for ground-
ing when doing welding work.
-DO NOT remove or conceal the warning sym-
bols and recommendations from the hoist.
-DO NOT operate a hoist without warning labels 
or stickers, or if they are illegible.
-DO NOT operate the hoist until it is properly 
secured to a support.

-DO NOT operate the hoist until the load slings 
or other authorized load devices are not proper-
ly adjusted and seated in the throat of the hook.
Raise the load carefully and make sure it is level 
and properly held before continuing with the 
process.
Disconnect the hoist that is malfunctioning and 
report the problem.
Make sure that the hoist stop system devices 
work properly, in both directions.
Warn personnel when cargo is approaching 
their location.
Make sure that the hook fasteners are closed 
and do not support the weight of the load in 
any way.
Make sure the load can move freely and remove 
any obstacles that may interfere with the path 
of the load it self.
Avoid swaying the load when moving.
Inspect the hoist regularly and keep proper 
maintenance records.
-DO NOT be distracted when the hoist is oper-
ating.

GENERAL SPECIFICATIONS

Electric hoist with translation - thrust line

CAPACITY

VEL. 
LIFTING
mts/ min

BRANCHES

MOTOR

WEIGHT

1/2 T

5,6

1-6 mm

3/4 HP
1000 rpm

35,5

1 T

2,64

2-6mm

38

2 T

3

2-8 mm

1/2 HP 
1400 rpm

75

3 T

3

2-8 mm

77

5 TON.

1,25

2-10 mm

2 HP
1400 rpm

135

10

Summary of Contents for POEL01

Page 1: ...MANUAL AND WARRANTY POLIPASTOEL CTRICO ELECTRICCHAINHOIST ATENCI N lea entienda y siga las instrucciones de seguridad contenidas en este manual antes de operar esta herramienta WARNING read understand...

Page 2: ...A O L CONTENIDO CONTENT S MBOLOS SYMBOLS PELIGRO ADVERTENCIA PRECAUCI N Indica un riesgo personal o la posibilidad de un da o Herramientas tipo II doble aislamiento protege las herramientas el ctrica...

Page 3: ...a del polipasto de sal picaduras de soldaduras u otros contaminantes que puedan da arla NO utilice la cadena como si fuera una eslinga ni rodee con la misma la carga para transpor tarla NO coloque nin...

Page 4: ...o con traslaci n linea el ctrica CAPACIDAD VEL IZAJE mts min RAMALES MOTOR PESO 1 2 T 5 6 1 6 mm 0 30 HP 750 rpm 35 5 1 T 2 64 2 6mm 38 2 T 3 2 8 mm 75 3 T 3 2 8 mm 77 5 T 1 25 2 10 mm 0 5 HP 750 rpm...

Page 5: ...1 Insertar subconjunto A TRIPLE REDUCCI N 1 Insertar subconjunto A 2 Insertar subconjunto SUBCOJUNTO A SUBCOJUNTO B SUBCOJUNTO A SUBCOJUNTO B DOBLE REDUCCI N 5 E S P A O L Manual de usuario...

Page 6: ...O DEL GANCHO Realice una inspecci n en el gancho semanal mente Reemplace en cualquiera de los siguientes ca sos 1 Deformaci n de la garganta superior a un 15 2 Que se encuentre doblado o torcido m s d...

Page 7: ...lo en el extremo suelto deje que la cadena cuelgue verticalmente con una carga li gera unos 10 kg para que quede tirante Mida la longitud exterior de un n mero conveniente de eslabones unos 30 cm Haga...

Page 8: ...gol pe seco ocasionado por el freno cuando se libera y cuando se bloquea En caso de que debiera re gularse la tensi n del resorte porque el freno no trabaja deber procederse como sigue Retirar el cap...

Page 9: ...e comando defectuoso 4 Terminales flojos en la botonera de comando bornera de paso o terminales del contactor 5 Cable botonera de comando cortado Soluci n 1 Reemplace por otro de iguales caracter stic...

Page 10: ...in as a sling or surround the load with it to transport it DO NOT place any type of load on the tip of the hook or on its fixing device DO NOT leave the hoist loaded without taking the necessary safet...

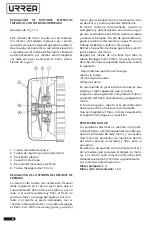
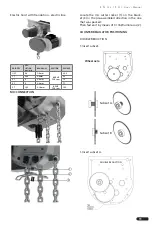
Page 11: ...10 mm 0 5 HP 750 rpm 135 MIC CONNECTION Locate the mic cutter rocker 1 on the brack et 3 in the pre assembled direction in the one that was packed Then fasten it by means of 3 16W umbracos 2 COUNTER R...

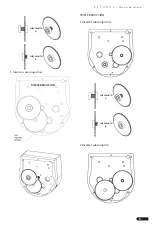
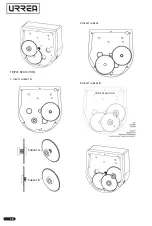
Page 12: ...TRIPLE REDUCTION 1 Insert subset A 2 Insert subset 3 Insert subset B SUBCOJUNTO A SUBCOJUNTO B Subset A Subset B TRIPLE REDUCTION 12...

Page 13: ...hen working with the hoist That way it will be fulfilling the function of keeping the device in place without danger of it coming off the hook 4 The chain fastening bolt must be made of grade 8 steel...

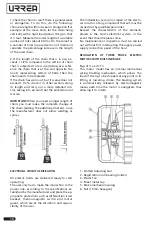
Page 14: ...ICAL CIRCUIT VERIFICATION All electric hoists are delivered ready to start operating The user only has to make the connection to the power line according to the specifications es tablished by the manu...

Page 15: ...ing to the consumption of the motor and in the way that the motors are to be protected The correct thing would be to place individual protections to each motor ther mal or motor guard The approximate...

Page 16: ...d 2 Incorrect positioning of the support or sling on the hook Solution 1 See hook status verification 2 Place the support or sling for movement of loads in the throat of the hook so that the latch can...

Page 17: ...Notas Notes 17 Manual de usuario User s manual...

Page 18: ...rized or unqualified person URREA HERRAMIENTAS PROFESIONALES S A DE C V garantiza este producto por el termino de 1 a o en sus piezas componentes y mano de obra contra cualquier defecto de fabricaci n...

Reviews: