6
fluid volume to decrease and increases turn-
ing counterclockwise.
USE
1. Start with the spray gun while maintaining
the right angle.
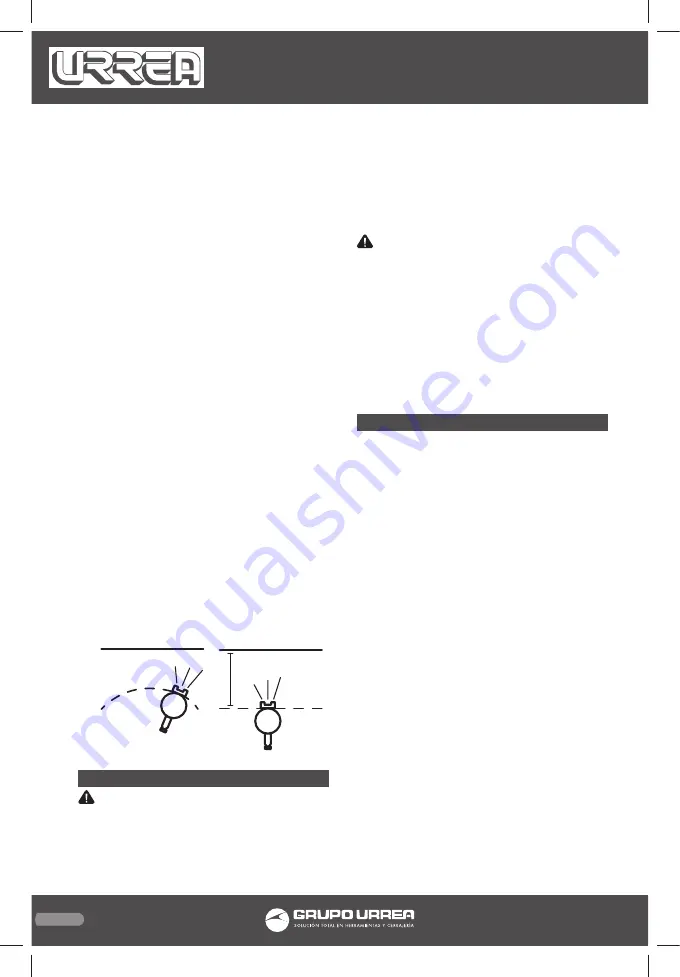
2. Keep a distance of 15-30 cm from the work
surface. Put the gun perpendicular to the area
to be sprayed and move in parallel direction
repeatedly. Note that stopping this move-
ment in the middle of the process causes a
buildup of paint, do not move from side to
side while painting the gun cause a build up
of paint in the center and an insufficient coat-
ing on the ends.
3. Start gun movement and then pull the trig-
ger. When you finish then release the trigger
and stop the movement of the gun. Thus com-
bining each stroke to the next without show-
ing irregularities.
4. The amount of paint to be applied may vary
depending on the speed of the route, the dis-
tance to the surface and the adjustment of
the fluid regulator.
5. Strokes overlap enough to obtain a uniform
layer.
NOTE: With two thin layers of paint and the
better the results will be less likely to run off
the paint against a single thick layer.
6. Use pieces of cardboard or other material
to protect the remaining surfaces of excess
paint during spraying.
MAINTENANCE
CAUTION: A LOW OR INCOMPLETE CLEAN-
ING CAN CAUSE FAULTS IN THE DISTRIBUTION
OF THE FAN.
1. Remove any remaining paint into another
container emptying the cup.
2. Disassemble the gun, making sure to remove
the needle (for the back of the gun) before re-
moving the nozzle to prevent damage to the
nozzle closure.
3. Clean all ducts which passes the painting.
Use the brush dipped in solvent to clean all
components of the gun.
WARNING: Never use metal or similar el-
ements that could damage the holes in the
nozzle and the container. Never completely
immerse the gun in solvent. Never use compo-
nents or parts that are not original.
STORAGE
1. When not using the gun turn left fluid regu-
lator to open, this will reduce the spring ten-
sion on the tip of the needle.
2. The gun must be clean and slightly oiled.
TROUBLESHOOTING
WRONG SPRAYING
Little fluid. Add more fluid.
Over tilting. Keep it upright.
Loss of fluid in connections. Tighten connec-
tions.
Lack of lubrication at nut and needle. Lubri-
cate.
Air outlet obstructed. Clean air outlet.
LOSS OF FLUID THROUGH DEPOSIT NUT
The cup connection is loose. Tighten.
The cup is damaged by the use or dry (lack of
lubrication). Replace the cup or lubricate with-
out using silicone oil.
THE FAN IS ARCHED
The nozzle is damaged or loose. Tighten or re-
place the nozzle.
Buildup of material on the air outlet. Remove
obstruction without using metal objects to
clean.
THE CENTER OF THE FAN IN TOO NARROW
Too little material or diluted. Regulate fluid
dissolution.
Air pressure is too high. Lower air pressure.
THE FAN IS TOO WIDE
Material too thick. Regulate fluid dissolution.
Air pressure too low. Raise the air pressure.
WRONG
At this
point the
coating
will be
scarce.
At this point the
coating will be
plentiful.
CORRECT
15 to 30 cm
The coating
is uniform.
PPG10-PPG17 manual.indd 6
17/11/15 5:32 p.m.


