background image

-

14

-

•  Failure to clean and maintain this unit as indicated can result in poor performance, safety hazards, fire, and 

even death.

•  Unplug your stove’s electrical cord prior to removing the back panel or opening the exhaust system for any 

inspection, cleaning, or maintenance work.

• 

Never perform any inspections, cleaning, or maintenance on a hot stove.

•  Do not operate stove with broken glass, leakage of flue gas may result.

EXHAUST SYSTEM

Creosote Formation – When any wood is burned slowly, it produces tar and other organic vapors, which combine 

with expelled moisture to form creosote. The creosote vapors condense in the relatively cool chimney flue or a 

newly started fire or from a slow-burning fire. As a result, creosote residue accumulates on the flue lining. When 

ignited, this creosote makes an extremely hot fire, which may damage the chimney or even destroy the house. 

Despite their high efficiency, pellet stoves can accumulate creosote under certain conditions.

Fly Ash – This accumulates in the horizontal portion of an exhaust run. Though non-combustible, it may impede 

the normal exhaust flow. It should therefore be periodically removed.

Inspection and Removal – The chimney connector and chimney should be inspected by a qualified person 

annually or per ton of pellets to determine if a creosote or fly ash build-up has occurred. If creosote has accumulated, 

it should be removed to reduce the risk of a chimney fire. Inspect the system at the stove connection and at the 

chimney top. Cooler surfaces tend to build creosote deposits quicker, so it is important to check the chimney 

from the top as well as from the bottom. The creosote should be removed with a brush specifically designed for 

the type of chimney in use. A qualified chimney sweep can perform this service. It is also recommended that 

before each heating season the entire system be professionally inspected, cleaned and, if necessary, repaired. 

To clean the chimney, disconnect the vent from the stove.

Operation  / Maintenance

SHUTDOWN PROCEDURE

Turning your stove off is a matter of pressing the “POWER” button on the display board. The green light will turn 

back to red when the “POWER” button is pushed. The auger motor will stop, and the blowers will continue to 

operate until the internal firebox temperatures have fallen to a preset level.

1. 

Your stove is equipped with a high temperature thermodisc. This unit has a manual reset thermodisc.  This 

safety switch has two functions.

A.  To recognize an overheat situation in the stove and shut down the fuel feed or auger system.

B. 

In case of a malfunctioning convection blower, the high-temperature thermodisc will automatically shut 

down the auger, preventing the stove from overheating.

NOTE: On some units, once tripped, like a circuit breaker, the reset button will have to be pushed before restarting 

your stove. On other units the thermodisc has no reset button and will reset itself once the stove has cooled. The 

manufacturer recommends that you call your dealer if this occurs as this may indicate a more serious problem. 

A service call may be required.

2.  If the combustion blower fails, an air pressure switch will automatically shut down the auger.

NOTE: Opening the stove door for more than 30 seconds during operation will cause enough pressure change to 

activate the air switch, shutting the fuel feed off.  The stove will shut down and show “E2” on the two digit display. 

The stove has to fully shut down before restarting.

WARNING: Never shut down this unit by unplugging it from the power source.

Summary of Contents for Ashley AP5780

Page 1: ...this appliance Failure to follow these instructions could result in property damage bodily injury or even death Contact your local building or fire officials about obtaining permits restrictions and i...

Page 2: ...repair or replace any part of the stove unless instructions for doing so are given in this manual All other work should be done by a trained technician Do not operate your stove with the viewing door...

Page 3: ...use volatile fuels or combustibles doing so may cause a personal and property damage hazards SAFETY AND EPA COMPLIANCE Your pellet stove has been approved for installation in the USA and Canada It may...

Page 4: ...ly harm heater damage and void your warranty IMPROPER INSTALLATION The manufacturer will not be held responsible for damage caused by the malfunction of a stove due to improper venting or installation...

Page 5: ...er and 2 beyond each side of the cleanout tee if an interior vertical instillation Canada Floor protector should comply with CAN ULC standards Needs to extend 18 to the front 8 beyond each side of the...

Page 6: ...st be sealed using Hi Temp RTV Use 4 inch vent if the vent height is over 12 feet or if the installation is over 2 500 feet above sea level We recommend the use of Simpson Dura Vent or Metal Fab pipe...

Page 7: ...when adjacent to public walkways E Minimum 2 foot 0 61m clearance above any grass plants or other combustible materials F Minimum 3 foot 0 91m clearance from an forced air intake of any appliance G Mi...

Page 8: ...ire harnesses as shown Step 2 Unpack the top mount controls and ensure that the wiring harness shown is attached securely Step 3 Connect the factory installed wiring harnesses to the control panel as...

Page 9: ...used if your heater is below ground level by simply adding the clean out section and vertical pipe inside until ground level is reached With this installation you have to be aware of the snowdrift lin...

Page 10: ...to your stoves inlet exhaust pipes are approximate and may vary depending on your installation TYPICAL FRESH AIR TERMINATION EXHAUST INLET LOCATIONS OUTSIDE AIR SUPPLY OPTIONAL UNLESS INSTALLING IN A...

Page 11: ...n changes the two digit display from degrees Celsius to degrees Fahrenheit D MODE M T BUTTON The Mode of the stove can be switched between manual and controlled with a Thermostat Separate LEDs to the...

Page 12: ...onal fuel introduced by hand will not increase heat output but may seriously impair the stoves performance by generating considerable smoke Do not burn wet pellets The stove s performance depends heav...

Page 13: ...set more towards the right Through trial and error you will find the best setting Consult your dealer if you need help NOTE On heat range 1 damper should be either completely closed or open no more th...

Page 14: ...sh specifically designed for the type of chimney in use A qualified chimney sweep can perform this service It is also recommended that before each heating season the entire system be professionally in...

Page 15: ...ns CO is a poisonous gas when exposed to elevated concentrations for extended periods of time While the modern combustion systems in heaters drastically reduce the amount of CO emitted out the chimney...

Page 16: ...and the auger feed system Scoop out the pellets and then run the auger until the hopper is empty and pellets stop flowing this can be done by pressing the ON button with the viewing door open Vacuum o...

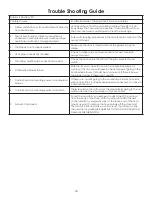
Page 17: ...o operate this wood heater in a manner inconsistent with operating instructions in this manual Trouble Shooting Guide Display is Flashing E1 Possible Causes Possible Remedies Unplug stove first when p...

Page 18: ...h the gray wires to the air switch 6 Combustion blower failure With the stove on check to see if the combustion blower is running If it is not you will need to check for power going to the combustion...

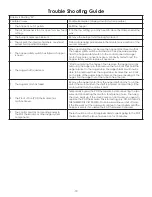
Page 19: ...n then remove the two bolts that hold the auger bracket to the auger tube The auger bracket will now be able to be removed form the auger tube Remove the two bolts on the side of the auger tube to rem...

Page 20: ...tor for secure connections Use a continuity tester to test the hopper safety switch replace if necessary 6 The auger shaft is jammed Start by emptying the hopper Then remove the auger motor by removin...

Page 21: ...ell Coming Back Into The Home Possible Causes Possible Remedies Unplug stove first when possible 1 There is a leak in the vent pipe system Inspect all vent pipe connections Make sure they are sealed w...

Page 22: ...ose wire or connector Check all wires and connectors that connector to the auger motor high limit switch and the Molex connector 5 Bad control board If the fuse is good the wires and connectors check...

Page 23: ...Remove the burnpot and thoroughly clean it 5 Air damper is broken Visually inspect the damper assembly Make sure the damper plate is attached to the damper rod When the damper rod is moved the plate s...

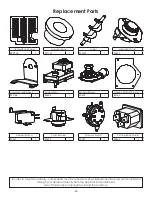
Page 24: ...e appliance manufacturer Use of third party components will void the warranty Auger Bushing 891132 1 Auger Motor 80488 1 T disc Exhaust 80599 1 High Limit T disc 80455 1 Gasket Exhaust Blower 88166 1...

Page 25: ...from the appliance manufacturer Use of third party components will void the warranty PCBA 80631 1 PCBA Controller 80630 1 Front Louver 892774 1 Ash Cover Gaskets 88266 2 Hopper Handle 891148 1 Front...

Page 26: ...using original manufacturers parts purchased through your dealer or directly from the appliance manufacturer Use of third party components will void the warranty Power Cord 80461 1 Ignitor 80607 1 Ig...

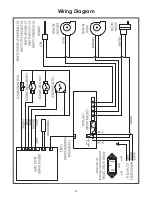
Page 27: ...27 Wiring Diagram 1 25A 250V FUSE 7 5A 250V FUSE...

Page 28: ...Notes...

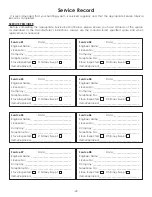
Page 29: ...07 Date _____________________ Engineer Name ________________________________ License No ____________________________________ Company _____________________________________ Telephone No _______________...

Page 30: ...h of this written warranty or any implied warranty 2 Should the heater be replaced by United States Stove Company free of charge all further warranty obligations are thereby met 3 Parts and or service...

Page 31: ...UN ENDROIT SUR POUR VOUS Y REFERER LORSQUE VOUS NOUS CRIVEZ VEUILLEZ INDIQUER LE NUM RO COMPLET DU MOD LE AFFICH SUR LA PLAQUE SIGNAL TIQUE DE L APPAREIL DE CHAUFFAGE LORSQUE VOUS COMMANDEZ DES PIECES...

Page 32: ...onsable des dommages accidentels indirects sp ciaux ou dommages ventuels que quiconque pourrait subir la suite d une violation de cette garantie crite ou de toute garantie implicite 2 Si l appareil de...

Page 33: ...____________________________ Service de 07 Date _____________________ Nom de l ing nieur ____________________________ N de licence _________________________________ Compagnie _________________________...

Page 34: ...27 1 25A 250V Fusible 7 5A 250V Fusible Sch ma De C blage...

Page 35: ...de composants tiers annulera la garantie Joint de porte 88082 45 Porte 892777 1 Poign e de porte 892663 1 Joint en verre 88267 41 Verre de porte 892775 1 Cordon d alimentation 80461 1 Allumeur 80607...

Page 36: ...appareil L utilisation de composants tiers annulera la garantie PCBA 80631 1 Contr leur PCBA 80630 1 Joints de cendres 88266 2 Poign e de tr mie 891148 1 Echappement du disque T 80599 1 Joint d tanch...

Page 37: ...bricant de l appareil L utilisation de composants tiers annulera la garantie Bague de vis sans fin 891132 1 Moteur Auger 80488 1 pingle cheveux 83529 1 Prise 3 broches 80462 1 Panneau arri re ventil 8...

Page 38: ...s utilis s est peut tre de mauvaise qualit Si possible essayez une autre marque de granul s Essayez aussi une marque compos e d un autre type de bois r sineux plut t que feuillus Des bois diff rents...

Page 39: ...la tari re et essayez de le faire fonctionner Si le moteur tourne c est l arbre qui est coinc sur quelque chose Si le moteur ne tourne pas il est d fectueux 3 Tari re bloqu e Commencez par vider la tr...

Page 40: ...ommande n envoie pas de courant l allumeur V rifiez la tension qui arrive l allumeur lors du d marrage Ce doit tre la tension nominale Si la tension est inf rieure la valeur nominale v rifiez le c bla...

Page 41: ...n testeur de continuit pour tester l interrupteur de s curit de la tr mie remplacer le si n cessaire 6 L arbre de la tari re est coinc Commencez par vider la tr mie Puis retirez le moteur de la tari r...

Page 42: ...ite le moteur de la tari re en retirant la goupille de la tari re puis retirez les deux boulons qui fixent le support de tari re au tube de tari re Vous pouvez maintenant retirer le support du tube de...

Page 43: ...tilateur de combustion Lorsque le po le est en marche v rifiez si le ventilateur de combustion est en fonctionnement Sinon v rifiez l alimentation lectrique du ventilateur de combustion Ce doit tre la...

Page 44: ...auffe et d clenche l arr t de temp rature interne Enlevez la poussi re des bobinages et pales de ventilateur Si le graissage du ventilateur ne suffit pas il se peut que le ventilateur soit d fectueux...

Page 45: ...s votre revendeur agr pour vous procurer ce verre R installez la nouvelle vitre en la refixant avec les taquets de support et les vis sans trop serrer les vis pour ne pas endommager le verre Ne malmen...

Page 46: ...n cessaire de retirer la porte pour faire remplacer les joints us s d chir s ou compact s par votre revendeur agr MOTEURS DES VENTILATEURS Nettoyez tous les ans les orifices d a ration des moteurs de...

Page 47: ...osote Lorsque le bois br le lentement il produit du goudron et d autres vapeurs organiques qui se combinent avec l humidit rejet e pour former la cr osote Les vapeurs de cr osote se condensent dans u...

Page 48: ...registre doit tre r gl vers la gauche dans le sens de fermeture Pour une vitesse d alimentation lev e le registre doit tre plus ouvert en le r glant vers la droite Vous trouverez le r glage optimal p...

Page 49: ...ne violation des codes du b timent pour lesquels le po le a t approuv et cela annulerait toutes les garanties La conception du po le int gre l alimentation automatique des granul s dans le feu selon u...

Page 50: ...rres passant du niveau 1 au niveau 5 de chauffage C TOUCHE C F La touche C F fait passer l affichage deux chiffres des degr s Celsius aux degr s Fahrenheit et vice versa D TOUCHE MODE M T Le Mode de f...

Page 51: ...e aussi court et rectiligne que possible et doit s adapter par dessus et non pas l int rieur du branchement d air ext rieur du po le CONDITIONS SPECIALES D INSTALLATION DANS UNE MAISON MOBILE Avertiss...

Page 52: ...e nettoyage et un tuyau vertical l int rieur jusqu au niveau du sol Avec cette installation il faut tenir compte de la ligne de cong re des herbes et des feuilles mortes Nous recommandons une l vation...

Page 53: ...comme illustr tape 2 D ballez les meilleurs contr les de montage et de veiller ce que le faisceau de c blage illustr est fix tape 3 Connecter les install s en usine faisceaux de c blage sur le panneau...

Page 54: ...nt minimum de 2 pi 0 61 m au dessus de toute plante herbe ou autre mat riau combustible F D gagement minimum de 3 pi 0 91 m autour de l entr e d air forc e de tout appareil G D gagement minimum de 2 p...

Page 55: ...si l installation se trouve plus de 2 500 pi 762 m d altitude Nous recommandons l utilisation de conduits Simpson Dura Vent ou Metal Fab si vous utilisez d autres tuyaux consultez les codes de constr...

Page 56: ...egistre de tirage sur le syst me d vacuation de cet appareil Les directives d installation ci dessous doivent tre respect es pour garantir la conformit tant avec la liste de s curit de ce po le qu ave...

Page 57: ...sont indiqu s ici pourrait provoquer des blessures endommager le po le et annuler la garantie Installation inad quate Le fabricant ne pourra tre tenu pour responsable des dommages caus s par le mauva...

Page 58: ...aison Ne pas sur le feu ou utiliser des combustibles volatiles ou combustibles cela peut causer un danger de dommages personnels et mat riels SECURITE ET CONFORMITE EPA Votre po le granul s a t approu...

Page 59: ...as enti rement l alimentation des composants lectriques du po le Ne tentez jamais de r parer ou de remplacer une pi ce du po le sauf indication contraire dans les directives de ce guide Tous les autre...

Page 60: ...us pla t lire ce manuel en entier avant l installation et l utilisation de cet appareil Ne pas suivre ces instructions peut produire des degats materiels des blessures ou m me la mort Contactez votre...

Reviews: