background image

4

7.  The iron is not to be used if it has been dropped, if there are visible signs of damage 

or its leaking.

8.  Do not touch the iron rest during or just after ironing. It is hot!
9.  Do not roll the power cord or supply cord around the iron unit or base console for 

storage until it has cooled down completely.

10.  Do not attempt to open the cabinet or dismantle any parts from the appliance, there 

is no serviceable part inside.

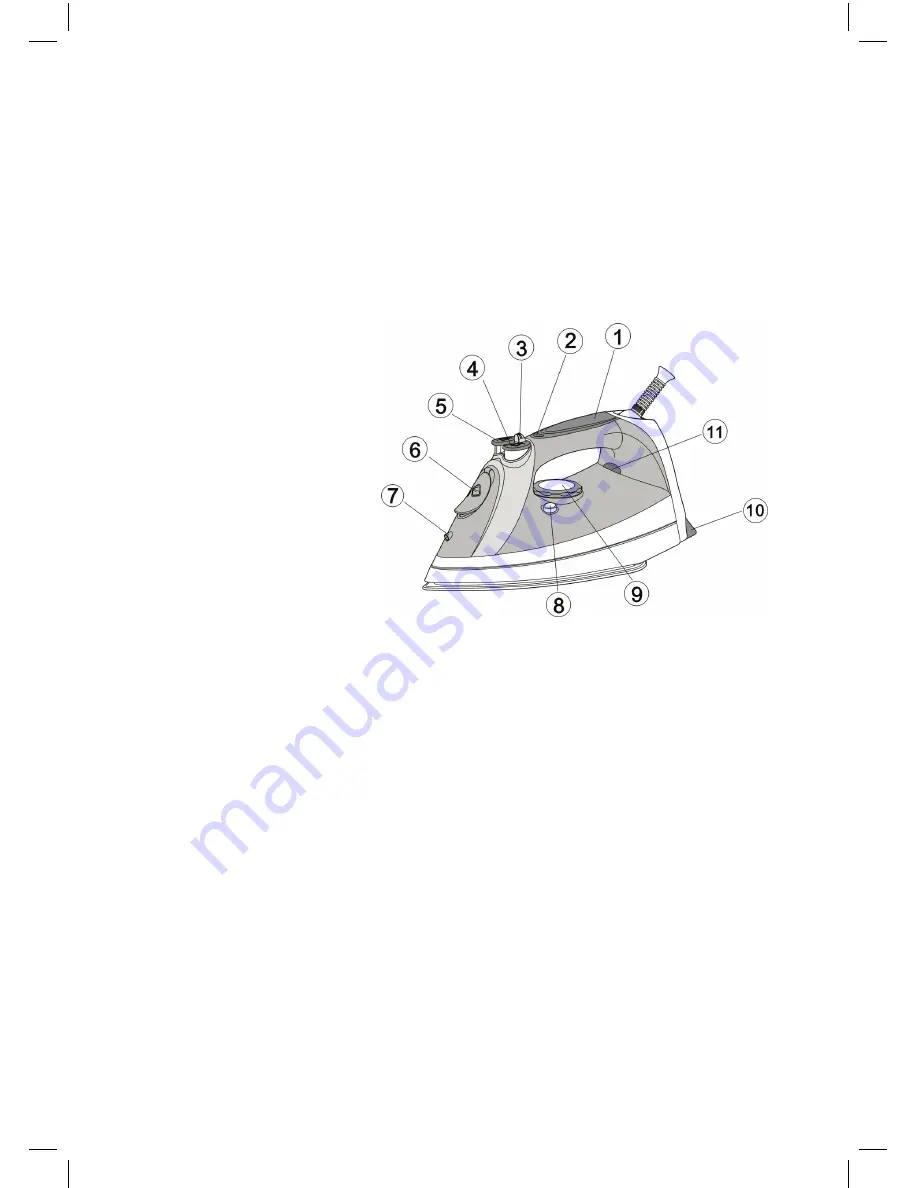
PART LIST

1.  Soft Grip Handle 
2.  Auto shut off indicator 
3.  Steam Control Knob 
4.  Burst of Steam Button 
5.  Spray Button 
6.  Water Inlet Cover 
7.  Spray Nozzle
8.  Self-Cleaning Button 
9.  Temperature Dial
10.  Back Heel
11.  Power Light

TIPS FOR IRONING

1.  Sort out the articles to be ironed according to the type of fabric. This will minimize the 

frequency of temperature adjustment for different garments.

2.  Test ironing a small area on the backside or inside the garment if you are unsure 

about the type of fabric. Start with a low temperature and increase gradually.

3.  Wait for about three minutes before ironing heat sensitive fabrics. Temperature 

adjustment needs certain time to reach the required level no matter it is higher or 
lower.

4.  Delicate fabrics such as silk, wool, velour, etc. are best ironed with an ironing cloth 

to prevent shine marks.

5.  You may need a few times of press to activate the spray, burst and vertically burst 

function.

READ THE GARMENT LABELS AND FOLLOW THE MANUFACTURER’S 
IRONING INSTRUCTIONS THAT ARE OFTEN SHOWN BY SYMBOLS SIMILAR 
TO THE FOLLOWS:

Summary of Contents for Techne 1000

Page 1: ...STEAM IRON Techne 1000 INSTRUCTION MANUAL...

Page 2: ...Innovatively designed using only the highest quality material and components your Usha Household Electronic Steam Iron is designed for years of trouble free performance Please read this Instruction M...

Page 3: ...at the surface on which the stand is placed is stable 9 If the power cord or supply cord is damaged it must be replaced by the authorised company service centre or its service agent 10 Empty the water...

Page 4: ...ht TIPS FOR IRONING 1 Sort out the articles to be ironed according to the type of fabric This will minimize the frequency of temperature adjustment for different garments 2 Test ironing a small area o...

Page 5: ...al in clockwise direction to maximum position pilot light glows 6 Pilot light goes off when the required temperature is reached 7 Move the Variable Steam Control Knob to position steam starts coming o...

Page 6: ...mperature Dial in clockwise direction to 3 dots setting For optimum steam quality do not use 1 dot or 2 dots setting for steam ironing 4 Pilot light glows indicating the iron is switched on 5 Pilot li...

Page 7: ...s very high This function provides extra amount of steam to remove wrinkles on delicate garments in hanging position hanging curtains or other hanging fabrics 1 Fill the iron as described in the secti...

Page 8: ...required temperature is reached 7 Wait for one more cycle pilot light glows and goes off 8 Turn the Temperature Dial in anti clockwise direction to Min 9 Disconnect the iron from mains supply outlet 1...

Page 9: ...ompletely store it vertically in a safe place Note Set the Steam Control Knob to position before storing the iron CLEANING MAINTENANCE 1 Disconnect the iron from the mains supply outlet 2 Use a damped...

Page 10: ...10 NOTES...

Page 11: ...1 Damages due to chipping peeling plating and denting 2 Breakage or damage to components made out of Bakelite Urea ABS SAN and such plastic materials rubber parts and cord 3 Normal wear and tear of p...

Page 12: ......

Reviews: