background image


Page   

10

   of   

26


2.0


Setup  


Installation  

   
The   HSW-­‐602   is   a   1U   rack   mount   device.      The   chassis   is   made   to   fit   a   19-­‐inch   standard   rack.      The   vent   
holes   are   located   on   the   sides   and   should   be   provide   1   inch   of   clearance   and   airflow   for   proper   cooling.      
It   is   designed   to   be   stacked   with   other   equipment   in   the   rack.   


o


Attach   the   HSW   into   a   1U   rack   slot   with   the   4   mounting   screws.      

Please   make   sure   the   rack   is   fully   grounded   to   avoid   excess   electrical   noise.   


o


Attach   the   HDMI   output   cables   to   the   HDMI   sink   devices.   

The   Live   output   is   intended   to   connect   directly   to   the   main   presentation   device   (projector),   and   the   
Preview   output   is   intended   to   connect   to   a   preview/check   display.   


o


Connect   HDMI   input   cables   to   appropriate   channels.      

There   are   4   HDMI   inputs   on   the   back   of   the   HSW,   and   2   on   the   front   for   quick   connections.      Note   
that   channels   1   and   2   are   on   the   front,   and   the   HSW   will   automatically   connect   to   these   on   boot.   


o


Connect   AES   audio   cable   from   the   output   on   the   HSW   to   a   digital   input   on   the   sound   processor.   
   

o


Connect   AES   Output   of   your   Digital   Cinema   Server   to   AES   input   on   the   HSW-­‐602   
   

o


Connect   TOSLINK   or   Coaxial   audio   cables   if   they   are   to   be   used.   


o


Connect   the   XLR   and   Line   In   cables   if   they   are   to   be   used.   


o


Connect   the   provided   power   adapter   and   plug   in   to   an   outlet.   
   

The   included   power   adapter   has   multiple   plug   configurations   for   different   electrical   standards.   


Locate  on  Network  

   
The   IP   address   of   the   HSW-­‐602   will   default   to   “169.254.

***

.0”,   where   

***

   is   the   last   number   of   the   S/N   

+   1.      For   example:   the   HSW   with   S/N   “HSW-­‐602-­‐1223-­‐

6

”   will   have   a   default   IP   address   of   169.254.

7

.0.      If   

this   IP   address   is   not   available,   the   HSW   will   increment   the   last   octet   until   finding   a   free   IP   address.      You   
can   put   this   IP   into   a   web   browser   to   view   the   Web   Interface.   


Note:      The   device   must   be   powered   and   booted   (15-­‐30   seconds)   to   be   accessible   on   the   network.   


Summary of Contents for HSW-602

Page 1: ... Page 1 of 26 HSW 602 HDMI Matrix Switch Installation and User Manual USL Inc ...

Page 2: ...r TOSLINK and Coaxial connections The HSW 602 can also overlay audio from an XLR or TLR 3 5mm source onto the AES EBU audio output for expanded presentation functionality The HSW 602 is designed specifically to interface with today s Digital Cinema Projectors and Media Servers providing ICP blanking for clean transitions Ethernet automation commands for seamless integration and AES EBU audio outpu...

Page 3: ...s 7 Front Panel Descriptions 8 Rear Panel Descriptions 9 2 0 SETUP 10 INSTALLATION 10 LOCATE ON NETWORK 10 3 0 OPERATION 11 FRONT PANEL CONTROLS 11 AUTOMATION 11 4 0 WEB INTERFACE 13 INPUT CONTROL 14 AES AUDIO MIXING 14 SETTINGS 15 Labels 15 Network 16 Projector 17 Update 18 Restore Factory Settings 19 5 0 PRODUCT SUPPORT 19 LIVE LOGGING 19 CONTACT USL 19 USL ONE YEAR LIMITED WARRANTY 20 APPENDIX ...

Page 4: ... FCC Rules These limits are designed to provide reasonable protection against harmful interference when the equipment is operated in a commercial environment This equipment generates uses and can radiate radio frequency energy and if not installed and used in accordance with this instruction manual may cause harmful interference to radio communications Operation of this equipment in a residential ...

Page 5: ...ricted access location Caution Troubleshooting must be performed by a trained technician To reduce the risk of electric shock do not attempt to service this equipment unless you are qualified Product End of Life Information Figure 2 1 This product was designed and built by USL to provide many years of service and is backed by our commitment to provide high quality support When it eventually reache...

Page 6: ...net connection provides access the HSW 602 Web Interface for control setup and updating of the HDMI switch TCP IP commands are accepted through port 10001 on the Ethernet interface and Telnet connections to port 23 are supported for live logging of operations AES output includes channel mixing of the Mic and Line in inputs with 0 centered gain control for each input to support overlay of microphon...

Page 7: ...and audio at full resolution Yes Consumer Electronic Control CEC Yes DVD Audio Yes Super Audio CD DSD Yes Deep color Yes xvYCC Yes Auto lip sync Yes Dolby TrueHD bitstream capable Yes DTS HD Master Audio bitstream capable Yes Updated list of CEC commands Yes 3D over HDMI Yes Ethernet channel Yes Audio return channel ARC Yes 4K resolution at 30 fps Yes 4K resolution at 60 fps No Rec 2020 color spac...

Page 8: ...nto live HDMI Source AES Output Only 3 4 HMDI Source Input HDMI 1 4b compliant connector for input source 5 10 HMDI Output Control Manual control buttons for Preview Live output selection 11 Power LED The power LED light is on when main power is applied and the power switch is ON 12 Power Switch Toggles power to the device FIGURE 1 HWS 602 FRONT PANEL 1 2 3 4 5 6 7 8 9 10 11 12 ...

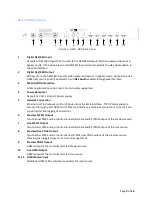
Page 9: ...e from the Web Interface TCP IP commands are accepted through port 10001 on the Ethernet interface and Telnet connections to port 23 are supported for live logging of operations 6 Preview S PDIF Output Two channel PCM audio or multi channel bitstream audio S PDIF output of the Preview source 7 Live S PDIF Output Two channel PCM audio or multi channel bitstream audio S PDIF output of the Live sourc...

Page 10: ...hat channels 1 and 2 are on the front and the HSW will automatically connect to these on boot o Connect AES audio cable from the output on the HSW to a digital input on the sound processor o Connect AES Output of your Digital Cinema Server to AES input on the HSW 602 o Connect TOSLINK or Coaxial audio cables if they are to be used o Connect the XLR and Line In cables if they are to be used o Conne...

Page 11: ...red on all lights on the front panel will turn on for several seconds Afterward the power light will remain on as the HSW boots The HSW 602 will be now ready to use with Live output defaulting to Input 1 and Preview defaulting to Input 2 on startup The Ethernet and web services will be available several seconds after the device has finished booting Front Panel Controls Pressing the corresponding b...

Page 12: ...n the current state of command Examples To find the currently selected Live channel send the HSW the following command hsw live source x0a x0D This will return a value from 0 5 indicating which input is currently being passed to the Live output To set the Live output to a different source send the command hsw live source 3 x0a x0D This will set the live source to channel 4 Note that source channel...

Page 13: ...red on and connected to your computer or network access the device directly using a web browser Enter the IP address of the HSW 602 into the address line of the web browser to show the web interface The web interface will show in full or mobile mode based on the size of the window it is displayed in http ip_address_of_the_switch FIGURE 3 WEB INTERFACE ...

Page 14: ...ough to the AES output The device defaults to this setting on boot and when powered off Selecting the Enable button will activate the AES mixer in the HSW 602 and disable any audio coming in from the AES EBU RJ45 input port The HDMI Microphone and Line In buttons configure how audio is mixed by the HSW 602 When enabled the audio from the Live HDMI source routed to the AES output Selecting Micropho...

Page 15: ...ttings pages Labels The Labels page under the settings allows for renaming the buttons for each input channel on the Web Interface Change these names to more easily identify sources while switching The save button at the bottom will show confirmation when the changes are saved to memory FIGURE 6 MAKING LABELS ...

Page 16: ...work DHCP server Note that IP addresses assigned by a DHCP server may not be static and could unexpectedly change Choosing No will allow the user to pick an IP address subnet mask and default gateway appropriate to the network s configuration Press the save button and the web page will confirm when settings have been saved to memory IP address changes will take affect after the next reboot of the ...

Page 17: ...Live output on the HSW 602 is switched between different channels The blanking done by the HSW is with the ICP of the projector and not the dowser The HSW can still blank the projector image when a different input on the projector is being used such as a Media Block If the HSW is moved between auditoriums it can still blank the image on the previous projector until the projector IP setting on the ...

Page 18: ...to your computer 2 Click the Choose File button to open a file dialog 3 On the file dialog find the saved file and click Open 4 The Web Interface will show the name of the selected file 5 Click Update 6 Wait for all the steps of the update process to complete Once all steps have turned green the HSW 602 is ready to use Refresh the Web Page to see the new firmware version FIGURE 9 FIRMWARE UPDATE ...

Page 19: ...live log available for access To view the non interactive live logs open a terminal program and connect via telnet to port 23 The HSW will display information that can be forwarded to USL to help diagnosing any issues encountered Contact USL USL proudly stands behind its products We are ready to answer questions about the installation or operation of the HSW 602 The manual application notes and ot...

Page 20: ... conform with the foregoing warrantee and which is returned to our factory freight paid or serviced by one of our authorized contractors The forgoing warranty is exclusive and in lieu of all other warranties whether expressed or implied Such warranty shall not apply to any product or component A repaired or altered by anyone other than USL Inc or an authorized service contractor B tampered with or...

Page 21: ... hsw sys source3 name hsw sys source4 name hsw sys source5 name Yes String Query or assign the channel name for HDMI inputs 0 5 Inputs are 0 referenced The names will be shown in the Web Interface Switching Commands hsw live source Yes 0 5 Assign the Live output to the specified input channel Inputs are 0 referenced assigning 0 will activate input 1 hsw preview source Yes 0 5 Assign the Preview ou...

Page 22: ...static IPv4 address to be used when DHCP is disabled hsw sys ip subnet Yes IP String Assign or Query the IPv4 subnet mast to be used when DHCP is disabled hsw sys ip gateway Yes IP String Assign or Query the IPv4 default gateway to be used when DHCP is disabled Projector Configuration Commands hsw sys projector enable Yes 0 or 1 Enable or disable digital cinema projector communication hsw sys proj...

Page 23: ... Sends CEC SEEK FORWARD command to current Live Source hsw cec rev Yes None Sends CEC SEEK REWIND command to current Live Source hsw cec eject Yes None Sends CEC EJECT command to current Live Source hsw cec standby Yes None Sends CEC STANDBY command to current Live Source hsw cec standbyall Yes None Broadcasts CEC STANDBY command to CEC bus hsw cec resume Yes None Sends CEC PLAY command to current...

Page 24: ...EBU over CAT5 or CAT6 Ethernet cable These cables are twisted pair and have the required characteristic impedance Each RJ 45 connector carries up to 8 digital audio channels Audio Channels AES Pair Top RJ 45 Pins 1 2 1 1 2 3 4 2 3 6 5 6 3 4 5 7 8 4 7 8 TABLE 2 RJ45 AES PINOUT Audio Routing FIGURE 10 AUDIO ROUTING DIAGRAM ...

Page 25: ... Page 25 of 26 Appendix C GPIO Pinout GPIO implementation planned for future use ...

Page 26: ... Page 26 of 26 ...

Reviews: