


Version 160624
Page 21
7.4
Set IP Utility
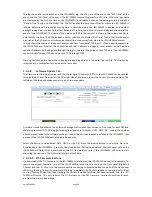
The Set IP utility allows the user to
configure the network settings on the
JSD-100MA.
Connect the host computer to the
USB port on the front of the JSD-
100MA. The JSD-100MA should
appear under the USB Device List.
It is identified by which USB port it
is connected to on the host
computer. Click the JSD-100MA
on the found list.
Fill in the IP address, subnet mask,
and gateway as dotted decimal
values. Press “Set IP” to save the
values in the JSD-100MA.
Fill in the network hostname for the JSD-100MA. The hostname can be up to 15 characters long and
cannot contain spaces. The hostname will be converted to upper case before being saved. Press “Set
Name” to save the value to the JSD-100MA.
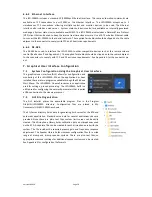
7.5
JSD-100MA Configuration
The JSD-100MA is configured using the graphical user interface (Shown
in start menu as: JSD-100MA Cinema Processor). The GUI may connect
to the JSD-100MA over USB, RS-232, or Ethernet. In most installations,
configuration is done over USB. With USB, it is very clear which JSD-
100MA you are configuring (the one that the USB cable is plugged in to).
The GUI and the JSD-100MA provide two sets of controls and two
displays. For example, you can change the format on either the JSD-
100MA unit or on the GUI and both will reflect the new value. If you
open a configuration file when connected to the JSD-100MA, all the
settings in that configuration file are sent to the JSD-100MA. When you
connect to a JSD-100MA, all the configuration settings in that unit are
loaded into the GUI. It is quite possible to operate the GUI and create configuration files without the JSD-
100MA being connected. Make sure the new file is saved before connecting the JSD-100MA since the
connection will cause the current values in the JSD-100MA to be overwritten with the values in the JSD-
100MA. When the JSD-100MA is connected to the GUI and a new configuration file opened, that configuration
data is copied out to the connected JSD-100MA.
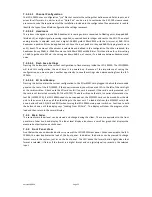
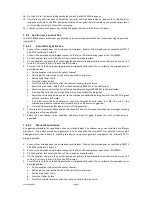
When the GUI is started, the “Overview Screen” will be visible. This screen can show the status of multiple JSD-
100MA systems on a network. The title bar shows the theater name and the screen number for that particular
JSD-100MA. Click “Screen 1”to bring up the details of the first (and only, at this point) JSD-100MA.
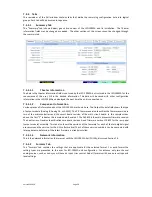
Click “Comm Settings” and then the “USB” tab. Make sure “Connect to first available USB device” is checked
and then press OK. Press the “Connect” button to connect to the JSD-100MA. Current settings will be
downloaded from the JSD-100MA and displayed on the GUI. Detailed below are the several buttons that are
visible along the top of the GUI.