background image

3

NOTE: Type of chimney: Class A All-Fuel UL 103HT

1. The furnace should be the only heating appliance using

a chimney flue. One furnace per flue.

2. A masonry chimney should have a tile or stainless steel

liner.

3. The masonry chimney should not have any missing

mortar or loose bricks.

4. There should be no mortar or parts of the chimney

blocking the chimney flue.

5. There should be a two inch clearance between any

chimney (masonry or metal) and combustibles (such
as the house).

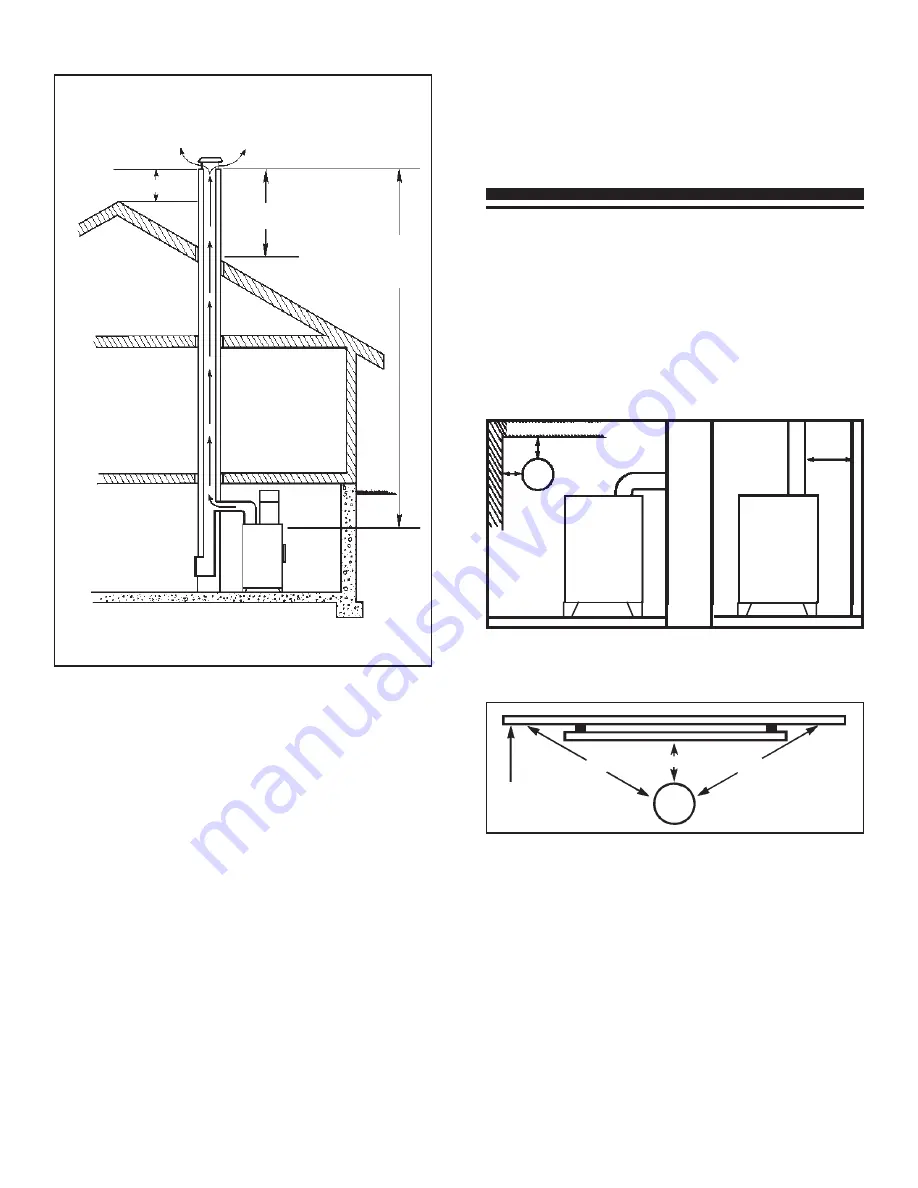
6. The chimney should extend at least 2' above the
   highest point of the house, or 2' above the point at

which the chimney is 10' from the roof.

7. The chimney should be relatively straight and vertical.

8. The portion of an all-fuel metal chimney that extends

above the roof should be well secured.

9. A masonry chimney should be built on footings and not

attached to the house.

    10. A rain cap, complete with an animal or bird screen,

should be installed on top of the chimney.

CREOSOTE — FORMATION AND NEED

FOR REMOVAL

When wood is burned slowly, it produces tar and other organic
vapors, which combine with expelled moisture to form creosote.
The creosote vapors condense in the relatively cool chimney flue
of a slow-burning fire. As a result, creosote residue accumulates

on the flue lining. When ignited, this creosote makes an extremely
hot fire.

The chimney connector and chimney should be inspected at
least twice monthly during the heating season to determine if a
creosote build-up has occurred. If creosote has accumulated, it
should be removed to reduce the risk of a chimney fire.

SMOKE PIPE INSTALLATION

Clearances to combustible materials (i.e. paneling, ceiling tile,
sheet rock, plaster, draperies, casements or wood trim, etc.)
will vary with the type of flue connection used. Be sure to
maintain the specified clearances for your type of installation.

TYPE OF FLUE

REQUIRED

CONNECTION

CLEARANCE

24 Gauge or Heavier

18"

Single Wall Stainless Steel
or Black Pipe

Double Wall Stainless Steel

6"

Class A 103HT All-Fuel or Equivalent

2"

CEILING OR WALL

18"

9"

18"

COMBUSTIBLES

SMOKE PIPE

TOP OF CHIMNEY MUST
BE 2 FT. ABOVE HIGHEST
POINT OF ROOF WITHIN
10 FEET

2 FT.

MINIMUMS

3 FT.

MINIMUM

CAP SHOULD HELP
PREVENT DOWNDRAFT
WHILE STILL PROVIDING
ADEQUATE EXHAUST.

MINIMAL 3 FT.
FROM TOP OF
CHIMNEY TO POINT
AT WHICH IT PASSES
THROUGH THE ROOF.

RECOMMENDED

MINIMAL

20 FT. HEIGHT

CHIMNEY FLUE
SHOULD BE
CONSTANT DIAMETER
THROUGHOUT ITS
ENTIRE HEIGHT.

CHIMNEY FLUE
MUST BE AS
LARGE OR 20%
LARGER THAN
FURNACE FLUE
PIPE

APPROVED

CHIMNEY

CLEANOUT DOOR
SHOULD HAVE
AIRTIGHT FIT. DO
NOT LEAVE OPEN
WHEN FURNACE IS
IN OPERATION.

CHIMNEY THIMBLE SHOULD BE
CONSTRUCTED OF FIRE CLAY, AND
SHOULD FIT TIGHTLY TO FLUE PIPE.

According to NFPA standards, single wall stove pipes can be
within 9" of combustibles provided an approved fire retardant
material covered with 28 gauge sheet metal, spaced out 1" on
non-combustible spacers, is utilized. See illustration.

When using a Class A or double wall flue pipe connection,
follow the manufacturer's instructions.

When constructing a single wall smoke pipe, the following
guidelines must be observed.

1. The connector pipe should be 24 gauge or heavier

stainless steel or black pipe.

2. Secure all joints with three #8 screws.

3. If the connector pipe must pass through a wall, an ap-

proved insulated or ventilated thimble, at least three
times the diameter of the smoke pipe must be used. (i.e.
a 6" diameter smoke pipe needs an 18" thimble).

4. The connector pipe should never be used as a chimney.

IMPORTANT INFORMATION FOR

ALL CONNECTOR PIPES

The connector pipe must be constructed and installed so that it

Summary of Contents for Clayton 1600M

Page 1: ...OUT RESTRICTIONS AND INSTALLATION REQUIREMENTS IN YOUR AREA REFER TO MARKINGS ON APPLIANCE FOR ADDITIONAL INFORMATION UNITED S UNITED S UNITED S UNITED S UNITED ST T T T TA A A A ATES TES TES TES TES S S S S ST T T T TO O O O OVE C VE C VE C VE C VE COMP OMP OMP OMP OMPANY ANY ANY ANY ANY K K K K Kee ee ee ee eeping North ping North ping North ping North ping North America W America W America W Am...

Page 2: ...rn air facility WARNING Do not alter this appliance in any way Doing so may void your warranty These instructions comply with CAN CSA B365 LOCATINGYOURFURNACE The furnace is to be installed maintaining clearances as shown in illustration Do not place the furnace directly on a combustible floor If you re placing it on a combustible floor an approved fire retardant material equivalent to 3 8 UL List...

Page 3: ...rim etc will vary with the type of flue connection used Be sure to maintain the specified clearances for your type of installation TYPE OF FLUE REQUIRED CONNECTION CLEARANCE 24 Gauge or Heavier 18 Single Wall Stainless Steel or Black Pipe Double Wall Stainless Steel 6 Class A 103HT All Fuel or Equivalent 2 CEILING OR WALL 18 9 18 COMBUSTIBLES SMOKE PIPE TOP OF CHIMNEY MUST BE 2 FT ABOVE HIGHEST PO...

Page 4: ...reosote fire in such a chimney can burn out of control because of the air leak through the barometric damper or gas hood Keeping the chimney clean and burning well seasoned wood is absolutely necessary This type of instal lation does require more frequent inspection and maintenance HEATED AIR DISCHARGE The Clayton furnace is designed for use as a supplemental heating source When used as a suppleme...

Page 5: ... provided the warm air distributed into your home will be restricted and the efficiency of the furnace decreased Without a return air system warm air will be drawn into your basement unnecessarily heating unused areas of the home In extreme cases if your basement or utility room is fairly air tight the large blower on the 1600M could depressurize the room and pull toxic flue gases from the furnace...

Page 6: ...2 washer over threaded part of door handle Then attach 1 2 lock nut being careful not to over tighten Handle should turn freely FUEL ASH DOOR LATCH INSTALLATION Withtwo1 4 x3 4 hexbolts attachthedoorlatchtothedoorlatch mounting bracket on the left side of door frame as illustrated Adjust latch until door closes securely FIREBOX The firebrick must be inserted on each side resting on the grate frame...

Page 7: ...e chamber flat side down 3 Place remaining firebrick in smoke chamber as numbered below Inplacingthefirebrickinthesmokechamber liftthe left side of firebrick first and drop into place See Illustra tions below REAR OF FIREBOX TOP 2 1 3 5 4 6 1 2 BRICK 41 2 BRICKS THE MODEL 1600M PLENUM OPENING 13 x18 Rectangle Plenum Opening ...

Page 8: ...Put brass knob onto end of handle SMOKE DOOR INSTALLATION INSTALLING ASH DOOR SPIN DRAFT 1 Screw spin draft onto 3 8 x 2 1 2 carriage bolt 2 Screw spin draft and bolt assembly into ash door allowing approximately 1 2 of the bolt to extend beyond the inside of the door 3 Secure bolt in place with 3 8 16 locking nut SPIN DRAFT CAP 3 8 16 x 2 1 2 CARRIAGE BOLT SMOKE DOOR SMOKE DOOR CLIPS 1 4 X 1 1 4 ...

Page 9: ...9 ALL WIRING MUST BE DONE BY A QUALIFIED ELECTRICIAN Predrilled holes are provided on the back of the furnace for mounting the electrical box ELECTRICAL INSTALLATION ...

Page 10: ...10 ALL WIRING MUST BE DONE BY A QUALIFIED ELECTRICIAN ...

Page 11: ...fle rod to the front position 4 Open the fuel load door and light fire using kindling and several sheets of newspaper then close the furnace door The furnace door should remain closed for 5 to 10 minutes in order to establish the fire If the fire has established you are ready to load the furnace CAUTION To prevent flame and smoke spillage the slide baffle must be pulled out and the fuel door must ...

Page 12: ...e set at a 1 2 inch opening If the forced air draft is used the damper on the built in draft regulator will automatically open to the preset factory spacing Do not burn garbage plastics gasoline drain oil or other flammable liquids Plastics when burned form hydrofluoric and hydrochloric acids which will damage and destroy your furnace pipe and chimney The burning of trash or oil can result in an e...

Page 13: ...s not too close to the top of the chimney D Check chimney draft make sure chimney flue pipe is clean and chimney is of adequate height E Make sure you re not suffocating the fire with excessive amounts of unburned wood F Slide baffle should be pulled out prior to load door opening 4 Problem Distributionblowervibrating Solution A Tighten blower wheel to motor shaft B Check for bad fan bearings 5 Pr...

Page 14: ...r parts a G must be added to the end of the part number of any part painted GREEN on thefurnace ITEM DECRIPTION PART 1 Left Side Weldment Painted 69452G 2 Right Side Weldment Painted 69453G 3 Top Wrapper 69088 4 Back Weldment Painted 69454G 5 Side Insulation 2 ea C98771 6 Back Insulation C98971 7 Ash Pan Weldment 68882 8 Carrying Handle 24233 9 Shaker Grate Section 23852 10 Shaker Bar C000047 Snap...

Page 15: ...1 2 Rope for Fire Door 52 88057 35 1 2 Rope for Ash Door 32 88057 36 Aqua Siphon Cover 23819 1 20 Kep Nuts 83250 4 ITEM DESCRIPTION PART 37 1 4 x 1 1 4 Carriage Bolt 83445 2 38 1 4 20 Kep Nut 83250 6 39 Smoke Door Curtain 23800 40 Smoke Door Clip 23787 2 41 1 2 Hex Nut 83276 2 42 1 2 Coupling C21899 43 Brass Coil Knob 89574 4 44 1 4 x 3 4 Hex Bolt 83339 6 45 Shaker Grate Handle 69005 46 Hinge Brac...

Page 16: ...IPTION PART 1 3 Speed Switch 80361 2 Plastic Knob C9267M 3 Low Speed Thermodisc 80388 2 1 5 MODEL 1600M Blower Motor Kit 69160 1400CFM Blower Housing Kit 69281 ITEM DESCRIPTION PART 4 3 Speed Motor 1 3 hp 80416 5 Blower Housing 1600 C46799 6 Capacitor C45699 3 4 6 ...

Page 17: ...RT 1 Draft Blower 80422 2 Power Supply Cord C40899 3 FAD Bracket 69192 4 10 24 Kep Nut 3ea 83244 5 1 4 20 x 1 Bolt 2ea 83379 6 1 4 20 Lock Nut 83261 FORCED AIR DRAFT PARTS LIST Kit 69189 PRE ASSEMBLED AT FACTORY OPTIONALKIT ...

Page 18: ...wn completely wrap a piece of hi temp fiberglass rope gasket provided with the kit around each threaded leg between the washer and the outside of the firebox Tighten the nuts down securely to insure an airtight installation The installation is now ready to be plumbed to your existing domestic hot water system Choose one of the three methods described in the Hot Water Kit Installation Instructions ...

Page 19: ... furnace as practical Press female end of the back draft damper over Clayton Furnace collar or male end of the duct pipe When properly placed the arrows on the air flow decal should point away from the furnace HORIZONTAL INSTALLATION SEE PRODUCT LABEL NOTE POSITION SO THAT AIR FLOW WILL OPEN DAMPER FROM BOTTOM VERTICAL INSTALLATION NOTE POSITION SO THAT AIR FLOW WILL OPEN DAMPER IN DIRECTION OF DU...

Page 20: ...N WRITING ALWAYS GIVE THE FULL MODEL NUMBER WHICH IS ON THE NAMEPLATE ATTACHED TO THE BACK OF THE HEATER WHEN ORDERING REPAIR PARTS ALWAYS GIVE THE FOLLOWING INFORMATION AS SHOWN IN THIS LIST 1 The PART NUMBER 2 The PART DESCRIPTION 3 The MODEL NUMBER 1600M 4 The SERIAL NUMBER ____________________ UNITED STATES STOVE COMPANY 227 Industrial Park Road P O Box 151 South Pittsburg TN 37380 423 837 210...

Reviews: