7
USSC
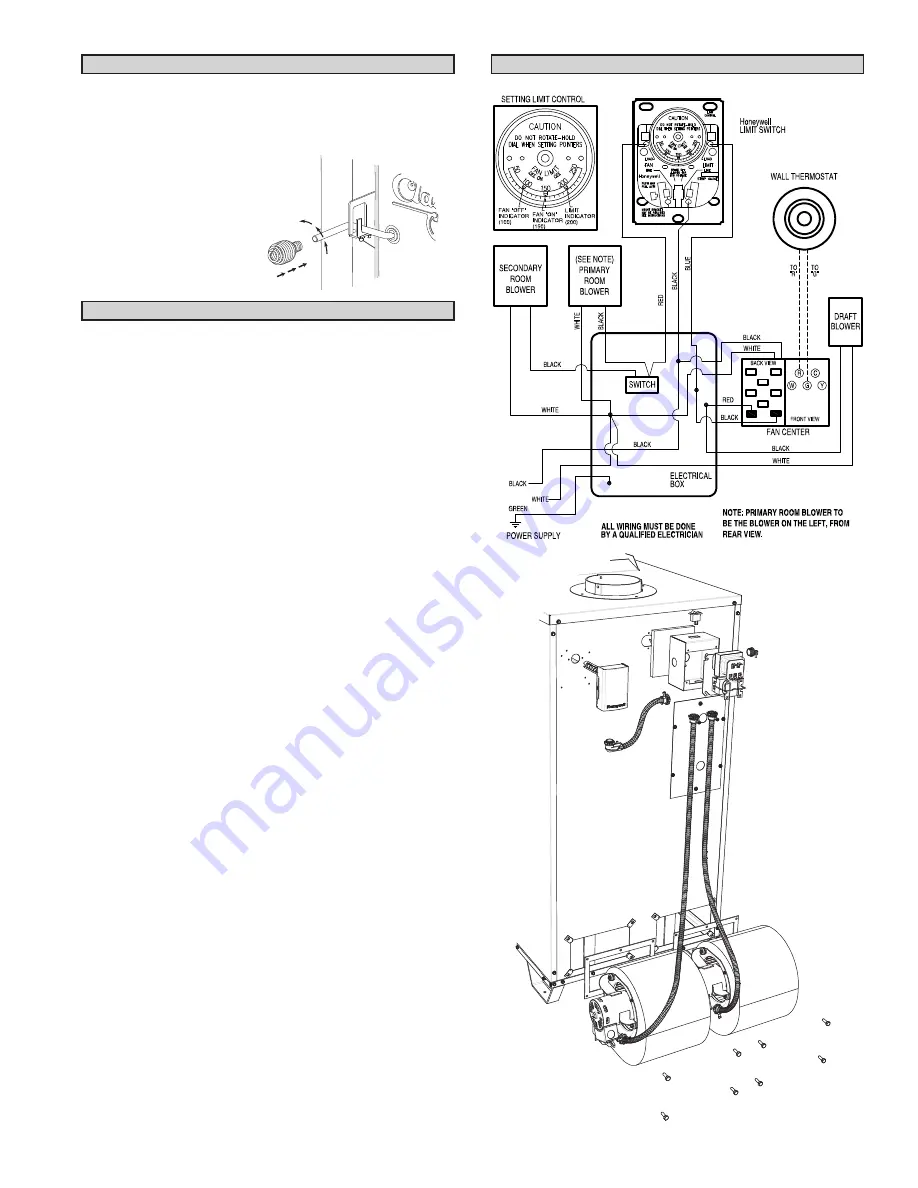
SPRING HANDLES
Attach the four(4) spring handles to the Feed/Ash Doors,
Baffle Rod, and Shaker Rod by twisting the springs counter-
clockwise while applying pressure until you have screwed
them approximately 3/4”-1” onto the rods.
(4) Spring Handles
DISTRIBUTION BLOWER & ACC.
(2)
800 CFM Blower
(2)
Gasket, Blower
(8)
Tinnerman Clip, 1/4-20
(8)
1/4-20 x 3/4 Bolt
(2)
Conduit Assembly (5ft)
(1)
Honeywell Limit Control
(1)
Conduit Assembly (1ft)
(1)
Junction Box
(1)
Insulation (5” x 5”)
(1)
Rocker Switch
(1)
Romex Cable Clamp
(1)
Fan Center Control
(3)
73B Wire Nut
(1)
74B Wire Nut
(1)
Female Term. (blue)
(1)
Female Term. (red)
(8)
#10 x 1/2 Screw
1. Remove all contents and insure that all components are
present for assembly. See the part list below
2. Begin by attaching the blowers to the unit. Insert a clip into
each mounting hole in the furnace’s cabinet back. Be sure
to install the gasket between the blower and cabinet back.
Insert the eight bolts provided and tighten.
3. Mount the Honeywell limit control to the cabinet back. The
conduit assembly should already be attached to the limit
control, otherwise, do so then make the correct wiring con-
nections to the limit control. See wiring diagram.
4. Next, mount the junction box and insulation using two of the
#10 x 1/2 screws provided. Make a small slice in the 5 x 5 in-
sulation to allow the wires from the draft blower to protrude,
then Install it between the cabinet back and junction box,
with the foil side to the cabinet back. Attach the conduit
assembly from the limit control to the junction box as shown.
5. If not already installed, snap the rocker switch into the top of
the junction box. Provide a 110 volt power supply and con-
nect to the junction box with the cable clamp to the right
side.
6. Attach the two longer conduit assemblies to the junction
box and to each blower.
7. Before mounting the Fan Center, make all the wire connec-
tions per the wiring diagram, then attach the fan center to
the junction box.
All electrical connections should be done by a
qualified electrician.
NOTE: The extra brown wire on the fan center has
no use. It should be capped off or removed.
The conduit may be cut shorter to provide a cleaner
installation.
WIRING DIAGRAM
Summary of Contents for Clayton 1602G
Page 18: ...18 USSC NOTES ...
Page 19: ...19 USSC NOTES ...


