2GM
1-6-18
1-6-9 Removing and splitting the fuser unit
WARNING
• The fuser unit is hot after the machine was running. Wait until it cools down.
CAUTION
• When refitting the fuser unit, make sure the fuser unit gear and the machine’s drive gear are properly meshed with each
other. For this, rotate the main motor several turns before fusing screws.
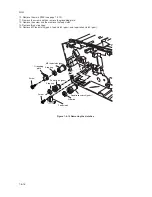
1. Remove the rear cover (see page 1-6-3).
2. Remove the right and left cover (see page 1-6-4).
3. Remove two connectors.
4. Remove two screws.
5. Remove the fuser unit.
Figure 1-6-21 Removing the fuser unit
Screws
Screws
Fuser unit
Connectors
Summary of Contents for CD 1018
Page 1: ...Service Manual MFP Copy CD 1018 Date 17 03 2005 ...
Page 2: ...Service Manual MFP Copy DC 2018 Date 17 03 2005 ...
Page 70: ...2GM 1 5 2 2 Paper misfeed detection conditions Registration sensor Exit sensor Figure 1 5 2 ...
Page 124: ...2GM 1 6 31 Eraser lamp 9 Remove the eraser lamp Figure 1 6 35 Removing the eraser lamp ...


