1-3-20
2GM
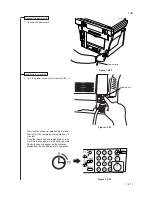
Figure 1-3-46
Figure 1-3-45
CAUTION
Be sure to tighten the pins securely when
connecting the cable.
7.Connect the power cord and turn the power
switch on ( | ). Warm up will begin. 1 will appear
on the operation panel and the start indicator will
light when the machine is in a ready state.
Pins
Power switch
Summary of Contents for CD 1018
Page 1: ...Service Manual MFP Copy CD 1018 Date 17 03 2005 ...
Page 2: ...Service Manual MFP Copy DC 2018 Date 17 03 2005 ...
Page 70: ...2GM 1 5 2 2 Paper misfeed detection conditions Registration sensor Exit sensor Figure 1 5 2 ...
Page 124: ...2GM 1 6 31 Eraser lamp 9 Remove the eraser lamp Figure 1 6 35 Removing the eraser lamp ...


