2GM
1-6-2
1-6-2 Removing the process unit
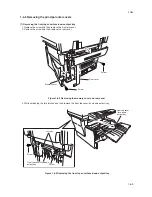
1. Open the front top cover.
2. Open the front cover.
3. Lift the process unit together with the toner container out of the machine.
Figure 1-6-1 Removing the process unit
CAUTIONS
• After removing the process unit, seal it in the protective bag and place it on flat surface. Do not place the process unit in
a dusty area.
• Do not give impact to the process unit.
• Do not place floppy disks near the process unit.
• If the process unit is replaced for some reason, the toner installation mode must be run.
1. Run maintenance mode U157 to clear the developing drive time.
2. Run maintenance mode U130 to turn the setting ON.
3. Turn the power switch off and then on again.
The toner installation mode starts to add toner to the developing section of the process unit (approximately 15 minutes).
* Run the toner installation mode only when you have replaced the process unit with a new one. (Do not run it when
toner remains in the process unit.)
Front top cover
Front cover
Process unit
Summary of Contents for CD 1018
Page 1: ...Service Manual MFP Copy CD 1018 Date 17 03 2005 ...
Page 2: ...Service Manual MFP Copy DC 2018 Date 17 03 2005 ...
Page 70: ...2GM 1 5 2 2 Paper misfeed detection conditions Registration sensor Exit sensor Figure 1 5 2 ...
Page 124: ...2GM 1 6 31 Eraser lamp 9 Remove the eraser lamp Figure 1 6 35 Removing the eraser lamp ...


