Section 7 COPIER MANAGEMENT FUNCTIONS
7-18
3
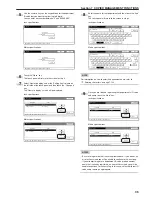
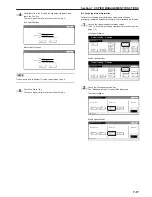
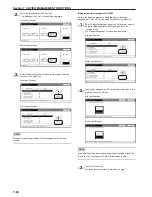
Select the department ID-code for which you want to change
the registered information, and then touch the “Mgt. Inf.
Correction” key.
The “Department inform. edit” [“Department info. Editing”]
screen will be displayed.
Inch specifications
Up
Down
Order of
indication
Mgt. Inf.
correction
Delete
Register
Limit
in use
01
02
0001
0014
00000015
00000016
00000017
001/010
1st Sales Dept.
2nd Sales Dept.
3rd Sales Dept.
4th Sales Dept.
5th Sales Dept.
6th Sales Dept.
7th Sales Dept.
Close
Department
Default setting - Management
Management edit
Metric specifications
Up
Down
Order of
indication
Mgt. Inf.
correction
Delete
Register
Limit
in use
01
02
0001
0014
00000015
00000016
00000017
001/010
1st Sales Dept.
2nd Sales Dept.
3rd Sales Dept.
4th Sales Dept.
5th Sales Dept.
6th Sales Dept.
7th Sales Dept.
Close
Department
Default setting - Management
Management edit
To change the registered ID-code, proceed to the next step.
To change the registered department name, proceed to step
7.
NOTE
It is possible for you to change the order of how the list of ID-codes is
displayed.
To so, touch the “Order of indication” key and then touch the “Sort by
code” key (and select either “1
/
9” or “9
/
1”) or the “Sort by Name”
key (and select either “A
/
Z” or “Z
/
A”), as appropriate.
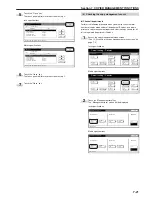
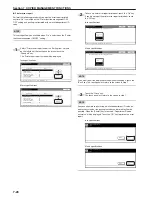
4
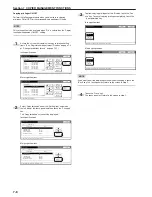
Select “ID-code” under the “Setting item” column on the left
side of the touch panel and then touch the “Change #” key.
The “ID-code” screen will be displayed.
Inch specifications
Close
Change #
Value
Setting item
Default setting - Management code menu - Management edit
Department inform. edit
ID-code
Name to display
0007
1st Sales Dept.
Back
Metric specifications
Close
Change #
Value
Setting item
Default setting - Management code menu - Management edit
Department info. Editing
ID-code
Name to display
0007
1st Sales Dept.
Back
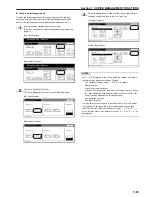
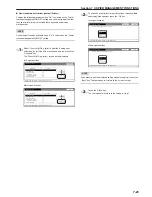
5
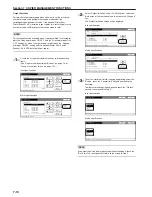
Touch the “Clear” key to delete the old ID-code. Use the
numeric keys on the keypad to enter the new ID-code (up to
8 digits).
Inch specifications
Close
Back
Management code menu - Management edit
ID-code
(0~99999999)
ID-code
0007
Clear
Metric specifications
Close
Back
Management code menu - Management edit
ID-code
(0~99999999)
ID-code
0007
Clear
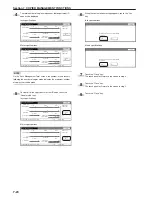
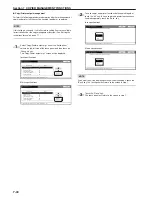
6
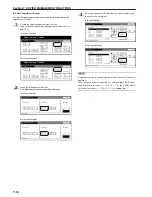
Touch the “Close” key.
The touch panel will return to the screen in step 4. Proceed
to step 10.
Inch specifications
Close
Back
Management code menu - Management edit
ID-code
(0~99999999)
ID-code
0007
Clear
Metric specifications
Close
Back
Management code menu - Management edit
ID-code
(0~99999999)
ID-code
0007
Clear
Summary of Contents for CD 1030
Page 1: ...INSTRUCTION HANDBOOK DIGITAL MULTIFUNCTIONAL SYSTEM CD 1030 1040 1050 ...
Page 9: ...vii Printer Kit Page 8 12 Printer scanner Kit Page 8 12 Fax Kit Page 8 12 ...
Page 12: ...x ...
Page 20: ...1 8 ...
Page 28: ...Section 2 NAMES OF PARTS 2 8 ...
Page 44: ...Section 4 BASIC OPERATION 4 12 ...
Page 114: ...Section 5 OTHER CONVENIENT FUNCTIONS 5 70 ...
Page 242: ...Section 7 COPIER MANAGEMENT FUNCTIONS 7 106 ...
Page 282: ...10 14 ...
Page 285: ...W Warm up 4 1 Waste Toner Box 10 3 When paper misfeeds 9 4 X XY zoom mode 4 8 Z Zoom mode 4 6 ...
Page 286: ...E1 ...
Page 288: ...UTAX GmbH Ohechaussee 235 22848 Norderstedt Germany ...


