Section 7 COPIER MANAGEMENT FUNCTIONS
7-96
3
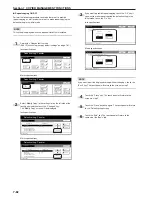
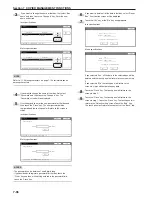
If you want to change the name of that box, first select “Box
name” and then touch the “Change #” key. Enter the new
name as desired.
Inch specifications
Box007
Box name ABCD_0000101
password (No register)
Default menu
Reset
Box
Change #
Close
Default setting - Document Management - Box editing
Setting mode
Metric specifications
Box 007
Box name
ABCD_0000101
Password
(No register)
Close
Default menu
Reset
Box
Change #
Default setting - Document management - Box editing
Setting mode
NOTE
Refer to “11. Entering characters” on page 7-103 for information on
entering characters.
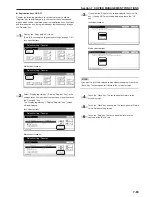
4
If you want to change the name of that box, first select
“Password” and then touch the “Change #” key. The
“Password” screen will be displayed.
5
Use the keypad to enter the new password for that box and
then touch the “Close” key. The new password will be
registered and the touch panel will return to the screen in
step 3.
Inch specifications
Password
(Enter by #key)
Password
Back
Close
Default setting - Document Management - Box editings - 007
Enter new password.
Clear
Metric specifications
Password
(Enter #-key)
Password
Back
Close
Default settund -
Document Management
- Box editing - 007
Enter new password.
Clear
NOTES
• The password can be between 1 and 8 digits long.
• If you decide not to register a password for that box, touch the
“Clear” key and then, with nothing entered in the password field,
touch the “Close” key.
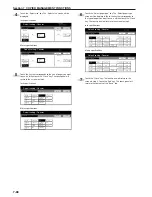
6
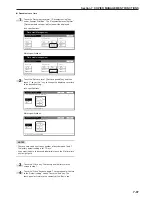
If you want to delete all of the data in that box, select “Reset
Box”. A verification screen will be displayed.
7
Touch the “Yes” key or the “No” key, as appropriate.
Inch specifications
Box No. :
Box name :
Reset this Box. Do you really want to reset?
Yes
No
Stop
007
ABCD_0000101
Metric specifications
BOX No. :
Box name :
Stop
007
ABCD_0000101
Reset this Box. Do you really want to reset?
Yes
No
If you selected “Yes”, all the data in the selected box will be
deleted and the touch panel will return to the screen in step
3.
If you selected “No”, the touch panel will return to the
screen in step 3 without deleting any data.
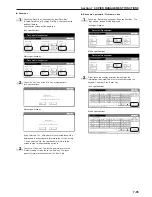
8
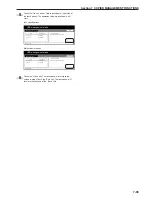
Touch the “Close” key. The touch panel will return to the
screen in step 2.
9
Touch the “Close” key. The touch panel will return to the
screen in step 1. Touch the “Close” key. The touch panel will
return to the “Default setting” screen.Touch the “End” key.
The touch panel will return to the contents of the “Basic” tab.
Summary of Contents for CD 1030
Page 1: ...INSTRUCTION HANDBOOK DIGITAL MULTIFUNCTIONAL SYSTEM CD 1030 1040 1050 ...
Page 9: ...vii Printer Kit Page 8 12 Printer scanner Kit Page 8 12 Fax Kit Page 8 12 ...
Page 12: ...x ...
Page 20: ...1 8 ...
Page 28: ...Section 2 NAMES OF PARTS 2 8 ...
Page 44: ...Section 4 BASIC OPERATION 4 12 ...
Page 114: ...Section 5 OTHER CONVENIENT FUNCTIONS 5 70 ...
Page 242: ...Section 7 COPIER MANAGEMENT FUNCTIONS 7 106 ...
Page 282: ...10 14 ...
Page 285: ...W Warm up 4 1 Waste Toner Box 10 3 When paper misfeeds 9 4 X XY zoom mode 4 8 Z Zoom mode 4 6 ...
Page 286: ...E1 ...
Page 288: ...UTAX GmbH Ohechaussee 235 22848 Norderstedt Germany ...

