1-1-3
2DA/2DB-1
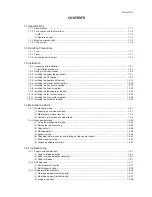
1-6 Assembly and Disassembly
1-6-1 Precautions for assembly and disassembly ......................................................................................... 1-6-1
(1) Precautions ..................................................................................................................................... 1-6-1
(2) Running a maintenance item .......................................................................................................... 1-6-2
1-6-2 Paper feed section ............................................................................................................................... 1-6-3
(1) Detaching and refitting the separation pulley ................................................................................. 1-6-3
(2) Detaching and refitting the forwarding pulley and paper feed pulley .............................................. 1-6-5
(3) Detaching and refitting the feed roller (20 ppm model only) ........................................................... 1-6-7
(4) Detaching and refitting the drawer separation pulley (20 ppm model only) .................................... 1-6-8
(5) Detaching and refitting the drawer forwarding pulley and drawer paper feed pulley
(20 ppm model only) ....................................................................................................................... 1-6-9
(6) Detaching and refitting the paper conveying unit ......................................................................... 1-6-11
(7) Detaching and refitting the bypass paper feed pulley and bypass separation pad ...................... 1-6-13
(8) Detaching and refitting the registration left roller .......................................................................... 1-6-15
(9) Detaching and refitting the registration cleaner ............................................................................ 1-6-15
(10) Adjustment after roller and clutch replacement ............................................................................ 1-6-16
(10-1) Adjusting the leading edge registration of image printing .................................................... 1-6-16
(10-2) Adjusting the leading edge registration for memory image printing ..................................... 1-6-17
(10-3) Adjusting the center line of image printing ........................................................................... 1-6-18
(10-4) Adjusting the trailing edge margin of image printing ............................................................ 1-6-19
(10-5) Adjusting the margins for printing ........................................................................................ 1-6-20
(10-6) Adjusting the amount of slack in the paper .......................................................................... 1-6-21
1-6-3 Optical section .................................................................................................................................... 1-6-22
(1) Detaching and refitting the exposure lamp ................................................................................... 1-6-22
(2) Detaching and refitting the scanner wires .................................................................................... 1-6-23
(2-1) Detaching the scanner wires ............................................................................................... 1-6-23
(2-2) Fitting the scanner wires ...................................................................................................... 1-6-25
(3) Detaching and refitting the ISU (reference) .................................................................................. 1-6-28
(4) Detaching and refitting the laser scanner unit .............................................................................. 1-6-29
(5) Adjusting the longitudinal squareness (reference) ....................................................................... 1-6-32
(6) Adjusting magnification of the scanner in the main scanning direction ........................................ 1-6-33
(7) Adjusting magnification of the scanner in the auxiliary scanning direction ................................... 1-6-34
(8) Adjusting the scanner leading edge registration ........................................................................... 1-6-35
(9) Adjusting the scanner center line ................................................................................................. 1-6-36
(10) Adjusting the margins for scanning an original on the contact glass ............................................ 1-6-37
1-6-4 Drum section ....................................................................................................................................... 1-6-38
(1) Detaching and refitting the drum unit ............................................................................................ 1-6-38
(2) Detaching and refitting the drum separation claws ....................................................................... 1-6-39
(3) Detaching and refitting the main charger unit ............................................................................... 1-6-40
1-6-5 Developing section .............................................................................................................................. 1-6-41
(1) Detaching and refitting the developing unit .................................................................................. 1-6-41
1-6-6 Transfer section .................................................................................................................................. 1-6-42
(1) Detaching and refitting the transfer roller ..................................................................................... 1-6-42
1-6-7 Fixing section ...................................................................................................................................... 1-6-43
(1) Detaching and refitting the fixing unit ........................................................................................... 1-6-43
(2) Detaching and refitting the press roller ......................................................................................... 1-6-45
(3) Detaching and refitting the fixing heater M and S ......................................................................... 1-6-46
(4) Detaching and refitting the heat roller separation claws ............................................................... 1-6-47
(5) Detaching and refitting the heat roller ........................................................................................... 1-6-48
(6) Detaching and refitting the fixing thermostat ................................................................................ 1-6-49
(7) Detaching and refitting the fixing thermistor ................................................................................. 1-6-49
(8) Adjusting the fixing unit height (adjusting lateral squareness) ...................................................... 1-6-50
1-7 Requirements on PCB Replacement
1-7-1 Upgrading the firmware on the main PCB ............................................................................................ 1-7-1
1-7-2 Upgrading the printer board firmware .................................................................................................. 1-7-2
1-7-3 Adjustment-free variable resisters (VR) ............................................................................................... 1-7-3
1-7-4 Remarks on engine PCB or main PCB replacement ........................................................................... 1-7-3
Summary of Contents for cd 1116
Page 1: ...Service Manual Copy CD 1116 CD 1120 Rev 1 ...
Page 2: ...Service Manual Copy DC 2116 DC 2120 Rev 1 ...
Page 4: ...This page is intentionally left blank ...
Page 247: ...2DA 2DB 1 2 3 2 Figure 2 3 2 Power source PCB silk screen diagram 220 240 V AC 120 V AC ...
Page 264: ...2DA 2DB 1 2 3 19 Figure 2 3 10 Operation unit PCB silk screen diagram ...

