2DA/2DB-1
1-5-39
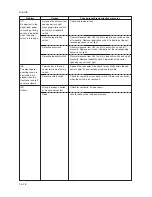
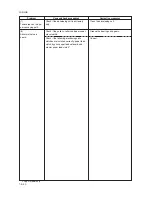
Problem
Causes/check procedures
Corrective measures
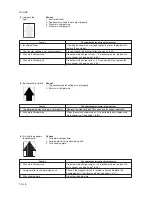
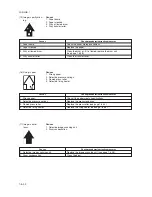
1-5-5 Mechanical problems
(1)
No primary paper feed.
(2)
No secondary paper
feed.
(3)
Skewed paper feed.
(4)
The scanner does not
travel.
(5)
Multiple sheets of paper
are fed at one time.
(6)
Paper jams.
Check if the surfaces of the following rollers
or pulleys are dirty with paper powder: for-
warding pulley, paper feed pulley, separation
pulley, registration rollers, bypass paper
feed pulley, bypass separation pad, feed
roller*, drawer forwarding pulley*, drawer
paper feed pulley* and drawer separation
pulley*.
Check if the forwarding pulley, paper feed
pulley or separation pulley is deformed.
Check if the drawer forwarding pulley*,
drawer paper feed pulley* or drawer separa-
tion pulley* is deformed.
Electrical problem with the following electro-
magnetic clutches: paper feed clutch, by-
pass paper feed solenoid and drawer paper
feed clutch*.
Check if the surfaces of the right and left
registration rollers are dirty with paper pow-
der.
Electrical problem with the registration mo-
tor.
Width guide in a drawer installed incorrectly.
Deformed width guide in a drawer.
Check if a pressure spring along the paper
conveying path is deformed or out of place.
Check if the scanner wire is loose.
The scanner motor malfunctions.
Check if the separation pulley or drawer
separation pulley* is worn.
Check if the paper is curled.
Check if the paper is excessively curled.
Deformed guides along the paper conveying
path.
Check if the contact between the right and
left registration rollers is correct.
Check if the press roller is extremely dirty or
deformed.
Check if the contact between the heat roller
and its separation claws is correct.
Check if the contact between the exit roller
and pulley is correct.
Clean with isopropyl alcohol.
Check visually and replace any deformed
pulleys (see pages 1-6-3 and 5).
Check visually and replace any deformed
pulleys (see pages 1-6-7 to 10).
See pages 1-5-35 and 36.
Clean with isopropyl alcohol.
See page 1-5-34.
Check the width guide visually and correct
or replace if necessary.
Repair or replace if necessary .
Repair or replace.
Reinstall the scanner wire (see page 1-6-
23).
See page 1-5-35.
Replace the separation pulley if it is worn
(see pages 1-6-3 and 8).
Change the paper.
Change the paper.
Repair or replace if necessary.
Check visually and remedy if necessary.
Clean or replace the press roller (see page
1-6-45).
Repair if any springs are off the separation
claws.
Check visually and remedy if necessary.
*: 20 ppm model only.
Summary of Contents for cd 1116
Page 1: ...Service Manual Copy CD 1116 CD 1120 Rev 1 ...
Page 2: ...Service Manual Copy DC 2116 DC 2120 Rev 1 ...
Page 4: ...This page is intentionally left blank ...
Page 247: ...2DA 2DB 1 2 3 2 Figure 2 3 2 Power source PCB silk screen diagram 220 240 V AC 120 V AC ...
Page 264: ...2DA 2DB 1 2 3 19 Figure 2 3 10 Operation unit PCB silk screen diagram ...


