background image

Section 7  COPIER MANAGEMENT

7-114

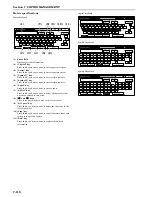
You can select the language that will be used in the touch panel.
Available languages:

Inch specifications

English, French (Français) and Spanish (Español),
Japanese (

日本語

)

Metric specifications

English, German (Deutsch), French (Français), Spanish (Español) 
and Italian (Italiano)

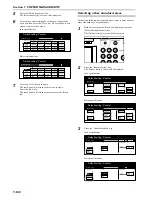
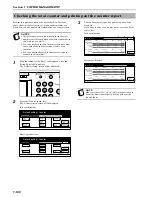
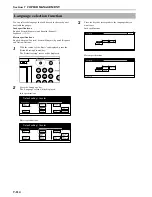
1

With the content of the “Basic” tab displayed, press the 
[Default Setting/Counter] key.
The “Default setting” screen will be displayed.

2

Press the “Language” key.
The “Language” screen will be displayed.

Inch specifications

Metric specifications

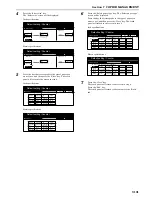
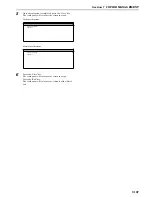
3

Press the key that corresponds to the language that you 
want to use.

Inch specifications

Metric specifications

Language selection function

End

Default setting / Counter 

Default setting

Copy

default

Machine

default

Counter

check

User

Adjustment

Language

Bypass

setting

Register

orig. size

Management

Print

report

End

Default setting / Counter 

Default setting

Copy

default

Machine

default

Counter

check

User

Adjustment

Language

Bypass

setting

Register

orig. size

Management

Print

report

Stop

Default setting

Language

Fran ais

Espaæol

English 

Stop

Default setting

Language

Deutsch

Fran ais

Espaæol

Italiano

English 

Summary of Contents for CDC 1526

Page 1: ...1526 D your office partner I N S T R U C T I O N H A N D B O O K UTAX Product Management 2004 please read the instruction handbook carefully before using this machine keep it close to the machine for easy reference ...

Page 2: ...to copy domestic or foreign currencies Copying other items may be prohibited IMPORTANT This Operation Guide is for the CDC 1526 and CDC 1526 D copiers NOTE This Operation Guide contains information that corresponds to using both the inch and metric versions of this copier When the difference in a message is only one of upper and lower case spelling we have listed the information as it specifically...

Page 3: ...this copier One touch image quality adjustment One touch selection of the image quality for example Vivid or Dull Calm is possible according to the type of copy image you want See One touch image quality adjustment on page 5 5 for the actual setting procedure Sharper Modulation setting selected Dull Calm setting selected Light setting selected Original Original Original Smooth setting selected Viv...

Page 4: ...erall color of the copies appears reddish or yellowish etc the overall color balance can be fine adjusted by increasing or decreasing the intensity of each of the colors cyan magenta yellow or black See Adjusting the color balance on page 5 1 for the actual setting procedure Original Yellow intensity increased Magenta intensity increased Cyan intensity increased Black intensity increased Yellow in...

Page 5: ...tting procedure Adjusting the color hue It is possible for you the change the color hue and create copies of interesting colors For example this adjustment turns reds into reddish yellows or yellows into yellow greens See Adjusting the color hue on page 5 3 for the actual setting procedure Original Gloss mode selected Y B and a minus value selected Greens near yellow are intensified towards yellow...

Page 6: ...he resulting colors will therefore differ somewhat from the actual copies made with this copier Adjusting the sharpness Adjusting the sharpness setting makes the contours of the image softer or sharper as appropriate See Adjusting the sharpness on page 6 57 for the actual setting procedure Original Sharpness setting increased Original Sharpness setting decreased ...

Page 7: ...Section 6 OTHER CONVENIENT FUNCTIONS This section contains explanations on using the various convenient functions of this copier Section 7 COPIER MANAGEMENT This section contains explanations on the procedures for changing the various default settings available for adjusting the copier to fit your copy needs and on the procedures for managing copy use Section 8 OPTIONAL EQUIPMENT This section cont...

Page 8: ...le of copies made from books Book erase mode 6 19 Fitting the image of either two or four originals onto a single copy page Combine Merge Copy modes 6 21 2 in 1 6 21 4 in 1 6 21 Printing page numbers on the copies Print page numbers mode 6 23 Enlarging the image and printing it out onto multiple sheets Poster mode 6 27 Making booklets from sheet originals Booklet Stitching mode Only available in d...

Page 9: ...ntering characters 7 115 Character input screens 7 115 Character input procedure 7 117 Section 8 OPTIONAL EQUIPMENT 8 1 Document Processor 8 1 Paper Feeder A 8 6 Paper Feeder B 8 6 Paper Feeder C 8 7 Document Finisher A 8 8 Document Finisher B 8 15 Memory Copy Board 8 15 Key Counter 8 16 Printer Kit 8 16 Fax Kit 8 16 Network Scanner Kit 8 16 Duplex Unit 8 16 Section 9 TROUBLESHOOTING 9 1 If one of...

Page 10: ...ate magnification ratios XY zoom mode Page 6 4 4 Making 2 sided copies from various types of originals 2 sided copy modes Page 6 6 5 Copying two page originals onto separate sheets Page separation Split copy modes Page 6 9 6 Making a margin space on the copies Margin mode Page 6 12 7 Centering the copy image Centering Image shift mode Page 6 15 8 Adding a space next to the copy images for making n...

Page 11: ...t mode Page 6 46 20 Making mirror image copies Mirror image mode Page 6 47 21 Making a test copy prior to large volume copying Proof mode Page 6 48 22 Making more of the same copies after a copy job is finished Repeat copy mode Page 6 50 23 Copying a large volume of originals in one operation Batch scanning mode Page 6 54 24 Making both color AND black white copies at the same time Color BW select...

Page 12: ...ge 7 114 30 A full range of optional equipment is available Document Processor Page 8 1 Paper Feeder Page 8 6 Paper Feeder Page 8 6 Paper Feeder Page 8 7 Document Finisher Page 8 8 Document Finisher Page 8 15 Left tray Memory Copy Board Page 8 15 Key Counter Page 8 16 Printer Kit Page 8 16 Fax Kit Page 8 16 Network Scanner Kit Page 8 16 Duplex Unit Page 8 16 Español English ...

Page 13: ...ly enters Low Power Mode when 15 minutes have passed since the device was last used The amount of time of no activity that must pass before Low Power Mode is activated may be lengthened See Energy saving Low power mode for more information Off Mode The device automatically enters Off Mode when 60 minutes have passed since the device was last used The amount of time of no activity that must pass be...

Page 14: ...d action are indicated inside the symbol Please contact your service representative to order a replacement if the safety warnings in this Operation Guide are illegible or if the guide itself is missing fee required Note An original which resembles a bank note closely may not be copied properly in some rare cases because this copier is equipped with a counterfeiting prevention function DANGER Indic...

Page 15: ...copier at the following locations for safety purposes BE SUFFICIENTLY CAREFUL to avoid fire or electric shock when removing a paper jam or when replacing toner Label 1 High temperature inside Do not touch parts in this area because there is a danger of getting burned NOTE DO NOT remove these labels ...

Page 16: ...of accidents due to tilting the copier body always turn the desk s stopper bolts until they make firm contact with the floor during initial installation or whenever the machine is moved During copying some ozone is released but the amount does not cause any ill effect to one s health If however the copier is used over a long period of time in a poorly ventilated room or when making an extremely la...

Page 17: ... If the power cord is pulled the wires may become broken and there is a danger of fire or electrical shock ALWAYS grasp the power plug when removing the power cord from the outlet ALWAYS remove the power plug from the outlet when moving the copier If the power cord is damaged there is a danger of fire or electrical shock If the copier will not be used for a short period of time overnight etc turn ...

Page 18: ...inhale toner move to a place with fresh air and gargle thoroughly with a large amount of water If coughing develops contact a physician If you do happen to ingest toner rinse your mouth out with water and drink 1 or 2 cups of water to dilute the contents of your stomach If necessary contact a physician If you do happen to get toner in your eyes flush them thoroughly with water If there is any rema...

Page 19: ...e only functional switches and are not suitable for isolating the equipment from the power source VORSICHT Der Netzstecker ist die Hauptisoliervorrichtung Die anderen Schalter auf dem Gerät sind nur Funktionsschalter und können nicht verwendet werden um den Stromfluß im Gerät zu unterbrechen ...

Page 20: ...its and methods of measurement for radio interference characteristics of information technology equipment EN55022 Class B Limits for harmonic currents emissions for equipment input current 16A per phase EN61000 3 2 Limitation of voltage fluctuations and flicker in low voltage supply systems for equipment with rated current 16A EN61000 3 3 Safety of information technology equipment including electr...

Page 21: ... if a paper misfeed occurs inside the copier 7 Toner container black 8 Toner container yellow 9 Toner container cyan 10 Toner container magenta 11 Waste toner box 12 Toner container cover Open these covers to replace toner containers and for cleaning 13 Handle Pulling out the handle provides a handhold when moving the copier Two handles are provided one on the left side and one on the right side o...

Page 22: ... that is to be set on the multi bypass tray 21 Right cover Open this cover if a paper misfeed occurs inside the copier 22 Drawer Cassette No 1 in standard copiers for 1 sided copies only This drawer cassette has a storage capacity of 500 sheets of copy paper Duplex Unit in duplex copiers for 2 sided copies This unit allows you to make duplex 2 sided copies 23 Paper length guide release levers Pinc...

Page 23: ... when you want to use the optional printer functions of this machine The indicator to the right of the key will light when the machine is in the printer operation mode The lamp to the left of the key will either light green or orange or will flash one of those colors depending upon the status of the machine See page 9 4 13 Scanner key lamp indicator Press this key when you want to use the optional...

Page 24: ... is set to 100 1 1 under the auto paper selection mode the number of copies to be made is set to 1 and the image quality is set to the text photo mode NOTES The default settings for the initial mode can be changed using the corresponding copy default settings procedure It is possible for you to change the default setting for the copy exposure in the initial mode from the manual exposure mode to th...

Page 25: ...duce Enlarge Plain Program 11x81 2 11x81 2 11x81 2 11x81 2 Orig image quality Text Text Photo Plain 11x17 1 2 3 4 6 5 10 11 12 7 8 9 13 14 15 16 17 18 20 19 21 Set 2 3 4 100 Image quality Text Text Photo 1 Paper Size Ready to copy Full Col Paper Size Basic User choice Function Colour func Plain APS Bypass Plain Colour Merge copy Image quality Reduce Enlarge Auto Exposure Exposure mode AMS 100 Redu...

Page 26: ...e auto exposure mode When making monochrome B W copies in the auto exposure mode the contrast of the original will be detected and the most suitable exposure level selected automatically When making full color copies in this mode the copier will automatically perform the corresponding background exposure adjustment See page 4 3 10 AMS key Press this key until it is highlighted when you want to hav...

Page 27: ...age quality Up Down Sort Finished 2 sided Split Reduce Enlarge Margin Imag shift Erase Mode Select size orig Auto Selection Page numbering Cover Mode Merge copy Large of originals Poster Booklet Set Ready to copy Full Col Paper Size Basic User choice Function Colour func Program Auto Rotation Eco Print Modify copy Up Down OHP back Orig set direction Select of Output Test copy Invert Sharp ness Mem...

Page 28: ...een layout Main functions procedure on page 7 97 or the Customize screen layout Add functions procedure on page 7 98 as appropriate Paper Size A 5 A 3 A 4 B 5 A 3 B 4 A 3 B 4 A 4 B 5 A 4 A 5 B 4 B 5 B 4 B 5 A 3 A 4 A 3 A 4 B 4 B 5 B 4 B 5 A 4 A 5 AMS Reduce Enlarge XY Zoom Standard Zoom 25 400 Keys 100 100 400 200 122 141 115 86 70 81 50 25 Ready to copy Full Col Set Back Register Close ...

Page 29: ...ze and type on page 7 99 respectively Among the special paper that can be use with this copier there is a wide range in paper quality and construction especially in those types of paper noted below For that reason there is a greater possibility of problems occurring during copying with these type of paper Whenever you do use such special paper as noted here it is recommended that you first make a ...

Page 30: ...der Paper type drawer cassette No 1 No 4 on page 7 48 1 Pull the drawer cassette out toward you as far as it will go NOTE DO NOT pull more than one drawer cassette out at a time 2 Pinch the levers for the paper width guide plates and move the plates to fit the width of the paper that is to be loaded in that drawer cassette The paper sizes are marked on the bottom of the drawer cassette 3 Pinch the...

Page 31: ...d paper may be the cause of paper jams Make sure that the paper is set securely against the paper length and width guide plates If there is a gap between the paper and any guide plate readjust the guide plates to fit the paper snugly Anytime paper does not fit snugly against the guide plates the message display may not indicate the correct size of paper for that drawer cassette NOTE When you are l...

Page 32: ...n this case you should refer to Multi bypass tray paper settings on page 7 99 and follow the procedure starting from step 3 to specify the size and type of paper to be used 1 Open the multi bypass tray NOTE When loading 8 1 2 11 A4R size or larger paper be sure to pull out the multi bypass extension to match the size of the paper 2 Adjust the insert guides to fit the width of the paper that is to ...

Page 33: ... onto the multi bypass tray make sure that the side to be copied onto is facing upward When printing onto envelopes When you are using the optional printer functions of this machine envelopes can be set in the multi bypass tray for printing Up to 10 Inch specifications 20 Metric specifications enve lopes can be set on the multi bypass tray at a time For more details refer to the Operation Guide fo...

Page 34: ...l actually depend upon the type of envelope being used Make sure that the flaps of all the envelopes are closed before inserting them into the multi bypass tray Make sure all envelopes are folded well at each crease so they lay flat on the by pass tray DO NOT set the flap towards the trailing edge of insertion as there is a danger of it jamming When setting envelopes on the multi bypass tray BE SU...

Page 35: ...key as desired to light the lamp in that key Full color copy mode Press the Full Color key to light the lamp in that key Select this mode when you want to make full color copies Auto Color Selection mode Press the A C S key to light the lamp in that key The copier will automatically detect the difference between color and monochrome B W originals and will select the full color copy mode for color ...

Page 36: ...ble in duplex copiers 2 The optional Memory Copy Board must be installed in order to use this mode or function in standard copiers 5 Selecting the paper size Inch specifications Metric specifications When the APS key is highlighted on the touch panel copy paper of the same size as the original will be automatically selected In order to copy the original image onto a different size of paper without...

Page 37: ...Inch specifications Metric specifications NOTES It is possible for you to make adjustments to the auto exposure mode if the overall copies come out too dark or too light See Auto exposure adjustment color on page 7 82 and Auto exposure adjustment B W on page 7 83 It is possible for you to change the default setting for the copy exposure to the auto exposure mode See Exposure mode on page 7 70 Set ...

Page 38: ...de at a time See Copy limit on page 7 94 Set Ready to copy Full Color Paper Size Basic User choice Function Color func Program 11x81 2 Select paper Exposure mode Orig image quality Up Down Sort Finished 2 sided Separation Reduce Enlarge Margin Centering Border Erase Select orig size Auto Selection Page Cover Mode Combine Batch scanning Poster Booklet Set Ready to copy Full Col Paper Size Basic Use...

Page 39: ...s limit may differ depending upon the type and conditions of the paper being used If The top tray exceeds capacity Remove the paper Too much paper in top tray Remove paper is displayed there are too many copies on the top tray Remove the copies from the top tray and then press the Start key to resume copying If ejected copies come out curled or are otherwise not stored cleanly remove the paper fro...

Page 40: ...r will not be used for a short period of time overnight etc turn the power switch OFF If it will not be used for an extended period of time vacations etc remove the power plug from the outlet for safety purposes during the time the copier is not in use ...

Page 41: ...r balance Colour balance key The Color balance Colour balance screen will be displayed Inch specifications Metric specifications 3 Press the On key Inch specifications Metric specifications Adjusting the color balance Set Ready to copy Full Color Paper Size Basic User choice Function Color func Program 11x81 2 Color balance Mono color Adjust Hue One touch image Color B W selection Ready to copy Fu...

Page 42: ...olor as desired Inch specifications Metric specifications 5 Press the Close key The touch panel will return to the screen in step 2 0 5 5 Cyan Magenta Yellow Black Color balance Off On Ready to copy Full Color Paper Size Set Back Register Close 11x81 2 0 5 5 Cyan Magenta Yellow Black Colour balance Off On Ready to copy Full Col Paper Size Set Back Register Close ...

Page 43: ...ected the Each key go directly to step 6 Inch specifications Metric specifications Adjusting the color hue All Makes adjustment to the overall color wheel Yellow Green Blue Magenta Makes adjustment to the yellow green and blue magenta portions of the color wheel Green Cyan Magenta Red Makes adjustment to the green cyan and magenta red portions of the color wheel Cyan Blue Red Yellow Makes adjustme...

Page 44: ...low will be intensified towards yellow and cyans near blue towards blue See sample 2 on page iii 8 Press the Close key The touch panel will return to the screen in step 2 Yellow Blue Green Red Magenta Cyan Adjust Hue None All Each Ready to copy Full Color Paper Size Set Back Register Close 11x81 2 Yellow Blue Green Red Magenta Cyan Adjust Hue None All Each Ready to copy Full Col Paper Size Set Bac...

Page 45: ... image Quick image screen will be displayed Inch specifications Metric specifications 3 Select the image quality setting that you want to use Inch specifications Metric specifications 4 Press the Close key The touch panel will return to the screen in step 2 One touch image quality adjustment Set Ready to copy Full Color Paper Size Basic User choice Function Color func Program 11x81 2 Color balance...

Page 46: ... blue Inch specifications Metric specifications 4 Press the Close key The touch panel will return to the screen in step 2 Mono color mode Set Ready to copy Full Color Paper Size Basic User choice Function Color func Program 11x81 2 Color balance Mono color Adjust Hue One touch image Color B W selection Ready to copy Full Col Paper Size Basic User choice Function Colour func Program Colour balance ...

Page 47: ...played Inch specifications Metric specifications 4 Press the On key or the Off key as appropriate Inch specifications Metric specifications 5 Press the Close key The touch panel will return to the screen in step 2 Gloss mode ON OFF Set Ready to copy Full Color Paper Size Basic User choice Function Color func Program 11x81 2 Auto Rotation Eco Print Modify Copy Up Down OHP backing Orig set direction...

Page 48: ...Section 5 COLOR COPY SETTINGS 5 8 ...

Page 49: ...on Color func Combine Orig image quality Reduce Enlarge Auto Exposure Exposure mode AMS 100 Reduce Enlarge Program 11x81 2 Orig image quality Text Text Photo 2 3 4 1 Plain APS Bypass Plain Color Plain 11x81 2 11x81 2 11x81 2 Plain 11x17 Set 100 Image quality Text Text Photo Paper Size Ready to copy Full Col Paper Size Basic User choice Function Colour func Merge copy Image quality Reduce Enlarge A...

Page 50: ...olor Plain 11x81 2 11x81 2 11x81 2 Plain 11x17 Set 100 Image quality Text Text Photo Paper Size Ready to copy Full Col Paper Size Basic User choice Function Colour func Merge copy Image quality Reduce Enlarge Auto Exposure Exposure mode AMS 100 Reduce Enlarge Program 2 3 4 1 Plain APS Bypass Plain Colour Plain Plain 11x81 2 Paper Size 81 2x11 11x17 11x17 51 2x81 2 AMS Reduce Enlarge XY Zoom Standa...

Page 51: ...A3 A4 B4 B5 B4 A4 B5 A5 A3 B4 A4 B5 Enlargement 115 122 141 200 400 B4 A3 B5 A4 A4 B4 A5 B5 A4 A3 B5 B4 A5 A3 Set 100 Ready to copy Full Color Paper Size Basic User choice Function Color func Combine Orig image quality Reduce Enlarge Auto Exposure Exposure mode AMS 100 Reduce Enlarge Program 11x81 2 Orig image quality Text Text Photo 2 3 4 1 Plain APS Bypass Plain Color Plain 11x81 2 11x81 2 11x81...

Page 52: ... 11x81 2 11x81 2 11x81 2 Plain 11x17 Set 100 Image quality Text Text Photo Paper Size Ready to copy Full Col Paper Size Basic User choice Function Colour func Merge copy Image quality Reduce Enlarge Auto Exposure Exposure mode AMS 100 Reduce Enlarge Program 2 3 4 1 Plain APS Bypass Plain Colour Plain Plain 11x81 2 Paper Size 81 2x11 11x17 11x17 51 2x81 2 AMS Reduce Enlarge XY Zoom Standard Zoom 25...

Page 53: ...he originals that were currently being copied and put them aside 3 Set the new originals and perform the desired copy procedure 4 When copying is completed press the Interrupt key once again and replace the newly copied originals with the ones removed before Then press the Start key The interrupted copy job will be resumed NOTE When the Memory Copy Board is installed on your copier or when you are...

Page 54: ... the original Making 2 sided copies from an open faced original books etc With this mode the two facing pages of a book or magazine are copied separately onto the front and back sides of the copy paper by simply pressing the Start key NOTE Only 8 1 2 11 11 17 A5R B5R A4R B4 and A3 size originals can be used in this mode Making 2 sided copies from various types of originals 2 sided copy modes Only ...

Page 55: ...the Open from top Top binding setting for finished copies The image that is copied onto the back side of the copies will be rotated 180 degrees If you then bind the copy set at the top the images will be oriented in the same direction when flipped up like a calendar etc Original Copy ghi ghi def abc ghi abc d e f abc def Original Copy 1 2 Set Ready to copy Full Color Paper Size Basic User choice F...

Page 56: ...ided Open from left Open from right Book Duplex Book Book ook 2 sided Original Finished Register to copy Full Col sided 2 sided sided 2 sided Left Right binding Top binding Left Right binding Top binding ook 2 sided Original Finished Register to copy Full Col Left binding Right binding Book Duplex Book Book Original Finished sided 2 sided sided 2 sided Book 2 sided 1 Register y Full color Paper Ba...

Page 57: ...ding upon the size of the originals the image will be enlarged or reduced to fit the size of the copy paper Metric specifications Asia Pacific Only 8 1 2 11 11 17 A5 B5R A4R B4 and A3 size originals and B5R B5 A4R or A4 size copy paper can be used in this mode Depending upon the size of the originals the image will be enlarged or reduced to fit the size of the copy paper Page separation Split copy...

Page 58: ...Poster Booklet 11x81 2 Register 1 sided 1 sided 2 sided Separation 2 sided 1 sided Book 1 sided 1 sided 2 sided 2 sided 2 sided Book 2 sided Ready to copy Full color Paper Size Set Back Close Able to copy 1 sided separate or 2 sided copy using 1 sided original Book original or 2 sided original Register 1 sided 1 sided 2 sided Split 2 sided 1 sided Book 1 sided 1 sided 2 sided 2 sided 2 sided Book ...

Page 59: ... start automatically If you set an original on the platen a message will be displayed telling you to set the next original In this case go to the next step 8 Replace the first original with the next one and press the Start key Scanning of that next original will start 9 Once you have finished scanning all of the originals press the Scanning finished key Copying will start ...

Page 60: ...margin on the front side will be automatically created on the back side of the copies Separate front and back margin settings Inch specifications When you are making 2 sided copies the margin positions and widths can be selected separately for the front and back sides The width of each margin can be set to any 1 8 increment between 0 and 3 4 A setting of 0 will leave no margin space Metric specifi...

Page 61: ... Page numbering Cover Mode Merge copy Large of originals Poster Booklet Ready to copy Full color Paper Size Set Back Register Margin Centering None Margin Centering Reposition image to left right or top bottom and also center image on paper 11x81 2 Close Ready to copy Full Col Paper Size Set Back Register Margin Image shift None Margin Image shift Reposition image to left right or top bottom and c...

Page 62: ...ss the Start key Copying will start 11x81 2 Ready to copy Full color Paper Size Set Back Close Back page margin Auto Front Back margin Rear Left top corner Check direction Check direction of original top side If AUTO is selected for duplex copying rear will have same margin setting as that for the front page Ready to copy Full Col Paper Size Set Back Close Back page margin Auto Front Back margin B...

Page 63: ...Program 11x81 2 Select paper Exposure mode Orig image quality Up Down Sort Finished 2 sided Separation Reduce Enlarge Margin Centering Border Erase Select orig size Auto Selection Page Cover Mode Combine Batch scanning Poster Booklet Set Ready to copy Full Col Paper Size Basic User choice Function Colour func Program Select paper Exposure mode Image quality Up Down Sort Finished 2 sided Split Redu...

Page 64: ...Section 6 OTHER CONVENIENT FUNCTIONS 6 16 6 Press the Start key Copying will start ...

Page 65: ...ettings will be displayed Inch specifications Metric specifications Adding a space next to the copy images for making notes Memo mode Original Copy Original Copy Set Ready to copy Full Color Paper Size Basic User choice Function Color func Program 11x81 2 Auto Rotation Eco Print Modify Copy Up Down OHP backing Orig set direction Select of Output Proof Copy Invert Sharp ness Memo pages Mirror Gloss...

Page 66: ...telling you to set the next original In this case go to the next step 8 Replace the first original with the next one and press the Start key Scanning of that next original will start 9 Once you have finished scanning all of the originals press the Scanning finished key Copying will start Layout A Layout B Layout A Layout B dy to copy Full color Register es None Solid Dotted Borders Layout Border l...

Page 67: ...s With this mode you can make clean copies even from thick books The width of the outside border to be erased can be set to any 1 8 increment between 0 and 3 4 The width of the center area to be erased can be set to any 1 8 increment between 0 and 1 1 2 A setting of 0 will result in no border being erased The width of the outside border that will be erased is shown as A in the illustration while t...

Page 68: ...n Reduce Enlarge Margin Centering Border Erase Select orig size Auto Selection Page Cover Mode Combine Batch scanning Poster Booklet Set Ready to copy Full Col Paper Size Basic User choice Function Colour func Program Select paper Exposure mode Image quality Up Down Sort Finished 2 sided Split Reduce Enlarge Margin Imag shift Erase Mode Select size orig Auto Selection Page numbering Cover Mode Mer...

Page 69: ...njunction with the 2 sided copy modes in order to copy four originals onto one sheet When setting the originals on the platen be sure to set the originals in the correct order 1 and then 2 4 in 1 Use this mode when you want to copy four originals onto one sheet This mode can also be used in conjunction with the 2 sided copy modes in order to copy eight originals onto one sheet When setting the ori...

Page 70: ... start Set Ready to copy Full Color Paper Size Basic User choice Function Color func Program 11x81 2 Select paper Exposure mode Orig image quality Up Down Sort Finished 2 sided Separation Reduce Enlarge Margin Centering Border Erase Select orig size Auto Selection Page Cover Mode Combine Batch scanning Poster Booklet Set Ready to copy Full Col Paper Size Basic User choice Function Colour func Prog...

Page 71: ... displayed Inch specifications Metric specifications Printing page numbers on the copies Print page numbers mode E D C B A E 5 D 4 C 3 B 2 A 1 E P 5 D P 4 C P 3 B P 2 A P 1 E 5 5 D 4 5 C 3 5 B 2 5 A 1 5 E D C 3 B 2 A 1 E 3 D 2 C 1 B A Original Copy 1 1 1 1 Direction the top of the original is set towards the rear of the copier Direction the top of the original is set towards the left of the copier...

Page 72: ...Finish Page Last page Setting start 1 Set denom inator Denominator Auto Start Rear Left top corner Check direction Check direction of original top side Ready to copy Full color Paper Size Set Back Register Close 11x81 2 Page numbering None Setting 1st page 1 P 1 1 n Start page 1 Setting last page Last page Last page Setting Start page 1 Set Denomin Denominator Auto Start Back Edge Left top corner ...

Page 73: ...1 2 Setting start 1 999 Keys 1 Back Edge Left top corner Check direction Check direction of original Ready to copy Full Col Paper Size Set Back Close Page None Setting 1st page 1 P 1 1 n Start page 1 Setting last page Finish Page Last page Setting start 1 Set denom inator Denominator Auto Start Rear Left top corner Check direction Check direction of original top side Ready to copy Full color Paper...

Page 74: ...Auto Start Back Edge Left top corner Check direction Check direction of original Ready to copy Full Col Paper Size Set Back Register Close Setting denominator Auto Manual Rear Left top corner Check direction Check direction of original top side Ready to copy Full color Paper Size Set Back Close 11x81 2 Setting denominator Auto Manual Back Edge Left top corner Check direction Check direction of ori...

Page 75: ... zoom priority key as desired If you selected the Copy size key go to the next step If you selected the Auto zoom priority key go directly to step 7 Inch specifications Metric specifications Enlarging the image and printing it out onto multiple sheets Poster mode Original Copy Set Ready to copy Full Color Paper Size Basic User choice Function Color func Program 11x81 2 Select paper Exposure mode O...

Page 76: ...n A0 A1 A2 Copy size Ready to copy Full Col Poster None Copy size Auto zoom priority Paper Size Set Back Register Close Enlarge image to poster size combine separ pages to make a poster Please set the manuscript in direction 100 400 keys 100 Ready to copy Full Color Poster None Copie size Auto zoom priority Paper Size Set Back Register Close 11x81 2 Enlarge image to poster size combine separ pages...

Page 77: ...ize copy paper can be used in this mode If Left is selected as the binding direction Copying will be performed so that the stacked and folded pages of the finished copies read from left to right If Right is selected as the binding direction Copying will be performed so that the stacked and folded pages of the finished copies read from right to left If Top is selected as the binding direction Copyi...

Page 78: ...riginals Poster Booklet Ready to copy Full color Paper Size Set Back Register Close Booklet None Booklet Book Booklet Edit one or two sided original pages and output a book Use Book booklet for book original 11x81 2 Ready to copy Full Col Paper Size Set Back Register Close Booklet None Booklet Book Booklet Edit 1 and 2 sided originals and output as book Use Book booklet for book original Booklet N...

Page 79: ...g mode Change setting of original and finishing mode Paper Size Set Back Register Close Booklet None Booklet Book Booklet 1 sided 2 sided Left Right 2 sided Top Bottom Open from left Stitching Front cvr Open from right Open from top Original Finished Stitching Off Rear Left top corner Check direction Check direction of original top side 11x81 2 Saddle Stitch None Paper Size Set Back Register Close...

Page 80: ...CTIONS 6 32 12 Replace the first original with the next one and press the Start key Scanning of that next original will start 13 Once you have finished scanning all of the originals press the Scanning finished key Copying will start ...

Page 81: ...ies are folded that page will act as the front and back cover to the copy set Without a cover When the finished copies are folded the front and back of the copy set will be blank 1 Set the open faced book etc original to be copied 2 Press the Function tab The content of the Function tab will be displayed 3 Press the Booklet key The Booklet screen will be displayed Inch specifications Metric specif...

Page 82: ...ont cvr Open from right Original Finished Copy front None Check direction Set the book original top side direct to rear Set first page Press Start key Paper Size Set Back Register Close 11x81 2 Saddle Stitch None Booklet None Booklet Book Booklet Book Left Book Right Left binding Copy on front cov Right binding Original Finished Copy front None Check direction Set book original top side direction ...

Page 83: ...ft Book Right Open from left Copy on front cvr Open from right Original Finished Copy front None Check direction Set the book original top side direct to rear Set first page Press Start key Paper Size Set Back Register Close 11x81 2 Saddle Stitch None Booklet None Booklet Book Booklet Book Left Book Right Left binding Copy on front cov Right binding Original Finished Copy front None Check directio...

Page 84: ... sorting of copy sets without the Document Finisher Sort Finished mode 3 2 1 3 2 1 3 2 1 3 2 1 3 2 1 3 3 3 1 1 1 2 2 2 When Sort ON and On 1 set are selected Original Copy When Sort OFF and On Output each page are selected Copy Original Same size paper different orientation Set Ready to copy Full Color Paper Size Basic User choice Function Color func Program 11x81 2 Select paper Exposure mode Orig...

Page 85: ...Section 6 OTHER CONVENIENT FUNCTIONS 6 37 5 Press the On 1 set key 6 Use the keypad to set the number of copies to be made 7 Press the Start key Copying will start ...

Page 86: ...be displayed 3 Press the Auto Rotation key The Auto Rotation screen will be displayed Inch specifications Metric specifications 4 Press the No rotate key Inch specifications Metric specifications Auto rotation function Set Ready to copy Full Color Paper Size Basic User choice Function Color func Program 11x81 2 Auto Rotation Eco Print Modify Copy Up Down OHP backing Orig set direction Select of Ou...

Page 87: ...her you want both sides or only one side of both the front and back covers to be copied onto or to have either or both of them left completely blank Select also whether or not you even want to include a back cover at all The illustrations above show the result when sets of 2 sided copies are being made If you are making sets of 1 sided copies copying will not be performed on the rear side of the c...

Page 88: ...shed 2 sided Split Reduce Enlarge Margin Imag shift Erase Mode Select size orig Auto Selection Page numbering Cover Mode Merge copy Large of originals Poster Booklet Ready to copy Full color Paper Size Set Close Register Close Cover Mode No cover Cover Front cover Insert Color or Thick etc paper as a front back cover Able to copy on same paper Set the cover paper for specify drawer 11x81 2 Ready t...

Page 89: ...lace the first original with the next one and press the Start key Scanning of that next original will start 10 Once you have finished scanning all of the originals press the Scanning finished key Copying will start Ready to copy Full color Paper Size Set Back Close Register Cover Mode No cover Cover Front cover Rear cover Blank Front copy Back copy 2 sided copy Blank Front copy Back copy 2 sided c...

Page 90: ...lect a standard size other than those displayed go to the next step If you want to select the dimensions of the scan area manually go directly to step 7 Inch specifications Metric specifications NOTE If you have registered a custom original size you will be able to select that size for use in this mode See Original size registration on page 7 102 Original size selection mode Original Copy Set Read...

Page 91: ...ill start Select original size Select size Input size Other stand Size Ready to copy Full color Paper Size Set Back Register Close A 5 A 5 A 6 A 3 B 5 B 4 16 K 8 K B 6 B 5 Folio B 6 81 2x13 P Card 11x81 2 Select size original Select size Input size Others stand Size Ready to copy Full Col Paper Size Set Back Register Close 81 2x14 51 2x81 2 81 2x51 2 11x17 Pstcard 81 2x13 16 K 8 K 11x17 Select ori...

Page 92: ...ncies 1 Set the originals to be copied 2 Set the transparency film on the multi bypass tray IMPORTANT Fan through the transparencies before setting them Up to 25 transparencies can be set on the multi bypass tray at one time Make sure that paper of the same size and orientation as the transparencies has been loaded into a drawer cassette 3 Press the Function tab and then the Down key The content o...

Page 93: ...t Ready to copy Full color Paper Size Set Back Register Close OHP backing None Copy Blank Insert a blank paper between piece of OHP film or copy to a OHP back paper IPlace the OHP film in the bypass 11x81 2 Ready to copy Full Col Paper Size Set Back Register Close OHP back None Copy Blank Insert blank paper between OHP films or copy to OHP back paper Place OHP film on bypass ...

Page 94: ...or Invert mode Original Copy Set Ready to copy Full Color Paper Size Basic User choice Function Color func Program 11x81 2 Auto Rotation Eco Print Modify Copy Up Down OHP backing Orig set direction Select of Output Proof Copy Invert Sharp ness Memo pages Mirror Gloss Mode Set Ready to copy Full Col Paper Size Basic User choice Function Colour func Program Auto Rotation Eco Print Modify copy Up Dow...

Page 95: ...opy Set Ready to copy Full Color Paper Size Basic User choice Function Color func Program 11x81 2 Auto Rotation Eco Print Modify Copy Up Down OHP backing Orig set direction Select of Output Proof Copy Invert Sharp ness Memo pages Mirror Gloss Mode Set Ready to copy Full Col Paper Size Basic User choice Function Colour func Program Auto Rotation Eco Print Modify copy Up Down OHP back Orig set direc...

Page 96: ...e next original go to the next step 7 Replace the first original with the next one and press the Start key Scanning of that next original will start 8 Once you have finished scanning all of the originals press the Scanning finished key Copying of the test copy set will start Making a test copy prior to large volume copying Proof mode Set Ready to copy Full Color Paper Size Basic User choice Functi...

Page 97: ... start If you want to change the number of copies to be made press the Change Preset key and enter the actual number of copies you do want to make If there is some problem with the copies Press the Cancel key to cancel the copy job and start the procedure from the beginning Check proof copy To stop and retry press Cancel key To continue to print press Start key Orig page 1 sided Rear 100 APS 11x81...

Page 98: ... Function tab will be displayed 3 Press the Down key The content of the next portion of the Function tab will be displayed 4 Press the Modify Copy key The Modify Copy screen will be displayed Inch specifications Metric specifications 5 Press the On key Inch specifications Metric specifications If you want to register a security code go to the next step If you do NOT want to register a security cod...

Page 99: ...eprinting a registered copy job 1 Press the Repeat Copy key The Modify copy screen will be displayed 2 Press the Reprint key Inch specifications Metric specifications If you designated a security code when you registered the copy job for repeat copying the code input screen will be displayed In this case go to the next step If you did NOT designate a security code when you registered the copy job ...

Page 100: ...t Copy key The Modify copy screen will be displayed 2 Press the Print from 1st Head print key Inch specifications Metric specifications If you designated a security code when you registered the copy job for repeat copying the code input screen will be displayed In this case go to the next step If you did NOT designate a security code when you registered the copy job for repeat copying print out of...

Page 101: ...ications Metric specifications If you selected Yes the job data will be delete and the touch panel will return to the contents of the Basic tab If you selected No the touch panel will return to the screen in step 2 without canceling the selected job Stop Enter Enter by key Enter the re print code Clear Stop Enter Enter key Enter the re print code Clear Details Item Close Modify copy Orig page Set ...

Page 102: ...finished scanning all of the originals press the Scanning finished key Copying will start Copying a large volume of originals in one operation Batch scanning mode Original Copy Set Ready to copy Full Color Paper Size Basic User choice Function Color func Program 11x81 2 Select paper Exposure mode Orig image quality Up Down Sort Finished 2 sided Separation Reduce Enlarge Margin Centering Border Era...

Page 103: ...te copies at the same time Color BW selection mode Original Copy Set Ready to copy Full Color Paper Size Basic User choice Function Color func Program 11x81 2 Color balance Mono color Adjust Hue One touch image Color B W selection Ready to copy Full Col Paper Size Basic User choice Function Colour func Program Colour balance Mono colour Adjust Hue Quick image Colour B W selection Color B W selecti...

Page 104: ...ectly by pressing the right side keys Keys key and then using the keypad Inch specifications Metric specifications 7 Press the Start key Copying will start 20 1 Color B W selection Off On Color B W Set Set 1 499 1 499 keys keys Ready to copy Full Color Paper Size Set Back Register Close 11x81 2 20 1 Colour B W selection Off On Colour B W Set Set 1 499 1 499 Keys Keys Ready to copy Full Col Paper S...

Page 105: ... key The Sharpness screen will be displayed Inch specifications Metric specifications 5 Use the Dark Heavy key or the Light key to adjust the sharpness as desired Inch specifications Metric specifications 6 Press the Start key Copying will start Adjusting the sharpness Set Ready to copy Full Color Paper Size Basic User choice Function Color func Program 11x81 2 Auto Rotation Eco Print Modify Copy ...

Page 106: ...s the Start key Copying will start Saving on toner use Eco print mode With the eco print mode turned OFF With the eco print mode turned ON Set Ready to copy Full Color Paper Size Basic User choice Function Color func Program 11x81 2 Auto Rotation Eco Print Modify Copy Up Down OHP backing Orig set direction Select of Output Proof Copy Invert Sharp ness Memo pages Mirror Gloss Mode Set Ready to copy...

Page 107: ...ications Metric specifications Original set direction Set Ready to copy Full Color Paper Size Basic User choice Function Color func Program 11x81 2 Auto Rotation Eco Print Modify Copy Up Down OHP backing Orig set direction Select of Output Proof Copy Invert Sharp ness Memo pages Mirror Gloss Mode Set Ready to copy Full Col Paper Size Basic User choice Function Colour func Program Auto Rotation Eco...

Page 108: ...g characters Memorizing frequently used settings Program function Ready to copy Full Color Paper Size Set Basic User choice Function Color func Program Register Delete Change name Reg delete Recall 1 4 3 2 5 8 7 6 11x81 2 Ready to copy Full Col Paper Size Set Basic User choice Function Colour func Program Register Delete Change name Reg delete Recall 1 4 3 2 5 8 7 6 End Select program number Regis...

Page 109: ...cations 3 Set the originals to be copied and press the Start key Copying will start using the settings that were registered under that program Register program The set program is registered Is it correct Yes No Stop Program 1 Program name abc Register program The set program is registered Is it correct Yes No Stop Program 1 Program name ABC Recall Register Delete Change name Reg delete 1 Catalog A...

Page 110: ... Catalog A Catalog B Catalog C Catalog D File A File B List A 4 3 2 5 8 7 6 Ready to copy Full Color Paper Size Set Basic User choice Function Color func Program 11x81 2 Recall Register Delete Change name Reg delete 1 Catalog A Catalog B Catalog C Catalog D File A File B List A 4 3 2 5 8 7 6 Ready to copy Full Col Paper Size Set Basic User choice Function Colour func Program Select the number for ...

Page 111: ...delete 1 Catalog A Catalog B Catalog C Catalog D File A File B List A 4 3 2 5 8 7 6 Ready to copy Full Color Paper Size Set Basic User choice Function Color func Program 11x81 2 Recall Register Delete Change name Reg delete 1 Catalog A Catalog B Catalog C Catalog D File A File B List A 4 3 2 5 8 7 6 Ready to copy Full Col Paper Size Set Basic User choice Function Colour func Program Select the num...

Page 112: ...ress the Register key once again The screen to register functions and or modes under registration keys will be displayed Inch specifications Metric specifications Registration keys Set Ready to copy Full Color Paper Size Basic User choice Function Color func Program 11x81 2 Select paper Exposure mode Orig image quality Up Down Sort Finished 2 sided Separation Reduce Enlarge Margin Centering Border...

Page 113: ...l be registered under the registration key If you selected No the touch panel will return to the screen in step 5 without registering the selected function Select the number of program to registered Register present setting 1 registrat registrat registrat 3 2 End Select the number of program to registered Register present setting 1 No registrat No registrat No registrat 3 2 End Register this funct...

Page 114: ... Text Photo 2 3 4 1 Plain APS Bypass Plain Color Plain 11x81 2 11x81 2 11x81 2 Plain 11x17 Set 100 Image quality Text Text Photo Paper Size Ready to copy Full Col Paper Size Basic User choice Function Colour func Merge copy Auto Exposure Exposure mode AMS 100 Reduce Enlarge Program 2 3 4 1 Plain APS Bypass Plain Colour Plain Plain Set 100 Ready to copy Full Color Paper Size Basic User choice Funct...

Page 115: ...lect the number of program to delete Delete registration 1 Combine 3 2 End Orig image quality Reduce Enlarge Select the number of program to delete Delete registration 1 Merge copy 3 2 End Image quality Reduce Enlarge Delete registration Register No 1 Are you sure you want to delete Yes No Stop Delete registration Register No 1 Are you sure you want to delete Yes No Stop Set 100 Ready to copy Full...

Page 116: ...nder the situation indicated in the examples below Example Finished copies The asterisk in the illustration indicates the blank sheets Originals NOTE This procedure will assume that the color paper to be used as the front cover is loaded in cassette No 2 in the optional paper feeder and that there is plain copy paper loaded in cassette No 3 in the optional Paper Feeder Step 1 Accessing the Job bui...

Page 117: ...Check direction of original top side 1 sided copy 2 sided copy Open from left Open from right Open from top Finished Rear Left top corner Set Back Close Place originals then press Start key 1 sided 2 sided copy Ready to Job build Full color r Check direction Check direction of original 1 sided Copy 2 sided Copy Left binding Right binding Top binding Finished Back Edge Left top corner Set Back Clos...

Page 118: ...t from rear page Basic Quality Edit Ready to Job build Full color Set Back Close Place originals then press Start key Select paper Plain Bypass Plain Plain Color 11x81 2 Plain 81 2x11 11x81 2 11x81 2 Ready to Job build Full Col Set Back Close Place originals then press Start key Select paper Plain Bypass Plain Plain Colour Plain set Cancel Job Build Step2 Scan next original s Place the originals a...

Page 119: ...g copy 1 sided 2 sided copy Offset AMS Back Edge Select paper Original type 1 sided 2 sided Finished Reduce Enlarge Orig set direction Insert page 2 sided copy Left Finished page 4 Next copy page Front Print from Rear page Scanning finished Basic Quality Edit 11x81 2 set Job cancel Job Build Step4 Scan next original s Place the originals and press start key Press Scanning finished key when startin...

Page 120: ...ack Edge Select paper Original type 1 sided 2 sided Finished Reduce Enlarge Orig set direction Insert blank page 2 sided Copy Left Finished page 6 Next copy page Front Print from rear page Scanning finished Basic Quality Edit Scan next original s Place the originals and press start key Press Scanning finished key when starting copy set Back Close Select paper 3 4 2 Color Bypass Plain Plain Plain 1...

Page 121: ...g set direction Insert blank page 2 sided Copy Left Finished page 8 Next copy page Front Print from Rear page Scanning finished Basic Quality Edit set Cancel Job Build Step8 Scan next original s Place the originals and press start key Press Scanning finished key when starting copy 1 sided 2 sided copy Offset AMS Back Edge Select paper Original type 1 sided 2 sided Finished Reduce Enlarge Orig set ...

Page 122: ...d to making either 1 sided or 2 sided copies can only be made in the first step of the job build mode and will apply to all steps in the copy job 1 sided 1 sided copy Offset Basic Quality Edit AMS Back Edge Select paper Original type 1 sided 2 sided Finished Reduce Enlarge Orig set direction Insert page 1 sided copy Left Finished page 0 Ready to Job build Full color Place originals then press Star...

Page 123: ...gard to how the copy sets will be finished can only be made in the first step of the job build mode and will apply to all steps in the copy job r Check direction Check direction of original top side 1 sided copy 2 sided copy Open from left Open from right Open from top Finished Rear Left top corner Set Back Close Place originals then press Start key 1 sided 2 sided copy Ready to Job build Full col...

Page 124: ...cifications Ready to Job build Full color set Back Close Place originals then press Start key Check direction Check direction of original top side Offset Staple Punch Rear Left top corner Finished Off On Punch mode Staple mode None Saddle Stitch Ready to Job build Full Col set Back Close Set original Press Start key Check direction Check direction of original Group Staple Punch Back Edge Left top ...

Page 125: ... 11x17 81 2x14 81 2x11 11x17 81 2x14 11x17 81 2x11 11x17 51 2x81 2 81 2x11 11x17 Ready to Job build Full Col set Back Reduce Enlarge Close Set original Press Start key Keys 100 25 400 A 5 A 3 A 4 A 5 A 3 A 4 Folio A 3 A 3 Folio A 4 A 4 A 3 A 4 A 4 A 5 11x15 11x15 XY Zoom Standard Zoom AMS 100 400 200 127 141 106 90 70 75 50 25 Paper Size A 5 A 3 A 4 B 5 A 3 B 4 A 3 B 4 A 4 B 5 A 4 A 5 B 4 B 5 B 4 ...

Page 126: ...ob build Full Col Set original Press Start key set End Job Build Step 1 Text Photo Density 4 Off Off Off Off Exposure mode Image quality Eco print Glos pri Adjust Hue Sharp ness Colour balance Insert blank page 1 sided Copy Left Finished page 0 Basic Quality Edit Ready to Job build Full color set Back Exposure mode Close Place originals then press Start key Manual Lighter Darker Auto Ready to Job ...

Page 127: ... Step 1 Text Photo Density 4 Off Off Off Off Exposure mode Orig image quality Eco Print GlossPrint Adjust Hue Sharp ness Color balance Insert page 1 sided copy Left Finished page 0 Basic Quality Edit Ready to Job build Full Col Set original Press Start key set End Job Build Step 1 Text Photo Density 4 Off Off Off Off Exposure mode Image quality Eco print Glos pri Adjust Hue Sharp ness Colour balan...

Page 128: ...quality Eco Print GlossPrint Adjust Hue Sharp ness Color balance Insert page 1 sided copy Left Finished page 0 Basic Quality Edit Ready to Job build Full Col Set original Press Start key set End Job Build Step 1 Text Photo Density 4 Off Off Off Off Exposure mode Image quality Eco print Glos pri Adjust Hue Sharp ness Colour balance Insert blank page 1 sided Copy Left Finished page 0 Basic Quality E...

Page 129: ...ady to Job build Full Col Set original Press Start key set End Job Build Step 1 Text Photo Density 4 Off Off Off Off Exposure mode Image quality Eco print Glos pri Adjust Hue Sharp ness Colour balance Insert blank page 1 sided Copy Left Finished page 0 Basic Quality Edit Ready to Job build Full color set Back Sharpness Close Place originals then press Start key Light Shade on image edge Dark Accen...

Page 130: ...ep of the job build mode and will apply to all steps in the copy job Ready to Job build Full color Place originals then press Start key set End Basic Quality Edit Insert page 2 sided copy Left Finished page 0 Job Build Step 1 Auto Off Off None None Top tray Border Erase Modify Copy Select orig size Select of Output Page Margin Centering Ready to Job build Full Col Set original Press Start key set ...

Page 131: ...Full color set Back Modify Copy Close Place originals then press Start key _keys Security When select On data can be saved You can recall and re print at anytime Select password to secure a stored document Off On Ready to Job build Full Col set Back Modify copy Close Set original Press Start key Keys Security When select On job can be saved You can recall and re print at anytime You can set a pass...

Page 132: ...n only be made in the first step of the job build mode and will apply to all steps in the copy job Ready to Job build Full color Place originals then press Start key set End Basic Quality Edit Insert page 2 sided copy Left Finished page 0 Job Build Step 1 Auto Off Off None None Top tray Border Erase Modify Copy Select orig size Select of Output Page Margin Centering Ready to Job build Full Col Set...

Page 133: ...e optional Left Tray is installed 3 Press the Close key The touch panel will return to the screen in step 1 Ready to Job build Full color set Back Close Place originals then press Start key Tray 1 Tray 2 Select proper output tray to avoid mixing jobs You can confirm output tray with output management Select of Output Tray A Top tray Tray 5 Tray 4 Tray 3 Ready to Job build Full Col set Back Close S...

Page 134: ...ey will be the only lit indication on the operation panel To resume copying after the Low power mode has been activated press the Energy Saver key once again It will take the copier less than 30 seconds to return to a copy ready state NOTE The energy saving Low power mode will also engage automatically in this copier if no operation is performed for a predetermined period of time See Auto low powe...

Page 135: ...power consumption in the standby mode occupies a large part of overall consumption Having the copier turned OFF automatically after a certain amount of time reduces unnecessary power consumption in the standby mode or at night if the copier happens to be left on accidentally The result is a lower electricity bill NOTES In order to change the amount of time that will elapse before the auto sleep fu...

Page 136: ...Section 6 OTHER CONVENIENT FUNCTIONS 6 88 ...

Page 137: ...999 Clear the copy counts for all department ID codes at one time or for each individual department Check copy counts for your own department without the need to enter the management code Just enter the corresponding department ID code IMPORTANT In order to access the Change restrictions for use procedure under Editing copy management information it is necessary to select On under Copier function ...

Page 138: ...ier under each department ID code 7 24 Checking the copy management counts Check all departments Perform this procedure when you want to check the total number of copies made under all department ID codes as a whole print out a copy management report and clear the copy counts for all of the registered department ID codes 7 25 Check individual departments Perform this procedure when you want to che...

Page 139: ...rocedure will be displayed Inch specifications Metric specifications NOTES It is possible for you to change the 4 digit management code See Changing the management code on page 7 60 Perform the following procedure that corresponds to the desired setting End Default setting Counter Default setting Copy default Machine default Counter check User Adjustment Language Bypass setting Register orig size ...

Page 140: ...efault Machine default Counter check User Adjustment Language Bypass setting Register orig size Management Print report Close Each Mgt Total Management total Managem Total Default setting Register Sett Management Def Set Management edit Off On Management Management Close Each Mgt Total Management total Managem Total Default setting Register Sett Management Def Set Management edit Off On Management...

Page 141: ...sure to register both of the setting items above If you do not an error will occur and you will be unable to continue to the next step If you attempt to register a department ID code or a department name that is already registered an error will occur and you will be unable to continue to the next step In this case select a different ID code and or name as appropriate Close Back ID code ID code 0 9...

Page 142: ...o limit No limit No limit 0007 1st Sales Dept Copy limitation Printer limitation Limitation All Limitation Full Color Scanner limitation Fax Transm Limitation Cancel Change Registr Value Setting item 0007 1st Sales Dept Default setting Management Management edit New register Copy limitation Printer limitation Limitation All Limitation Full Color Scanner limitation Fax Transm Limitation On On No li...

Page 143: ...e settings are Can use and Is not permitted B W Black and white copying or printing F C Full color copying or printing If Each is selected as the Copy Printer output management setting The available settings are No limit Counter limit and Is not permitted B W Black and white copying or printing F C Full color copying or printing Copier Printer Scanner Fax Reference page B W F C B W F C Scanning Fa...

Page 144: ... step 2 Up Down Order of indication Mgt Inf correction Delete Register Limit in use 01 02 0001 0014 00000015 00000016 00000017 001 010 1st Sales Dept 2nd Sales Dept 3rd Sales Dept 4th Sales Dept 5th Sales Dept 6th Sales Dept 7th Sales Dept Close Department Default setting Management Management edit Up Down Order of indication Mgt Inf correction Delete Register Limit in use Close Default setting Ma...

Page 145: ...el will return to the screen in step 2 Up Down Order of indication Mgt Inf correction Delete Register Limit in use 01 02 0001 0014 00000015 00000016 00000017 001 010 1st Sales Dept 2nd Sales Dept 3rd Sales Dept 4th Sales Dept 5th Sales Dept 6th Sales Dept 7th Sales Dept Close Department Default setting Management Management edit Up Down Order of indication Mgt Inf correction Delete Register Limit ...

Page 146: ...d copying and printing press the No limit key and then proceed to step 5 Inch specifications Metric specifications NOTE If you want to quit the displayed setting without changing it press the Back key The touch panel will return to the screen in step 2 Up Down Order of indication Mgt Inf correction Delete Register Limit in use 01 02 0001 0014 00000015 00000016 00000017 001 010 1st Sales Dept 2nd S...

Page 147: ...warning message will appear if the maximum number of copies specified by Restrictions All is exceeded 1 Access the screen that contains the copy restriction setting items See Accessing the copy management menu screen on page 7 3 or Change restrictions for use on page 7 24 Inch specifications Metric specifications Close Back Management Management edit New register Limitation All No limit Counter li...

Page 148: ... up to 999 999 Inch specifications Metric specifications 5 Press the Close key The touch panel will return to the screen in step 2 Close Change Value Setting item 0007 1st Sales Dept Default setting Management Management edit Limit in use Copy limitation Printer limitation Limitation All Limitation Full Color Scanner limitation Fax Transm Limitation On On No limit No limit No limit No limit Close ...

Page 149: ... 5 Press the Close key The touch panel will return to the screen in step 2 Up Down Order of indication Mgt Inf correction Delete Register Limit in use 01 02 0001 0014 00000015 00000016 00000017 001 010 1st Sales Dept 2nd Sales Dept 3rd Sales Dept 4th Sales Dept 5th Sales Dept 6th Sales Dept 7th Sales Dept Close Department Default setting Management Management edit Up Down Order of indication Mgt I...

Page 150: ...ric specifications 5 Press the Close key The touch panel will return to the screen in step 2 Up Down Order of indication Mgt Inf correction Delete Register Limit in use 01 02 0001 0014 00000015 00000016 00000017 001 010 1st Sales Dept 2nd Sales Dept 3rd Sales Dept 4th Sales Dept 5th Sales Dept 6th Sales Dept 7th Sales Dept Close Department Default setting Management Management edit Up Down Order o...

Page 151: ...ess the Close key The touch panel will return to the screen in step 2 Up Down Order of indication Mgt Inf correction Delete Register Limit in use 01 02 0001 0014 00000015 00000016 00000017 001 010 1st Sales Dept 2nd Sales Dept 3rd Sales Dept 4th Sales Dept 5th Sales Dept 6th Sales Dept 7th Sales Dept Close Department Default setting Management Management edit Up Down Order of indication Mgt Inf co...

Page 152: ... be set to any 1 page increment up to 999 999 Inch specifications Metric specifications 5 Press the Close key The touch panel will return to the screen in step 2 Up Down Order of indication Mgt Inf correction Delete Register Limit in use 01 02 0001 0014 00000015 00000016 00000017 001 010 1st Sales Dept 2nd Sales Dept 3rd Sales Dept 4th Sales Dept 5th Sales Dept 6th Sales Dept 7th Sales Dept Close ...

Page 153: ...ayed setting without changing it press the Back key The touch panel will return to the screen in step 2 Up Down Order of indication Mgt Inf correction Delete Register Limit in use 01 02 0001 0014 00000015 00000016 00000017 001 010 1st Sales Dept 2nd Sales Dept 3rd Sales Dept 4th Sales Dept 5th Sales Dept 6th Sales Dept 7th Sales Dept Close Department Default setting Management Management edit Up D...

Page 154: ...s All is exceeded 1 Access the screen that contains the copy restriction setting items See Accessing the copy management menu screen on page 7 3 or Change restrictions for use on page 7 24 Inch specifications Metric specifications Close Back Management Management edit New register Printer limit All clear 999 999 1 999 999 Limited value No limit Counter limit Is not permitted Close Back Management ...

Page 155: ...cifications 5 Press the Close key The touch panel will return to the screen in step 2 Close Change Value Setting item Default setting Management Management edit Limit in use Fax Transm Limitation Scanner limitation Copy limitation All Copy limit Full Co Printer limit All Print limit Full Col No limit No limit No limit No limit No limit No limit 0007 1st Sales Dept Close Change Value Setting item D...

Page 156: ...rig size Management Print report End Default setting Counter Default setting Copy default Machine default Counter check User Adjustment Language Bypass setting Register orig size Management Print report Close Each Mgt Total Management total Managem Total Default setting Register Sett Management Def Set Management edit Off On Management Management Close Each Mgt Total Management total Managem Total...

Page 157: ...t screen will be displayed Inch specifications Metric specifications Stop ID code Name to display 01 1st Sales Dept This ID Code will be deleted Are you sure Yes No Stop ID code Name to display 01 1st Sales Dept This ID Code will be deleted Are you sure Yes No End Default setting Counter Default setting Copy default Machine default Counter check User Adjustment Language Bypass setting Register ori...

Page 158: ...4 Proceed to step 10 Inch specifications Metric specifications Up Down Order of indication Mgt Inf correction Delete Register Limit in use 01 02 0001 0014 00000015 00000016 00000017 001 010 1st Sales Dept 2nd Sales Dept 3rd Sales Dept 4th Sales Dept 5th Sales Dept 6th Sales Dept 7th Sales Dept Close Department Default setting Management Management edit Up Down Order of indication Mgt Inf correctio...

Page 159: ...r the department name refer to Entering characters on page 7 115 9 Press the End key The touch panel will return to the screen in step 7 10 Press the Close key The touch panel will return to the screen in step 3 11 Press the Close key The touch panel will return to the screen in step 2 12 Press the Close key Value Setting item Default setting Management Management edit Change Department inform edi...

Page 160: ...s for use on page 7 7 End Default setting Counter Default setting Copy default Machine default Counter check User Adjustment Language Bypass setting Register orig size Management Print report End Default setting Counter Default setting Copy default Machine default Counter check User Adjustment Language Bypass setting Register orig size Management Print report Close Each Mgt Total Management total ...

Page 161: ... Management edit Limit in use Copy limitation Printer limitation Limitation All Limitation Full Color Scanner limitation Fax Transm Limitation On On No limit No limit No limit No limit Close Change Value Setting item Default setting Management Management edit On On No limit No limit No limit No limit 0007 1st Sales Dept Limit in use Copy limitation Printer limitation Limitation All Limitation Full...

Page 162: ... Printer Fax Total Close Default setting Management Number print Black White Monocolour Full colour Total Management Total Counter clear Print report 300 0 80 380 100 10 110 50 450 0 90 490 100 100 1Hrs 10Min Scanner FAX Scan Transm Fax transm Scan pages Trsm pages Commun Time DEPT COUNT REPORT COPY PRINT LIMIT P 1 09 29 03 DEPT ID TOTAL TOTAL 1 8 ETC FULL COLOR 0 0 0 0 MONO COLOR 0 0 0 0 B W SCAN...

Page 163: ...ser Adjustment Language Bypass setting Register orig size Management Print report End Default setting Counter Default setting Copy default Machine default Counter check User Adjustment Language Bypass setting Register orig size Management Print report Close Each Mgt Total Management total Managem Total Default setting Register Sett Management Def Set Management edit Off On Management Management Cl...

Page 164: ...hite Monocolor Full color Total Scan pages Trsm pages Commun Time Number in 01 1st Sales Dept Close Default setting Management Each Management Total Counter clear 100 100 1Hrs 10Min Scanner FAX Number print Scan Transm Black White Monocolour Full colour Total Trsm pages Commun Time 80 0 18 1 000 98 5 000 Total 50 0 13 63 30 5 35 Copy Printer Fax transm Scan pages is limit value Number in is limit ...

Page 165: ...age 7 38 Total count for specified paper size 1 to 5 Page 7 39 Accessing the copy management default settings 1 Access the copy management menu screen See Accessing the copy management menu screen on page 7 3 Inch specifications Metric specifications End Default setting Counter Default setting Copy default Machine default Counter check User Adjustment Language Bypass setting Register orig size Man...

Page 166: ... Set Management edit Off On Management Management Close Each Mgt Total Management total Managem Total Default setting Register Sett Management Def Set Management edit Off On Management Management Close Change Value Setting item Default setting Management Copy management Print Managem Printer error report Others Mgt Reg print Copy Printer output mgt Scanner Management Fax Management Management Def ...

Page 167: ...g without changing it press the Back key The touch panel will return to the screen in step 1 3 Press the Close key The touch panel will return to the screen in step 1 Close Change Value Setting item Default setting Management Copy management Print Managem Printer error report Others Mgt Reg print Copy Printer output mgt Scanner Management Fax Management Management Def setting On On On On All On On...

Page 168: ...anyone attempts to print using an invalid department ID code an error will occur under the printing functions and printout will not be possible When the Printer key is pressed Department ID code mismatch will be displayed Press the GO key to print out an error report If you want to cancel printing press the Cancel key For more details refer to the Operation Guide for the Printer Kit Inch specifica...

Page 169: ...ons NOTE If you want to quit the displayed setting without changing it press the Back key The touch panel will return to the screen in step 1 3 Press the Close key The touch panel will return to the screen in step 1 Close Change Value Setting item Default setting Management Copy management Print Managem Printer error report Others Mgt Reg print Copy Printer output mgt Scanner Management Fax Manage...

Page 170: ...specifications NOTE If you want to quit the displayed setting without changing it press the Back key The touch panel will return to the screen in step 1 3 Press the Close key The touch panel will return to the screen in step 1 Close Change Value Setting item Default setting Management Copy management Print Managem Printer error report Others Mgt Reg print Copy Printer output mgt Scanner Management...

Page 171: ...ng without changing it press the Back key The touch panel will return to the screen in step 1 3 Press the Close key The touch panel will return to the screen in step 1 Close Change Value Setting item Default setting Management Copy management Print Managem Printer error report Others Mgt Reg print Copy Printer output mgt Scanner Management Fax Management Management Def setting On On On On All On O...

Page 172: ...n to the screen in step 1 3 Press the Close key The touch panel will return to the screen in step 1 Close Change Default setting Management Management Def setting Management Def setting Value Setting item Scanner Management Fax Management Excess of limit Setting Def Val of coun limit Total size 1 Total size 2 Total size 3 On On Unable to use 999999 81 2x11 No specif 11 x17 No specif 81 2x11 No spe...

Page 173: ...Press the Close key The touch panel will return to the screen in step 1 Close Change Default setting Management Management Def setting Management Def setting Value Setting item Scanner Management Fax Management Excess of limit Setting Def Val of coun limit Total size 1 Total size 2 Total size 3 On On Unable to use 999999 81 2x11 No specif 11 x17 No specif 81 2x11 No specif Close Change Default set...

Page 174: ...the screen in step 1 Close Change Default setting Management Management Def setting Management Def setting Value Setting item Scanner Management Fax Management Excess of limit Setting Def Val of coun limit Total size 1 Total size 2 Total size 3 On On Unable to use 999999 81 2x11 No specif 11 x17 No specif 81 2x11 No specif Close Change Default setting Management Management Def setting Management D...

Page 175: ... If you want to quit the displayed setting without changing it press the Back key The touch panel will return to the screen in step 1 Close Change Default setting Management Management Def setting Management Def setting Value Setting item Scanner Management Fax Management Excess of limit Setting Def Val of coun limit Total size 1 Total size 2 Total size 3 On On Unable to use 999999 81 2x11 No spec...

Page 176: ...4 B5 Folio 11x17 81 2x14 81 2x11 51 2x81 2 Close Back Default setting Management Management Def setting Total size 1 Can set totals of paper size and type Off On Select size Select paper type Paper size Paper type With no specif 81 2x11 Close Back Default setting Management Management Def setting Total size 1 Can set totals of paper size and type Off On Select size Select paper type Paper size Pap...

Page 177: ...ID code and press the Each Mgt Total key you can check the copy counts for your own department Inch specifications Metric specifications 2 Perform the desired copy operation as usual 3 Once you are finished copying press the Management key clear Enter Each Mgt Total Enter ID code clear Enter Each Mgt Total Enter ID code Number in is limit value 01 1st Sales Dept Close Default setting Management Ea...

Page 178: ...ecessary to select Feed same paper type as well All types of paper Feed same paper type All types of paper Paper size drawer cassette No 1 No 4 Sets the size of paper that is loaded in drawers cassettes No 1 through and No 4 If you want the size to be detected automatically select Auto Detection Automatic size detection If you want to manually set the size of paper select Standard sizes The settin...

Page 179: ...s 7 52 Auto low power time Sets the amount of time between the point that copying ends and the energy saving Low power mode engages 1 5 15 30 45 60 90 120 180 and 240 minutes 15 minutes 7 53 Copy eject location Sets the location for ejection of finished copies This setting is displayed when an optional Document Finisher or the Left Tray is installed on the copier When an optional Document Finisher...

Page 180: ...ons turn this function OFF However it is recommended that you try to set a longer time interval until auto sleep engages before you actually turn it OFF On Off On 7 61 Color B W Mix Colour B W Mix Sets the priority mode when copying a document that mixes color and monochrome Color priority Color copy cyan magenta yellow and black mechanisms are operated regardless of original type Use this setting...

Page 181: ...g machine default settings and perform the corresponding setting s End Default setting Counter Default setting Copy default Machine default Counter check User Adjustment Language Bypass setting Register orig size Management Print report End Default setting Counter Default setting Copy default Machine default Counter check User Adjustment Language Bypass setting Register orig size Management Print ...

Page 182: ...setting screen 7 Press the End key The touch panel will return to the contents of the Basic tab End Default setting Counter Default setting Copy default Machine default Counter check User Adjustment Language Bypass setting Register orig size Management Print report End Default setting Counter Default setting Copy default Machine default Counter check User Adjustment Language Bypass setting Registe...

Page 183: ...nce again The touch panel will return to the Default setting screen 6 Press the End key The touch panel will return to the contents of the Basic tab End Default setting Counter Default setting Copy default Machine default Counter check User Adjustment Language Bypass setting Register orig size Management Print report End Default setting Counter Default setting Copy default Machine default Counter ...

Page 184: ...ting screen 6 Press the End key The touch panel will return to the contents of the Basic tab End Default setting Counter Default setting Copy default Machine default Counter check User Adjustment Language Bypass setting Register orig size Management Print report End Default setting Counter Default setting Copy default Machine default Counter check User Adjustment Language Bypass setting Register o...

Page 185: ...ting Counter Default setting Copy default Machine default Counter check User Adjustment Language Bypass setting Register orig size Management Print report End Default setting Counter Default setting Copy default Machine default Counter check User Adjustment Language Bypass setting Register orig size Management Print report Default setting Counter Close Up Down Change Setting mode Default menu Mach...

Page 186: ... Language Bypass setting Register orig size Management Print report End Default setting Counter Default setting Copy default Machine default Counter check User Adjustment Language Bypass setting Register orig size Management Print report Default setting Counter Close Up Down Change Setting mode Default menu Default setting Machine default Select Copy output mode Paper type paper weight Select pape...

Page 187: ... under the Default menu column on the left side of the touch panel and then press the Change key The Select paper type 2sided screen will be displayed Inch specifications Metric specifications Close Back Default setting Machine default Paper type paper weight Plain Normal2 Light Thin Normal3 Normal1 Heavy3 Heavy1 Extra Heavy Heavy2 Close Back Default setting Machine default Paper type paper weight...

Page 188: ...ustom 1 Custom 7 Custom 6 Custom 5 Custom 4 Custom 3 Custom 2 On On On On On On On Default setting Machine default Change Up Down Close Setting mode Default menu Select paper type 2sided Select paper type s for duplex copy Custom 1 Custom 7 Custom 6 Custom 5 Custom 4 Custom 3 Custom 2 On On On On On On On Default setting Machine default Change Up Down Close Back Default setting Machine default Sel...

Page 189: ...and then press the Change key The Low power mode chng time screen will be displayed Inch specifications Metric specifications Close Back Sleep mode changing time Possible to set the time for switching to sleep mode automatically after copy is done or last operation Default setting Machine default 1 240 60 Minute Close Back Sleep mode changing time Possible to set the time for switching to sleep mo...

Page 190: ... output mode screen will be displayed Inch specifications Metric specifications Close Back Low power mode chng time Possible to set the time for switching to low power mode automatically after copy is done or last operation Default setting Machine default 1 240 15 Minute Close Back Low power mode chng time Possible to set the time for switching to low power mode automatically after copy is done or...

Page 191: ...ect FAX output mode under the Default menu column on the left side of the touch panel and then press the Change key The Select FAX output mode screen will be displayed Inch specifications Metric specifications Close Back Default setting Machine default Set the default copy output destination Top tray Tray1 Tray2 TrayA Tray3 Tray5 Tray4 Select Copy output mode Close Back Default setting Machine def...

Page 192: ...t the main mode Select main mode under the Default menu column on the left side of the touch panel and then press the Change key The Select the main mode Select main mode screen will be displayed Inch specifications Metric specifications Close Back Default setting Machine default Set the default fax output destination Select FAX output mode Top tray Tray1 Tray2 TrayA Tray3 Tray5 Tray4 Close Back D...

Page 193: ...Key sound ON OFF screen will be displayed Inch specifications Metric specifications Close Back Select the default display panel mode when the power is on Default setting Machine default Select the main mode FAX mode Copy mode Close Back Select the default display panel mode when the power is on Default setting Machine default Select main mode FAX Mode COPY Mode End Default setting Counter Default ...

Page 194: ...nel and then press the Change key The Date Time screen will be displayed Inch specifications Metric specifications Close Back Select panel key sound mode off on Default setting Machine default Key sound ON OFF Off On Close Back Select panel key sound mode off on Default setting Machine default Key sound ON OFF Off On End Default setting Counter Default setting Copy default Machine default Counter ...

Page 195: ...the left side of the touch panel and then press the Change key The Time difference screen will be displayed Inch specifications Metric specifications Close Back Default setting Machine default Summertime Date Time Off On Year Month Day Time 2001 1 1 00 00 Close Back Default setting Machine default Summertime Date Time Off On Year Month Day Time 2001 1 1 00 00 End Default setting Counter Default se...

Page 196: ...Metric specifications 2 Select Management code change Change MGMT code with under the Default menu column on the left side of the touch panel and then press the Change key The Management code change Change MGMT code with screen will be displayed Inch specifications Metric specifications Close Back Default setting Machine default Time difference GMT 00 00 Close Back Default setting Machine default ...

Page 197: ...mn on the left side of the touch panel and then press the Change key The Auto sleep screen will be displayed Inch specifications Metric specifications Close Back Management code change Default setting Machine default Able to change management code key Close Back Change MGMT code with Default setting Machine default Able to change management code key End Default setting Counter Default setting Copy...

Page 198: ...nd then press the Change key This displays the Color B W Mix Colour B W Mix screen Inch specifications Metric specifications Close Back Default setting Machine default Off On Auto sleep Possible to switch to sleep mode automatically if no oper is done within fixed time after copy or last oper Close Back Default setting Machine default Off On Auto sleep Possible to switch to sleep mode automaticall...

Page 199: ...ting Machine default B W priority Color priority Color B W Mix When both color and B W printing are mixed Possible to select the mode for priority Close Back Default setting Machine default B W priority Colour priority Colour B W Mix When both colour and B W printing are mixed Possible to select the mode for priority End Default setting Counter Default setting Copy default Machine default Counter ...

Page 200: ...y once again The touch panel will return to the Default setting screen 6 Press the End key The touch panel will return to the contents of the Basic tab Close Back Default setting Machine default Quality Mode Fast Mode High Density Print When print continuously with high density original Possible to select the mode for priority High Qual Mode Close Back Default setting Machine default High Density ...

Page 201: ...hite originals when the A C S Auto Color Selection mode is selected The lower the setting the more originals will be identified as color originals and the higher the setting the more originals will be identified as black and white originals 1 5 3 7 74 Eco print mode ON OFF Determines whether the Eco print mode will be the default setting in the initial mode In this case the amount of toner that is...

Page 202: ... be used to feed the cover sheets in the cover mode the booklet stitching mode and the book to booklet mode The setting for drawer cassette No 1 will not be available on duplex copiers because the Duplex Unit is installed in its place The setting for drawer cassette No 2 through No 4 will only be available when the optional Paper Feeder is installed on your copier 1st paper 2nd paper 3rd paper 4th...

Page 203: ... or not the Auto Rotation mode will be the default setting in the initial mode If Auto Rotation is turned ON the image will be automatically rotated even if the orientation of the original is different from that of the paper loaded in the drawers cassettes Rotate No Rotate Rotate 7 91 Margin width Determines the default value of the location and width of the margins in the margin mode Inch specifi...

Page 204: ...es the order of the main functions and modes that are displayed in the Basic and the User choice tabs in order to make the display more appropriate to the way you use the copier Up to 6 functions and modes can be listed and displayed Exposure Mode Reduce Enlarge Orig quality Quality orig Sort Finish 1 2 sided Original size 1 2 3 4 5 6 Exposure Mode Reduce Enlarge Orig quality Quality orig Sort Fin...

Page 205: ... to the desired procedure s explained under Making copy default settings and perform the corresponding setting s End Default setting Counter Default setting Copy default Machine default Counter check User Adjustment Language Bypass setting Register orig size Management Print report End Default setting Counter Default setting Copy default Machine default Counter check User Adjustment Language Bypas...

Page 206: ... will return to the Default setting screen 6 Press the End key The touch panel will return to the contents of the Basic tab End Default setting Counter Default setting Copy default Machine default Counter check User Adjustment Language Bypass setting Register orig size Management Print report End Default setting Counter Default setting Copy default Machine default Counter check User Adjustment Lan...

Page 207: ... 6 Press the End key The touch panel will return to the contents of the Basic tab End Default setting Counter Default setting Copy default Machine default Counter check User Adjustment Language Bypass setting Register orig size Management Print report End Default setting Counter Default setting Copy default Machine default Counter check User Adjustment Language Bypass setting Register orig size Ma...

Page 208: ...tting screen 6 Press the End key The touch panel will return to the contents of the Basic tab End Default setting Counter Default setting Copy default Machine default Counter check User Adjustment Language Bypass setting Register orig size Management Print report End Default setting Counter Default setting Copy default Machine default Counter check User Adjustment Language Bypass setting Register ...

Page 209: ...ault setting screen 6 Press the End key The touch panel will return to the contents of the Basic tab End Default setting Counter Default setting Copy default Machine default Counter check User Adjustment Language Bypass setting Register orig size Management Print report End Default setting Counter Default setting Copy default Machine default Counter check User Adjustment Language Bypass setting Re...

Page 210: ...ch panel will return to the screen in step 2 5 Press the Close key once again The touch panel will return to the Default setting screen 6 Press the End key The touch panel will return to the contents of the Basic tab End Default setting Counter Default setting Copy default Machine default Counter check User Adjustment Language Bypass setting Register orig size Management Print report End Default s...

Page 211: ...once again The touch panel will return to the Default setting screen 6 Press the End key The touch panel will return to the contents of the Basic tab End Default setting Counter Default setting Copy default Machine default Counter check User Adjustment Language Bypass setting Register orig size Management Print report End Default setting Counter Default setting Copy default Machine default Counter...

Page 212: ...ose key The touch panel will return to the screen in step 2 5 Press the Close key once again The touch panel will return to the Default setting screen 6 Press the End key The touch panel will return to the contents of the Basic tab End Default setting Counter Default setting Copy default Machine default Counter check User Adjustment Language Bypass setting Register orig size Management Print repor...

Page 213: ...will return to the Default setting screen 6 Press the End key The touch panel will return to the contents of the Basic tab End Default setting Counter Default setting Copy default Machine default Counter check User Adjustment Language Bypass setting Register orig size Management Print report End Default setting Counter Default setting Copy default Machine default Counter check User Adjustment Lang...

Page 214: ...y once again The touch panel will return to the Default setting screen 6 Press the End key The touch panel will return to the contents of the Basic tab End Default setting Counter Default setting Copy default Machine default Counter check User Adjustment Language Bypass setting Register orig size Management Print report End Default setting Counter Default setting Copy default Machine default Count...

Page 215: ... Paper Feeder is installed on your copier 4 Press the Close key The touch panel will return to the screen in step 2 5 Press the Close key once again The touch panel will return to the Default setting screen 6 Press the End key The touch panel will return to the contents of the Basic tab End Default setting Counter Default setting Copy default Machine default Counter check User Adjustment Language ...

Page 216: ...touch panel will return to the screen in step 2 5 Press the Close key once again The touch panel will return to the Default setting screen 6 Press the End key The touch panel will return to the contents of the Basic tab End Default setting Counter Default setting Copy default Machine default Counter check User Adjustment Language Bypass setting Register orig size Management Print report End Defaul...

Page 217: ... to the Default setting screen 6 Press the End key The touch panel will return to the contents of the Basic tab End Default setting Counter Default setting Copy default Machine default Counter check User Adjustment Language Bypass setting Register orig size Management Print report End Default setting Counter Default setting Copy default Machine default Counter check User Adjustment Language Bypass...

Page 218: ...el will return to the Default setting screen 6 Press the End key The touch panel will return to the contents of the Basic tab End Default setting Counter Default setting Copy default Machine default Counter check User Adjustment Language Bypass setting Register orig size Management Print report End Default setting Counter Default setting Copy default Machine default Counter check User Adjustment L...

Page 219: ... the Default setting screen 6 Press the End key The touch panel will return to the contents of the Basic tab End Default setting Counter Default setting Copy default Machine default Counter check User Adjustment Language Bypass setting Register orig size Management Print report End Default setting Counter Default setting Copy default Machine default Counter check User Adjustment Language Bypass se...

Page 220: ... The touch panel will return to the screen in step 2 5 Press the Close key once again The touch panel will return to the Default setting screen 6 Press the End key The touch panel will return to the contents of the Basic tab End Default setting Counter Default setting Copy default Machine default Counter check User Adjustment Language Bypass setting Register orig size Management Print report End D...

Page 221: ...y once again The touch panel will return to the Default setting screen 6 Press the End key The touch panel will return to the contents of the Basic tab End Default setting Counter Default setting Copy default Machine default Counter check User Adjustment Language Bypass setting Register orig size Management Print report End Default setting Counter Default setting Copy default Machine default Count...

Page 222: ...se key once again The touch panel will return to the Default setting screen 6 Press the End key The touch panel will return to the contents of the Basic tab End Default setting Counter Default setting Copy default Machine default Counter check User Adjustment Language Bypass setting Register orig size Management Print report End Default setting Counter Default setting Copy default Machine default ...

Page 223: ...se key once again The touch panel will return to the Default setting screen 6 Press the End key The touch panel will return to the contents of the Basic tab End Default setting Counter Default setting Copy default Machine default Counter check User Adjustment Language Bypass setting Register orig size Management Print report End Default setting Counter Default setting Copy default Machine default ...

Page 224: ... again The touch panel will return to the Default setting screen 6 Press the End key The touch panel will return to the contents of the Basic tab End Default setting Counter Default setting Copy default Machine default Counter check User Adjustment Language Bypass setting Register orig size Management Print report End Default setting Counter Default setting Copy default Machine default Counter che...

Page 225: ...se key once again The touch panel will return to the Default setting screen 6 Press the End key The touch panel will return to the contents of the Basic tab End Default setting Counter Default setting Copy default Machine default Counter check User Adjustment Language Bypass setting Register orig size Management Print report End Default setting Counter Default setting Copy default Machine default ...

Page 226: ...e Default setting screen 6 Press the End key The touch panel will return to the contents of the Basic tab End Default setting Counter Default setting Copy default Machine default Counter check User Adjustment Language Bypass setting Register orig size Management Print report End Default setting Counter Default setting Copy default Machine default Counter check User Adjustment Language Bypass setti...

Page 227: ...o the Default setting screen 6 Press the End key The touch panel will return to the contents of the Basic tab End Default setting Counter Default setting Copy default Machine default Counter check User Adjustment Language Bypass setting Register orig size Management Print report End Default setting Counter Default setting Copy default Machine default Counter check User Adjustment Language Bypass s...

Page 228: ...lt setting screen 6 Press the End key The touch panel will return to the contents of the Basic tab End Default setting Counter Default setting Copy default Machine default Counter check User Adjustment Language Bypass setting Register orig size Management Print report End Default setting Counter Default setting Copy default Machine default Counter check User Adjustment Language Bypass setting Regi...

Page 229: ...e Default setting screen 6 Press the End key The touch panel will return to the contents of the Basic tab End Default setting Counter Default setting Copy default Machine default Counter check User Adjustment Language Bypass setting Register orig size Management Print report End Default setting Counter Default setting Copy default Machine default Counter check User Adjustment Language Bypass setti...

Page 230: ...fault setting screen 6 Press the End key The touch panel will return to the contents of the Basic tab End Default setting Counter Default setting Copy default Machine default Counter check User Adjustment Language Bypass setting Register orig size Management Print report End Default setting Counter Default setting Copy default Machine default Counter check User Adjustment Language Bypass setting R...

Page 231: ...reen in step 2 5 Press the Close key once again The touch panel will return to the Default setting screen 6 Press the End key The touch panel will return to the contents of the Basic tab End Default setting Counter Default setting Copy default Machine default Counter check User Adjustment Language Bypass setting Register orig size Management Print report End Default setting Counter Default setting...

Page 232: ...return to the screen in step 2 5 Press the Close key once again The touch panel will return to the Default setting screen 6 Press the End key The touch panel will return to the contents of the Basic tab End Default setting Counter Default setting Copy default Machine default Counter check User Adjustment Language Bypass setting Register orig size Management Print report End Default setting Counter...

Page 233: ...e Close key The touch panel will return to the screen in step 2 5 Press the Close key once again The touch panel will return to the Default setting screen 6 Press the End key The touch panel will return to the contents of the Basic tab End Default setting Counter Default setting Copy default Machine default Counter check User Adjustment Language Bypass setting Register orig size Management Print r...

Page 234: ... step 2 5 Press the Close key once again The touch panel will return to the Default setting screen 6 Press the End key The touch panel will return to the contents of the Basic tab End Default setting Counter Default setting Copy default Machine default Counter check User Adjustment Language Bypass setting Register orig size Management Print report End Default setting Counter Default setting Copy d...

Page 235: ...ications Metric specifications Multi bypass tray paper settings End Default setting Counter Default setting Copy default Machine default Counter check User Adjustment Language Bypass setting Register orig size Management Print report End Default setting Counter Default setting Copy default Machine default Counter check User Adjustment Language Bypass setting Register orig size Management Print rep...

Page 236: ... arency Vellum Labels Recycled Cardstock Color Coated Custom 1 Custom 2 Custom 3 Custom 4 Custom 5 Custom 6 Custom 7 Custom 8 Rough Bond Preprinted Letterhead High quality Prepunched Envelope Default setting Counter Back Close Thick paper Select paper type Plain Transp arency Vellum Labels Recycled Cardstock Colour Coated High quality Custom 1 Custom 2 Custom 3 Custom 4 Custom 5 Custom 6 Custom 7 ...

Page 237: ...pass setting Select size Input size Others Standard Paper type Select paper type Plain Default setting Counter Back Close Auto Detection Default setting Counter Back Close Select size ISO B5 Envelope DL Envelope C5 Envelope C4 EX OUFUKU HAGAKI YOUKEI 2 YOUKEI 4 Comm 10 Comm 9 Comm 6 3 4 MO 81 2x13 8K 16K 12x18 Default setting Counter Back Close Select size ISO B5 Envelope DL Envelope C5 Envelope C...

Page 238: ...ch specifications Metric specifications Original size registration End Default setting Counter Default setting Copy default Machine default Counter check User Adjustment Language Bypass setting Register orig size Management Print report End Default setting Counter Default setting Copy default Machine default Counter check User Adjustment Language Bypass setting Register orig size Management Print ...

Page 239: ...se key The touch panel will return to the screen in step 3 6 Press the Close key The touch panel will return to the screen in step 2 Press the End key The touch panel will return to the contents of the Basic tab Close Back Original size custom 1 Register custom size original Off On Default setting Register orig size 2 2 y x 2 115 8 2 17 Close Back Original size custom 1 Register custom size origin...

Page 240: ...corresponding color pattern will be printed out Inch specifications Metric specifications NOTE Make sure there 11 8 1 2 A4 size paper loaded in one of the drawers cassettes Auto color adjustment End Default setting Counter Default setting Copy default Machine default Counter check User Adjustment Language Bypass setting Register orig size Management Print report End Default setting Counter Default...

Page 241: ... is output after step 8 is complete Repeat steps 6 through 8 three times to output all three color patterns The number of magenta colored boxes in the upper right corner of each color pattern indicates which one it is first second or third Be sure that you use the color patterns in the proper sequence 9 Once adjustment is completed the touch panel will return to the screen in step 5 Inch specifica...

Page 242: ...roximately 5 minutes Inch specifications Metric specifications Drum refresh End Default setting Counter Default setting Copy default Machine default Counter check User Adjustment Language Bypass setting Register orig size Management Print report End Default setting Counter Default setting Copy default Machine default Counter check User Adjustment Language Bypass setting Register orig size Manageme...

Page 243: ...panel will return to the screen in step 4 Inch specifications Metric specifications 6 Press the Close key The touch panel will return to the screen in step 2 Press the End key The touch panel will return to the contents of the Basic tab Now drum refreshing Please wait Now drum refreshing Please wait ...

Page 244: ...t a counter report press the Print report key Inch specifications Metric specifications NOTE Make sure there is 11 8 1 2 A4 size paper loaded in one of the drawers cassettes when you print out the counter report Checking the total counter and printing out the counter report End Default setting Counter Default setting Copy default Machine default Counter check User Adjustment Language Bypass settin...

Page 245: ... Counter check Print report 1 072 0 601 1 673 0 1 1 1 1 1 073 0 602 1 675 774 1 2 969 2 194 Copy Printer Fax Copy scanner Fax Total Total Close Default setting Number print Num of pages Black White Monocolour Full colour Total Original Counter check Print report 1 072 0 601 1 673 0 1 1 1 1 1 073 0 602 1 675 774 1 2 969 2 194 Copy Printer Fax Copy scanner Fax Total Total COUNT REPORT Machine No ACV...

Page 246: ...ll Color B W Auto Color Correction Eco Print Select paper Pap Type Auto col pap Paper Type Auto BW Paper Default drawer Drawer for cover paper Default magnification Adjust auto expo color Adjust auto exposure B W Adjust auto exposure OCR Adj manual expo Mixed Adj manual expo photo Adj manual expo print Adj manual expo Text Adj manual expo map Sort Auto Rotation Default margin width Default erase w...

Page 247: ...R 0 0 421 0 477 PAGE SIZE COVERAGE TOTAL COUNT 898 0 00 0 00 3 08 0 00 3 38 3 24 4 COL YELLOW 11x17 8 5x14 8 5x11 5 5x8 5 OTHER 0 0 421 0 449 PAGE SIZE COVERAGE TOTAL COUNT 870 0 00 0 00 4 92 0 00 5 63 5 29 Total toner coverage report Copy toner coverage report Printer toner coverage report Fax toner coverage report TONER COVERAGE REPORT FAX COVERAGE 09 29 03 MACHINE NUM AGG3000000 TOTAL DEPT 0 PR...

Page 248: ...r coverage key the 4 different toner coverage reports will be printed out together End Default setting Counter Default setting Copy default Machine default Counter check User Adjustment Language Bypass setting Register orig size Management Print report End Default setting Counter Default setting Copy default Machine default Counter check User Adjustment Language Bypass setting Register orig size M...

Page 249: ...report is printed out the touch panel will return to the screen in step 4 6 Press the Close key The touch panel will return to the screen in step 2 7 Press the End key The touch panel will return to the contents of the Basic tab Printing report Orig page Count Set Output Cancel Rear 1 sided Sort 1 sided Plain AMS 100 1 0 1 11x81 2 Top tray Printing report Original Count Set Output Cancel Top Rear ...

Page 250: ...n will be displayed Inch specifications Metric specifications 3 Press the key that corresponds to the language that you want to use Inch specifications Metric specifications Language selection function End Default setting Counter Default setting Copy default Machine default Counter check User Adjustment Language Bypass setting Register orig size Management Print report End Default setting Counter ...

Page 251: ...been entered to this point 7 and key Press these keys when you want to move the cursor 8 Del prev key Press this key when you want to delete the character to the left of the cursor 9 Stop key Press this key when you want to cancel character input and return to the previous screen 10 End key Press this key when you want to register the entered information Capital keyboard Numeral Symbol keyboard En...

Page 252: ...u want to move the cursor 9 Del prev key Press this key when you want to delete the character to the left of the cursor 10 Stop key Press this key when you want to cancel character input and return to the previous screen 11 End key Press this key when you want to register the entered information Capital keyboard Symbol 1 keyboard Symbol 2 keyboard End Symbol 1 Space Symbol 2 Letter Capital Del pre...

Page 253: ...el prev Stop Name to display AllDel Limit 32 letters including A Limit 32 letters inc key End Num Sym Space Letter Capital Del prev Stop Name to display AllDel Limit 32 letters including Abcde a q 1 s w 2 d e 3 f r 4 g t 5 h y 6 j u 7 k i 8 l o 9 p 0 z x c v b n m End Symbol 1 Space Symbol 2 Letter Capital Del prev Stop Name to display AllDel Limit 32 letters inc key Abcde a q 1 s w 2 d e 3 f r 4 ...

Page 254: ...Section 7 COPIER MANAGEMENT 7 118 ...

Page 255: ...clips or staples In order to use such originals remove the clips or staples and straighten any crumples or folds before using them Failure to do so may cause originals to misfeed Clippings or originals with very slippery surfaces Originals with wet correction fluid Originals with folds If you must use such originals smooth out the folded portions before setting them in the Document Processor Failu...

Page 256: ...e up front side up for 2 sided copies on the original table The original set indicator will light green If the indicator doesn t light set the originals once again IMPORTANT Be sure to set only a number of originals that is LESS than the level indicator on inside of the rear insert guide Also DO NOT set originals outside the acceptable range as this can cause the originals to misfeed See page 8 1 ...

Page 257: ...originals remaining on the original table or on the original eject table If there are originals left in either place they may fall off the copier when the Document Processor is opened 2 Set the original to be copied face down and align the edges with the original size indicator lines 3 Hold the Document Processor release lever and close the Document Processor IMPORTANT Do NOT put undue pressure on...

Page 258: ...1 8 1 2 and 11 17 or 8 1 2 14 and 8 1 2 11 size originals can be used together in this mode and the originals must be arranged together so that their widths coincide Metric specifications Only A4 and A3 B5 and B4 or A4R and Folio size originals can be used together in this mode and the originals must be arranged together so that their widths coincide Differing finished sizes Auto selection Each or...

Page 259: ...lection Off Auto selection Electronic Filing Able to copy mixed size originals at one time using Document processor Ready to copy Full color Paper Size Set Back Register Close Auto Selection Off Auto selection Electronic Filing Able to scan mix size originals at one time using Document processor and copy them in unified paper size 1st pg Orig 11x81 2 11x81 2 81 2x11 11x17 81 2x14 Ready to copy Ful...

Page 260: ...alled at the bottom most Paper Feeder when an optional Paper Feeder is installed with the copier Paper Feeder B You can add paper drawers triple 500 sheet capacity cassettes which are identical to the copier s standard drawer The paper capacity and paper loading procedures are the same as those for the standard cassette see page 3 1 Use right cover 3 to clear paper jams Casters are attached to the...

Page 261: ...l go NOTE Do not pull multiple drawers cassettes out at the same time 2 Load the paper aligning it along the right side of the drawer cassette IMPORTANT When loading paper make sure there is no creasing or any other abnormality that can cause a paper jam A sticker 1 is provided inside the drawer cassette to indicate the maximum allowable level The surface of the paper stack should not be higher th...

Page 262: ...cument by document sorted copy or stacking of multiple copies of a document by page unsorted copy It also makes it possible to align pages and staple copies or punch holes in them option Installing an optional Folding Unit makes it possible to fold and staple copies while an optional Multi Job Tray lets you eject copies to specified trays See the user documentation that comes with the Document Fin...

Page 263: ...Imag shift Erase Mode Select size orig Auto Selection Page numbering Cover Mode Merge copy Large of originals Poster Booklet Rear Left top corner Check direction Check direction of original top side Sort Finished Sort Off On Offset Staple mode Staple Punch mode Punch Ready to copy Full Color Paper Size Set Back Register Close 11x81 2 Sort Off Sort On Back Edge Left top corner Check direction Check...

Page 264: ...Basic User choice Function Color func Program 11x81 2 Select paper Exposure mode Orig image quality Up Down Sort Finished 2 sided Separation Reduce Enlarge Margin Centering Border Erase Select orig size Auto Selection Page Cover Mode Combine Batch scanning Poster Booklet Set Ready to copy Full Col Paper Size Basic User choice Function Colour func Program Select paper Exposure mode Image quality Up...

Page 265: ...ginals have been completely scanned press the Scanning finished key 6 Copying will start and each finished copy set will be automatically stapled and ejected onto the Finisher 7 Once copying is completed remove the finished copy sets from the Finisher Limited number of staple pages The limit is set in setting mode When selecting staple function the offset can not be combined None 1 staple 2 staple...

Page 266: ...y to copy Full Col Paper Size Basic User choice Function Colour func Program Select paper Exposure mode Image quality Up Down Sort Finished 2 sided Split Reduce Enlarge Margin Imag shift Erase Mode Select size orig Auto Selection Page numbering Cover Mode Merge copy Large of originals Poster Booklet Rear Left top corner Check direction Check direction of original top side Sort Finished Sort Off On...

Page 267: ...ions Metric specifications IMPORTANT The position of the holes on each page may differ very slightly This may be especially true if the automatic drawer cassette switching function engages and changes to paper feed from a different drawer cassette No and position of holes Orientation of originals 2 holes Left side 2 holes Right side 2 holes Top 3 holes Left side 3 holes Right side 3 holes Top Punc...

Page 268: ... steps 4 and 5 for all of the document pages After all of the pages have been scanned press the End key 6 As copying is performed the pages are ejected to the tray you selected 7 Remove the ejected copies after copying is complete Set Ready to copy Full Color Paper Size Basic User choice Function Color func Program 11x81 2 Auto Rotation Eco Print Modify Copy Up Down OHP backing Orig set direction ...

Page 269: ...kes it possible to eject copies to specified trays See the user documentation that comes with the Document Finisher for more information For information about Document Finisher operation see Document Finisher A on page 8 8 Memory Copy Board The Memory Copy Board is required in order to use the following modes and functions of your copier Combine Merge Copy modes Auto selection Filing mode Batch sc...

Page 270: ...counter will be displayed on the touch panel Printer Kit If the Printer Kit is installed in your copier you can use the copier as a printer For more details refer to the Operation Guide for the Printer Kit Fax Kit If the Fax Kit is installed in your copier you can use the copier as a facsimile Also if the Fax Kit is used together with the optional Network Scanner Kit this copier can be used as a n...

Page 271: ...the originals is not appropriate for the poster mode When using 11 8 1 2 A4 size originals set them length wise Paper drawer is out of order Select another paper drawer Paper cassette is out of order Select other paper cassette The drawer cassette currently in use is out of order and cannot be used for the moment Contact your service representative or authorized service center immediately If you w...

Page 272: ...bypass tray and that size selected in the paper size setting are the same and restart the copy operation from the beginning 3 4 7 99 Time for maintenance Periodic maintenance is required to keep your copier in good condition Contact your service representative or authorized service center immediately Check paper size There is no paper loaded of a size that can be used in the currently selected mod...

Page 273: ...cassette x There is no paper in the indicated drawer cassette Load paper of the indicated size 3 1 Duplex tray inoperable call service Duplex unit is out of order Call service The Duplex Unit is out of order and 2 sided copying is not possible Contact your service representative or authorized service center immediately Remove paper from duplex unit There is paper remaining inside the Duplex Unit R...

Page 274: ...Scanner key lights or blinks orange take the appropriate action to resolve that error If one of the following indicators lights Indication Procedure Reference page Lit or blinking orange Check the appropriate response to that indication and perform the corresponding procedure ...

Page 275: ...gain In such a case follow the procedure displayed on the touch panel to remove the jammed paper Misfeed location indicators 1 Misfeed in the paper feed section Page 9 6 2 Misfeed in the paper conveyor unit Page 9 11 3 Misfeed in the fixing section Page 9 12 4 Misfeed inside the left cover Page 9 14 5 Misfeed in the Duplex Unit Duplex copiers only Page 9 15 6 Misfeed in the optional Document Proce...

Page 276: ...the specified paper feeder 2 Taking care not to tear the jammed paper pull it from the copier NOTES If the paper tears remove all of the remaining pieces from inside the copier If the paper is jammed below the primary paper guide raise the primary paper guide and pull the paper out 3 Pull out the drawer cassette that is currently being used Paper misfeed JAM 1 Open Right Side Cover of drawer 2 Rem...

Page 277: ...cassette 3 Perform the following procedure to remove the jammed paper Inch specifications Metric specifications Drawer cassette 3 refers to the optional Paper Feeder Right cover 3 refers to the Paper Feeder right cover 1 Open right cover 3 2 Taking care not to tear the jammed paper pull it from the copier NOTE If the paper tears remove all of the remaining pieces from inside the copier Paper misfe...

Page 278: ...te 4 refers to the optional Paper Feeder Right cover 3 refers to the Paper Feeder right cover 1 Open right cover 3 2 Taking care not to tear the jammed paper pull it from the copier NOTE If the paper tears remove all of the remaining pieces from inside the copier 1 Open Right Side Cover of drawer 3 Remove paper if inside 2 Pull out drawer 4 3 Remove paper 4 Pull out drawer 3 pull out feeding unit ...

Page 279: ...rs remove all of the remaining pieces from inside the drawer cassette 8 Push the paper feeder unit drawer cassette 3 and drawer 4 back into the copier Misfeed inside the right side drawer cassette cover No 2 or No 3 The screens shown below indicate that there is a misfeed inside right side drawer cassette cover No 2 or No 3 Perform the following procedure to remove the jammed paper Inch specificat...

Page 280: ...mary paper guide and pull the paper out 3 Push the drawer cassette back into the copier Misfeed in the multi bypass tray The screens shown below indicate that there is a misfeed in the multi bypass tray Perform the following procedure to remove the jammed paper Inch specifications Metric specifications 1 Remove all of the paper remaining in the multi bypass tray 2 Reload the paper into the multi b...

Page 281: ...If edge of the paper inside the paper conveyor unit is soiled lift the paper straight up to remove it 3 Pull the green lever on the bottom of the paper conveyor unit in the direction indicated by the arrow and then open right cover 1 4 Taking care not to tear the jammed paper pull it from the copier NOTE If the paper tears remove all of the remaining pieces from inside the paper conveyor unit Pape...

Page 282: ...tear it If the jammed paper is difficult to pull out rotate the green fuser unit gear as you pull 3 Pull the green lock levers on the right and left towards you and open the fuser unit cover Paper misfeed JAM 1 Open left cover 2 Remove paper 3 Pull out fuser unit 4 Check the inside of machine and Remove paper if inside 5 Open cover of fuser unit Remove paper if inside 6 Close fuser unit close cove...

Page 283: ...from the copier 7 If there is paper jammed on the inside of the mechanism pull it out taking care not to tear it NOTE If the paper tears remove all of the remaining pieces from inside the paper conveyor unit 8 Push the fuser unit back into the copier 9 Close the left cover CAUTION The copier s fuser unit is extremely hot Take sufficient care when working in this area as there is a danger of gettin...

Page 284: ...he jammed paper pull it from the left cover NOTE If the paper tears remove all of the remaining pieces from inside the left cover 4 Close the left cover Paper misfeed JAM 1 Open left cover 2 Remove paper 3 Pull out fuser unit 4 Check the inside of machine and Remove paper if inside 5 Open cover of fuser unit Remove paper if inside 6 Close fuser unit close cover Paper misfeed JAM 1 Open left cover ...

Page 285: ...maining pieces from inside the Duplex Unit 4 Pull the lever on the bottom left side of the Duplex Unit and open the lower cover 5 Taking care not to tear the jammed paper pull it from the Duplex Unit NOTE If the paper tears remove all of the remaining pieces from inside the Duplex Unit 6 Close the covers and push the Duplex Unit back into the copier 1 Upper duplex unit Remove paper if inside 2 Ope...

Page 286: ...nal eject 3 Open the left cover of the Document Processor NOTE When opening the cover be sure to hold the handle in the middle 4 If there is an original jammed there remove it while taking care not to tear it NOTE If the paper tears remove all of the remaining pieces from inside the Document Processor 5 Open the paper reversing unit 1 1 Open document processor cover 2 Lift up reversing unit 3 Turn...

Page 287: ...ntil the paper is fed to a point where it is easier to remove 7 Close the paper reversing unit 8 Close t left cover The original set indicator should go out Reload the document and start copying again NOTE Be sure to hold the handle in the middle of the cover when closing it Misfeed in the optional Document Finisher See the Operation Guide for the Document Finisher for information about what you s...

Page 288: ...g originals in the optional Document Processor set them face up 4 1 8 2 The copies come out too light Is the copier in the auto exposure mode In order to adjust the overall exposure level perform the Auto exposure adjustment procedure 7 82 Is the copier in the manual exposure mode Adjust the exposure to the correct level using the copy exposure adjustment keys 4 3 To adjust the overall exposure ch...

Page 289: ...m securely with the original size indicator plate When setting originals in the optional Document Processor align the original insert guides securely before setting the originals 4 1 8 2 Was the paper set correctly Set paper securely against the guide plates 3 1 Paper jams occur often Is the copy paper loaded properly in the drawer cassette Load the paper properly 3 1 Depending upon the type and c...

Page 290: ...Section 9 TROUBLESHOOTING 9 20 ...

Page 291: ...ten with a soft cloth dampened with alcohol or mild detergent Never use thinner or other organic solvents to clean the platen If you are using the optional Document Processor and copies come out with black lines on them it means that the slit glass a is dirty Wipe the slit glass with a soft dry cloth or with a soft cloth moistened with alcohol Never use water thinner or organic solvents to clean t...

Page 292: ...he copier 2 Use the cleaning cloth that comes with the toner kit to clean the metal resisting roller 3 Push the paper conveyor unit back into the copier Clean the slit glass for original fed from DP 1 Open the document processor 2 Clean the surface of the slit glass located at left side with a dry cloth 3 Close the document processor 4 Press the END key If the slit glass is dirty black lines might...

Page 293: ...hen push it back in all the way Repeat this step 5 to 10 times 4 Take the supplied grid cleaner out of its package and remove the cap NOTE The sponge portion of the grid cleaner contains fluid Perform the cleaning operation as quickly as possible to prevent it from drying out 5 With the sponge portion of the grid cleaner up attach it to the copier as shown in the illustration 6 Lift up a little on...

Page 294: ...NOTE DO NOT attempt to reuse the grid cleaner after it is used once 9 Close the toner container cover Repeat the same steps to clean the chargers of the other toners 10 Close the front cover NOTE Be sure to hold both the left and right sides of the front cover and close it securely ...

Page 295: ...disks etc nearby Inch specifications Metric specifications The illustrations in the following procedure will show replacement of the black toner container 1 Open the front cover 2 Press the cover to the toner container you want to replace and then open it 3 Unlock the toner container by pressing the lock lever until you hear it click and then pull the toner container towards you until it stops Nex...

Page 296: ...ted properly 7 Close the toner container cover Follow this same procedure and replace the other toner containers as necessary 8 Close the front cover NOTE Be sure to hold both the left and right sides of the front cover and close it securely IMPORTANT In order to ensure superior quality copies be sure to periodically once a month clean the charger unit steps 1 through 3 on page 10 3 in addition to...

Page 297: ...from the copier Replacing the waste toner box CAUTION DO NOT attempt to incinerate the toner containers or the waste toner box Dangerous sparks may cause burns CAUTION DO NOT attempt to force open or destroy the toner containers or the waste toner box Replace the waste toner box Waste toner box is full Open the front cover and replace waste toner box See the operation manual for the procedure Repl...

Page 298: ...new waste toner box and then swing the waste toner box into position IMPORTANT Do not close the cap to the opening of the new waste toner box This may cause mechanical trouble in the copier 6 Close the front cover NOTE Be sure to hold both the left and right sides of the front cover and close it securely After use ALWAYS dispose of the toner containers and the waste toner box in accordance with Fe...

Page 299: ...ome 11 8 1 2 A4 size original during 2 sided copying 24 5 copies min full color 24 5 copies min monochrome Warm up time Within 179 secs at room temperature of 73 4 F 20 C humidity 65 First copy speed Full color Approx 9 4 secs Monochrome or monocolor Approx 9 4 secs Available magnification ratios Any 1 increment between 25 and 400 or standard pre set ratios Memory Standard copiers 256 MB of Bitmap...

Page 300: ...mode 2 Invert mode Mirror image mode Proof mode 2 Repeat copy mode 2 Batch scanning mode 2 Color BW selection mode 2 Eco print mode Program function Job build mode 2 Copy management mode 2 Language selection function 1 Only available in duplex copiers 2 Requires the optional Memory Copy Board in standard copiers Power source 120V AC 60 Hz 12 0 A 220V 240V AC 50 60 Hz 7 5 A Dimensions W D H 23 1 4 ...

Page 301: ...pprox 171 6 lbs Approx 78 kg Specifications are subject to change without notice Inch specifications Tray A 75 g m weight paper When NOT stapling 11 17 8 1 2 14 1500 sheets 8 1 2 11 11 8 1 2 3000 sheets When stapling 2 copies 11 17 700 sheets 8 1 2 14 700 sheets 8 1 2 11 1000 sheets 11 8 1 2 1000 sheets When stapling 3 4 copies 11 17 700 sheets 8 1 2 14 700 sheets 8 1 2 11 1000 sheets 11 8 1 2 100...

Page 302: ... 2 14 500 sheets 8 1 2 11 1000 sheets 11 8 1 2 1000 sheets When stapling 3 4 copies 11 17 500 sheets 8 1 2 14 500 sheets 8 1 2 11 1000 sheets 11 8 1 2 1000 sheets When stapling 5 10 copies 11 17 500 sheets 8 1 2 14 500 sheets 8 1 2 11 11 8 1 2 1100 sheets When stapling 11 20 copies 11 17 750 sheets 8 1 2 14 750 sheets 8 1 2 11 11 8 1 2 1200 sheets When stapling 21 30 copies 11 17 1000 sheets 8 1 2...

Page 303: ... to the copier Dimensions W D H 21 1 16 17 1 16 25 1 4 679 mm 434 2 mm 641 6 mm Weight Approx 91 48 lbs Approx 41 5 kg Specifications are subject to change without notice Paper Feeder C option Paper feed system Automatic feeding from 1 drawer cassette 500 sheet 80 g m capacity 1000 sheet 80 g m capacity 1500 sheet 80 g m capacity Acceptable copy paper sizes 11 17 A3 8 1 2 14 B4 257 mm 364 mm 11 8 ...

Page 304: ...from the Low Power mode at time of purchase 15 min Transition time from the Off and Sleep modes at time of purchase 60 min 2 sided copy function Standard in duplex copiers Not available in standard copiers Paper feed Recycled paper made from 100 recycled pulp may be used with this product Environmental specifications ...

Page 305: ...etails refer to the Operation Guide for the corresponding optional unit Available optional units The following optional units can be installed on your copier Installing the optional equipment Document Processor Original Cover Key Counter Memory Copy Board Fax Kit Network Scanner Kit Printer Kit Paper Feeder Document Finisher Duplex Unit ...

Page 306: ... copies and can sort multiple copy sets by shifting the position of ejection for each one It can also staple the copy sets An optional Multi Job Tray ejects copies to specified trays Memory Copy Board The Memory Copy Board is required in order to use the following modes and functions of your copier Combine Merge Copy modes Auto selection Filing mode Batch scanning mode Print page numbers mode Post...

Page 307: ...in combination with original size selection input size 21 The function selected second will be given priority and original size selection auto selection will engage Function selected first Function selected second 1 2 3 4 5 6 7 8 9 10 11 12 13 14 15 16 17 18 19 20 21 22 23 24 25 26 27 28 29 30 31 32 1 Color Mode full color 40 2 Color Mode black and white 41 42 43 38 37 3 Color Mode A C S 40 37 4 G...

Page 308: ...nd white copy mode and the A C S color mode only 69 Image quality OCR 70 Color Mode Black and white gray Function selected second Function selected first 33 34 35 36 37 38 39 40 41 42 43 44 45 46 47 48 49 50 51 52 53 54 55 56 57 58 59 60 61 69 70 1 Color Mode full color 2 Color Mode black and white 34 34 34 3 Color Mode A C S 36 4 Gloss mode 48 48 48 48 5 Adjusting the sharpness 6 One touch image ...

Page 309: ... 7 25 Checking the total counter and printing out the counter report 7 108 Cleaning the charger 10 3 Cleaning the copier 10 1 Cleaning the original cover 10 1 Cleaning the platen 10 1 Cleaning the resisting roller 10 2 Color B W Mix Colour B W Mix machine default setting 7 44 Color BW selection mode 6 55 Combine Merge Copy modes 6 21 COPIER MANAGEMENT 7 1 Copy default settings 7 65 Copy eject loca...

Page 310: ...67 Manual exposure adjustment text mode copy default setting 7 67 Manual exposure adjustment text photo mode copy default setting 7 67 Map mode 4 4 Margin mode 6 12 Margin width copy default setting 7 67 Memo mode 6 17 Memory Copy Board 8 15 Mirror image mode 6 47 Misfeed in one of the drawers cassettes No 1 through No 4 9 6 Misfeed in the Duplex Unit Duplex copiers only 9 15 Misfeed in the fixing...

Page 311: ...gistration keys 6 64 Registration keys ON OFF copy default setting 7 68 Repeat copy mode 6 50 Repeat copying ON OFF copy default setting 7 68 S Saving on toner use 6 58 Selecting functions 4 2 Selecting the color mode 4 1 Selecting the copy eject location 8 14 Selecting the image quality 4 4 Selecting the paper size 4 2 Separate front and back margin settings 6 12 Setting an original 4 1 Setting o...

Reviews: