Preparation before Use
2-4
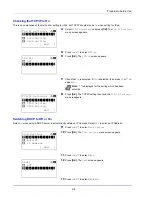
Checking that TCP/IP is On
This is an explanation of the method for setting for IPv4, but TCP/IP should also be
On
when setting for IPv6.
4
Select
TCP/IP Settings
and press
[OK]
. The
TCP/IP Settings
menu screen appears.
5
Press
or
to select
TCP/IP
.
6
Press
[OK]
. The
TCP/IP
screen appears.
7
Check that
On
is selected. If
Off
is selected, then press
or
to
select
On
.
8
Press
[OK]
. The TCP/IP setting is set and the
TCP/IP Settings
menu reappears.
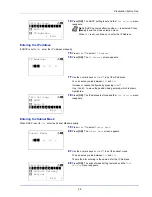
Switching DHCP to Off or On
Select
On
when using a DHCP server to automatically obtain an IP Address. Select
Off
to enter an IP Address.
9
Press
or
to select
IPv4 Setting
.
10
Press
[OK]
. The
IPv4 Setting
menu screen appears.
11
Press
or
to select
DHCP
.
12
Press
[OK]
. The
DHCP
screen appears.
13
Press
or
to select
Off
or
On
.
Note
"
*
" is displayed for the setting which has been
selected.
TCP/IP Settings:
a
b
********************-
2
IPv4 Setting
3
IPv6 Setting
[ Exit
]
1
TCP/IP
TCP/IP:
a
b
1
Off
********************-
2
*On
TCP/IP Settings:
a
b
********************-
2
IPv4 Setting
3
IPv6 Setting
[ Exit
]
1
TCP/IP
IPv4 Setting:
a
b
********************-
2
Auto-IP
3
IP Address
[ Exit
]
1
DHCP
DHCP:
a
b
1
Off
********************-
2
*On
Summary of Contents for P-4030D
Page 1: ...User manual P 4030D 4030DN 4530DN P 5030DN 6030DN Print A4 Laser Printer b w ...
Page 22: ...Machine Parts 1 6 ...
Page 60: ...Printing 3 8 ...
Page 71: ...4 11 Operation Panel Menu Map Sample Menu Map Printer Firmware version ...
Page 163: ...4 103 Operation Panel 5 Press or to select whether Thin Print is enabled ...
Page 194: ...Operation Panel 4 134 ...
Page 232: ...Document Box 5 38 ...
Page 238: ...Status Menu 6 6 ...
Page 272: ...Troubleshooting 8 24 ...
Page 311: ......


