background image

3NY

1-1-2

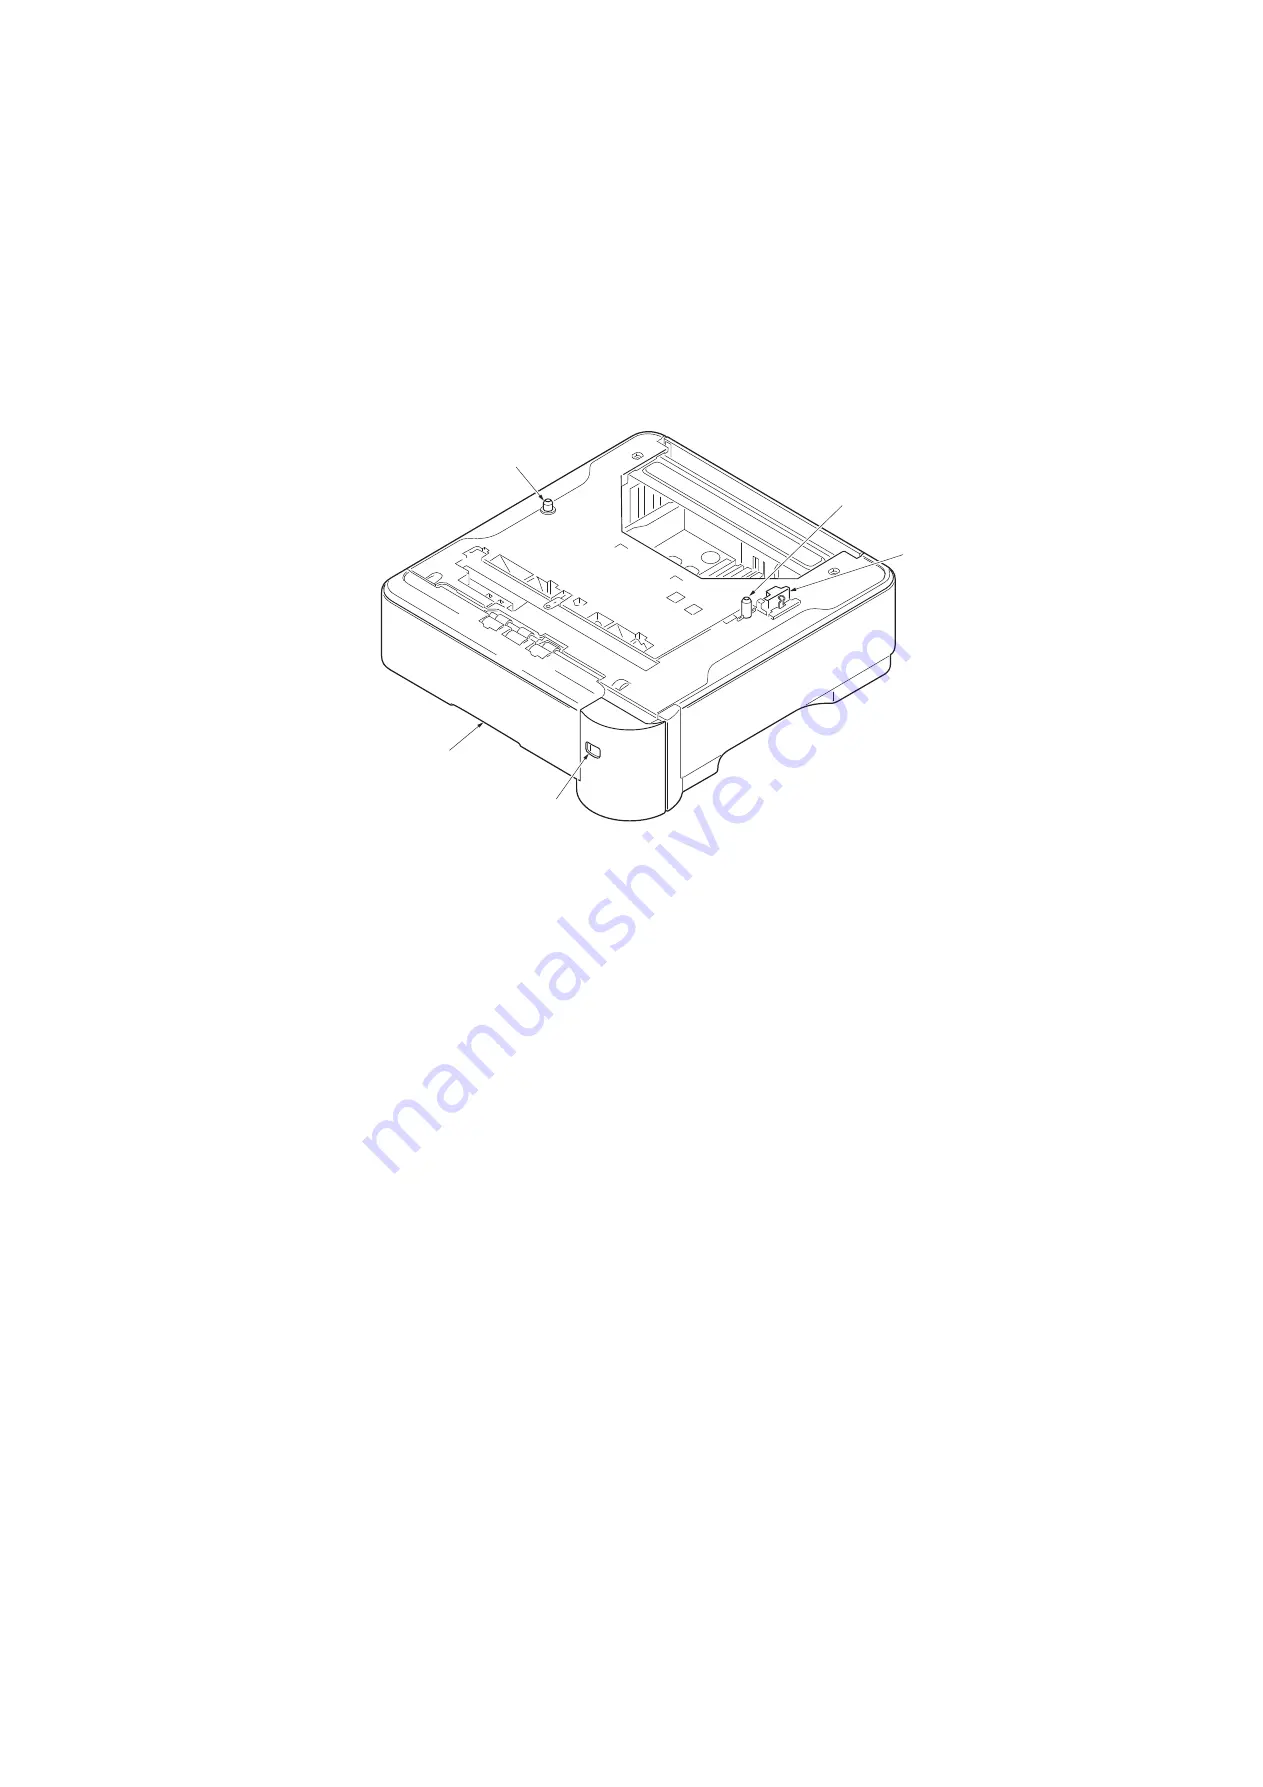
1-1-2  Parts names

Figure 1-1-1 

4

4

3

1

2

1. Cassette
2. Papersize window
3. Interface connector
4. Pins

Summary of Contents for PF 320

Page 1: ...Service Manual 3DSHU HHGHU 3 LUVW GLWLRQ Date 1 0 20 1 SM06 ...

Page 2: ...Service Manual 3DSHU HHGHU 3 LUVW GLWLRQ Date 0 20 1 SM06 ...

Page 3: ...ficials for details in your area for proper disposal ATTENTION IL Y A UN RISQUE D EXPLOSION SI LA BATTERIE EST REMPLACEE PAR UN MODELE DE TYPE INCORRECT METTRE AU REBUT LES BATTERIES UTILISEES SELON LES INSTRUCTIONS DONNEES Il peut être illégal de jeter les batteries dans des eaux d égout municipales Vérifiez avec les fonctionnaires municipaux de votre région pour les détails concernant des déchet...

Page 4: ...Revision history Revision Date pages Revised contents ...

Page 5: ...This page is intentionally left blank ...

Page 6: ...rsonnel to ensure the safety of their customers their machines as well as themselves during maintenance activities Service personnel are advised to read this booklet carefully to familiarize themselves with the warnings and precautions described here before engaging in maintenance activities ...

Page 7: ... this symbol CAUTION Bodily injury or damage to property may result from insufficient attention to or incorrect com pliance with warning messages using this symbol Symbols The triangle symbol indicates a warning including danger and caution The specific point of attention is shown inside the symbol General warning Warning of risk of electric shock Warning of high temperature indicates a prohibited...

Page 8: ...d or dusty place This may cause fire or electric shock Do not install the copier near a radiator heater other heat source or near flammable material This may cause fire Allow sufficient space around the copier to allow the ventilation grills to keep the machine as cool as possible Insufficient ventilation may cause heat buildup and poor copying performance Always handle the machine by the correct ...

Page 9: ... carefully Always check that the copier is correctly connected to an outlet with a ground connection Check that the power cable covering is free of damage Check that the power plug is dust free If it is dirty clean it to remove the risk of fire or electric shock Never attempt to disassemble the optical unit in machines using lasers Leaking laser light may damage eyesight Handle the charger section...

Page 10: ... caution labels that should be present on the machine according to the instruction handbook are clean and not peeling Replace with new ones if necessary Handle greases and solvents with care by following the instructions below Use only a small amount of solvent at a time being careful not to spill Wipe spills off completely Ventilate the room well while using grease or solvents Allow applied solve...

Page 11: ...This page is intentionally left blank ...

Page 12: ...tric problems 1 3 8 1 3 4 Mechanical problems 1 3 9 1 4 Assembly and Disassembly 1 4 1 Precautions for assembly and disassembly 1 4 1 1 Precautions 1 4 1 1 4 2 Assembly and disassembly 1 4 2 1 Removing the conveying roller paper feed roller and pickup roller 1 4 2 2 Removing the retard roller 1 4 3 3 Remove the drive unit and PF main PWB 1 4 4 2 1 Mechanical construction 2 1 1 Paper feed section 2...

Page 13: ...3NY This page is intentionally left blank ...

Page 14: ...io A4 B5 JIS A5 B6 Return postcard B5 ISO C5 Commercial 10 DL Commercial 9 Monarch Commercial 6 3 4 Youkei4 Youkei2 16K Custom 92 1mm x 165 1mm 3 5 8 x 6 1 2 Paper type Plain Recycled Bond Color Colour Preprinted Letterhead Prepunched Rough High quality Envelope Custom 1 to 8 Paper capacity 500 sheets maximum 80 g m2 Dimensions W D H 380 x 410 x 121 mm 14 15 16 x 16 1 8 x 4 3 4 Weight 4 0 kg or le...

Page 15: ...3NY 1 1 2 1 1 2 Parts names Figure 1 1 1 4 4 3 1 2 1 Cassette 2 Papersize window 3 Interface connector 4 Pins ...

Page 16: ...3NY 1 1 3 1 1 3 Machine cross section Figure 1 1 2 Machine cross section Paper path ...

Page 17: ...3NY 1 1 4 This page is intentionally left blank ...

Page 18: ...t the printer up without tilting it then put it down onto the paper feeder s by fitting the four corners as shown in the figure The number of the maximum stages Four steps Figure 1 2 1 1 Pull the cassette from the paper feeder out while griping the release lever Figure 1 2 2 Installing the paper feeder Printer Paper feeder Loading paper into the cassette Release lever Paper feeder Cassette ...

Page 19: ...he paper you are going to use appears in the paper size window Figure 1 2 3 3 Push the lock lever on the left side guide and slide to the desired paper size Figure 1 2 4 Cassette size dial Paper size Window Cassette Paper width guide Paper width guide Lock lever ...

Page 20: ...n using non standard size paper move the paper width guides and paper length guide all the way out insert the paper then adjust the paper width guides and paper length guide to the size of the paper Adjust them so that they are in light contact with the paper Figure 1 2 6 6 Fan the media paper transparencies then tap it on a level surface to avoid media jams or skewed printing Figure 1 2 7 Extensi...

Page 21: ... cassette Figure 1 2 8 8 Insert the cassette into the slot in the paper feeder Push it straight in as far as it will go Figure 1 2 9 Cassette Maximum line Envelope Maximum line Plain Cassette Paper feeder Completion of the machine installation ...

Page 22: ...nd displays the jam location on the printer operation panel Figure 1 3 1 Paper misfeed indication 2 Paper misfeed detection Figure 1 3 2 Paper misfeed detection Paper misfeed location Paper misfeed message Paper feeder 1 Paper feeder 2 Paper feeder 3 Paper feeder 4 Printer Cassette 1 Cassette 2 Cassette 3 Cassette 4 Cassette 5 PFPFS1 PFPFS2 PFPFS3 PFPFS4 ...

Page 23: ...er cassette 2 is inserted PF lift sensor 1 does not turn on within 10 s This error is detected four times successively Defective bot tom plate eleva tion mechanism in the cassette Check to see if the bottom plate can move smoothly and repair it if any prob lem is found Defective con nector cable or poor contact in the connector Reinsert the connector Also check for continuity within the connector ...

Page 24: ... PF lift motor 2 Defective PF main PWB Replace the PF main PWB See page 1 4 4 1040 PF lift motor 3 error paper feeder After cassette 4 is inserted PF lift sensor 3 does not turn on within 10 s This error is detected four times successively Defective bot tom plate eleva tion mechanism in the cassette Check to see if the bottom plate can move smoothly and repair it if any prob lem is found Defective...

Page 25: ...ication error A communication error is detected 10 times in succession Improper installa tion paper feeder Follow installation instruction carefully again Defective con nector cable or poor contact in the connector Reinsert the connector Also check for continuity within the connector cable If none replace the cable PF main PWB YC3 and engine PWB YC22 Defective engine PWB Replace the engine PWB and...

Page 26: ...cable If none replace the cable PF main PWB YC3 and PF main PWB YC4 Defective PF main PWB Replace the PF main PWB See page 1 4 4 1900 Paper feeder 1 EEPROM error When writing the data the write data and the read data is not in agree ment Defective PF main PWB Replace the PF main PWB See page 1 4 4 Device damage of EEPROM 1910 Paper feeder 2 EEPROM error When writing the data the write data and the...

Page 27: ...within the connector cable If none replace the cable PF feed motor 2 and PF main PWB YC6 Defective drive transmission sys tem of the PF feed motor Check if the rollers and gears rotate smoothly If not grease the bushes and gears Check for broken gears and replace if any Defective PF feed motor Replace the PF feed motor 2 Defective PF main PWB Replace the PF main PWB See page 1 4 4 2620 PF feed mot...

Page 28: ...within the connector cable If none replace the cable PF feed motor 4 and PF main PWB YC6 Defective drive transmission sys tem of the PF feed motor Check if the rollers and gears rotate smoothly If not grease the bushes and gears Check for broken gears and replace if any Defective PF feed motor Replace the PF feed motor 4 Defective PF main PWB Replace the PF main PWB See page 1 4 4 Code Contents Ca...

Page 29: ...gine PWB Refer to the service manual for the printer 2 Defective paper gauge sensing False paper gauge indication Defective paper gauge sensors Replace the PF main PWB See page 1 4 4 Actuator of paper gauge sensors does not oper ate smoothly Check visually and replace if necessary Defective PF main PWB Replace PF main PWB See page 1 4 4 Defective printer s engine PWB Replace printer s engine PWB R...

Page 30: ...tor Replace the drive unit See page 1 4 4 2 Skewed paper feed Check if the paper is curled Change the paper 3 Multiple sheets of paper are fed at one time Check if the paper is excessively curled Change the paper Deformed guides along the paper con veying path Check visually and replace any deformed guides 4 Paper jams Check if the contact between the pickup roller paper feed roller and retard rol...

Page 31: ...3NY 1 3 10 This page is intentionally left blank ...

Page 32: ...power cable from the wall outlet When handling PWBs printed wiring boards do not touch parts with bare hands The PWBs are susceptible to static charge Do not touch any PWB containing ICs with bare hands or any object prone to static charge When removing the hook of the connector be sure to release the hook Take care not to get the cables caught To reassemble the parts use the original screws If th...

Page 33: ...the cassette from the paper feeder 2 While pressing the lock lever and then slide the roller holder 3 Remove the paper feed roller assembly 4 Check or replace the paper feed roller or the pickup roller and refit all the removed parts Figure 1 4 1 Lock lever Pickup roller Paper feed roller Roller holder Paper feed roller assembly ...

Page 34: ...e of cas sette and then remove the retard roller assembly Figure 1 4 2 3 Remove the spring 4 Remove the retard holder by rotating 5 Check or replace the retard roller and refit all the removed parts Figure 1 4 3 Retard roller assembly Hook Cassette backside Cassette Retard roller guide Spring Retard roller holder ...

Page 35: ...ar ends 4 While pulling out the paper size switch and then remove the upper cover Figure 1 4 4 5 Release two hooks using the flat screw driver 6 Remove the PWB cover by pulling the knob up Figure 1 4 5 Upper cover Screw Screw Screw Screw Cassette size switch Right front cover Screw PWB cover Knob Hooks Upper cover Flat screw driver ...

Page 36: ...Figure 1 4 6 9 Pull the paper feed roller assembly up 10 Remove all connectors from the PF main PWB 11 Remove the screw and then remove the PF main PWB 12 Check or replace the drive unit or PF main PWB and refit all the removed parts Figure 1 4 7 Screw Screw Screw Connectors Wire holders Drive unit Wires Screw PF main PWB Paper feed roller assembly ...

Page 37: ...3NY 1 4 6 This page is intentionally left blank ...

Page 38: ... 10 11 1 5 6 1 Paper feed roller 2 Pickup roller 3 Retard roller 4 Retard roller guide 5 Conveying roller 6 Conveying pulley 7 Bottom plate 8 Bottom pad 9 Cassette base 10 Upper cover 11 Paper gauge sensor actuator OPPAUSEN OPSEL0 OPSEL1 OPSEL2 OPRDYN OPSCLK OPSDI OPSDO TMDRVN TMCLK TMLOCK TMDIR PAPSIZ0 PAPSIZ1 PAPSIZ2 YC6 4 YC6 3 YC6 2 YC6 1 YC2 1 YC2 2 YC2 4 YC1 3 OUT LMOTOR FEEDCLN TRANSCLN YC7...

Page 39: ...3NY 2 1 2 This page is intentionally left blank ...

Page 40: ... remaining amount level 4 PF lift sensor PFLS Detects the top limit of the bottom plate 5 PF paper feed sensor PFPFS Detects paper jam in the paper feeder 6 PF cassette size switch PFCSSW Detects the paper size dial setting of the paper setting dial 7 PF paper feed motor PFPFM Drives the paper feed mechanism in the paper feeder 8 PF lift motor PFLM Operates the bottom plate in the cassette 9 PF pa...

Page 41: ...3NY 2 2 2 This page is intentionally left blank ...

Page 42: ...3NY 2 3 1 2 3 Operation of the PWBs 2 3 1 Main PWB Figure 2 3 1 Main PWB silk screen diagram YC6 YC2 YC8 3 1 4 2 1 8 1 4 YC7 2 1 1 13 1 12 YC3 YC4 YC1 1 3 ...

Page 43: ... pulse Synchronous serial clock signal 5 OPRDYN 0 3 3 V DC SPI ready signal 6 3 3V1 3 3 V DC 3 3 V DC power source 7 GND Ground 8 OPSEL2 0 3 3 V DC SPI_SEL 2 9 OPSEL1 I 0 3 3 V DC SPI_SEL 1 10 OPSEL0 I 0 3 3 V DC SPI_SEL 0 11 OPPAUSEN O 0 3 3 V DC PF operation stop signal 12 GND I Ground YC4 1 24V1 24 V DC 24 V DC power source Connected to the lower paper feeder 2 OPSDO O 0 3 3 V DC pulse Synchron...

Page 44: ...ignal 5 GND Ground 6 24V2 24 V DC 24 V DC power output to PFPFM YC7 1 GND Ground Connected to the PF lift motor 2 LMOTOR O 0 3 3 V DC PFLM control signal YC8 1 24V2 24 V DC 24 V DC power output to PFFCL Connected to the PF paper feed clutch and PF feed clutch 2 FEEDCLN O 0 3 3 V DC PFFCL control signal 3 24V2 24 V DC 24 V DC power output to PFPFCL 4 TRANSCLN O 0 3 3 V DC PFPFCL control signal Conn...

Page 45: ...3NY 2 3 4 This page is intentionally left blank ...

Page 46: ...2 1 1 2 3 4 3 2 1 OUT GND 3 3V2 1 2 2 1 2 1 GND LMOTOR 1 2 3 4 3 2 1 3 2 1 3 2 1 3 2 1 24V2 FEEDCLN 24V2 TRANSCLN YC4 YC7 YC8 13 12 11 10 9 8 7 6 5 4 3 2 1 1 2 1 2 3 4 13 12 11 10 9 8 7 6 5 4 3 2 1 YC9 7 6 5 4 3 2 1 12 11 10 9 8 7 6 5 4 3 2 1 12 11 10 9 8 7 6 5 4 3 2 1 12 11 10 9 8 7 6 5 4 3 2 1 12 11 10 9 8 7 6 5 4 3 2 1 GND OPPAUSEN OPSEL0 OPSEL1 OPSEL2 GND 3 3V1 OPRDYN OPSCLK OPSDI OPSDO 24V1 Y...

Page 47: ...3NY 2 4 2 This page is intentionally left blank ...

Reviews: