HARDWIRE TO THE FUSE BOX
Check the Owner’s manual for the location of the fuse box. It may vary depending on make and model.
Remove the plastic panel to access the fuse box. It may open imply by lifting a tab or pulling it with your
fingers, or use a flat tool that can pinch in between the plastics.
STEP 1. Locate The Fuse Box
Use a circuit tester to test which fuse is constant(typically red) and provides 12v of power. A fuse that is
constant will stay active when the vehicle is off. The camera will automatically enter standby mode when the
vehicle is not moving for 10 minutes.
STEP 2. Which Slot Should I Use?
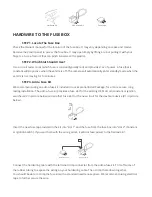
We recommend using an add-a-fuse kit included in our Essential Install Package, for a more secure, long
lasting installation. The add -a-fuse kit provides a fuse slot for the existing OEM circuit (constant or ignition
switched, #2 in picture below) and another fuse slot for the new circuit for the dashcam device (#1 in picture
below).
STEP 3. Add a Fuse Kit
Add a fuse kit
Hardwire Kit
Fuse tape
Add a fuse kit
1
New fuse tape
Insert the new fuse tap provided in the kit into “slot 1” and the fuse from the fuse box into “slot 2” (Constant
or Ignition Switch). If you set them with the wrong order, it will not feed power to the hardwire kit.
Connect the hardwiring cable with the terminal crimp connector from the add-a-fuse kit. Trim off some of
the rubber tubing to expose the wiring on your hardwiring cable. Then crimp them down together.
You should be able to crimp the fuse kit with a standard needle nose pliers. We recommend using electrical
tape to further secure the wire.


