background image

UTG

OWNER'S MANUAL

MODE D'EMPLOI

BEDIENUNGSANLEITUNG

MANUALE DI ISTRUZIONI

MANUAL DE INSTRUCCIONES

ИНСТРУКЦИЯ ПО ЭКСПЛУАТАЦИИ

໪ ቂ ང ಖ ༚

NS-IC400

IN-CEILING SPEAKER
ENCEINTE ENCASTRABLE POUR PLAFOND

05+%DQQMࡍ࡯ࠫ㧞㧜㧝㧜ᐕ㧝㧜᦬㧞㧞ᣣޓ㊄ᦐᣣޓඦᓟ㧠ᤨ㧟㧥ಽ

Summary of Contents for NS-IC400

Page 1: ...UAL MODE D EMPLOI BEDIENUNGSANLEITUNG MANUALE DI ISTRUZIONI MANUAL DE INSTRUCCIONES ИНСТРУКЦИЯ ПО ЭКСПЛУАТАЦИИ ቂ ང ಖ NS IC400 IN CEILING SPEAKER ENCEINTE ENCASTRABLE POUR PLAFOND 05 DQQM ࡍ ࠫ 㧞㧜㧝㧜ᐕ㧝㧜 㧞㧞ᣣ ޓ ᦐᣣ ޓ ඦᓟ㧠ᤨ㧟㧥ಽ ...

Page 2: ...aused by improper placement or installation of speakers CONSUMER PRECAUTIONS Information for Users on Collection and Disposal of Old Equipment This symbol on the products packaging and or accompanying documents means that used electrical and electronic products should not be mixed with general household waste For proper treatment recovery and recycling of old products please take them to applicabl...

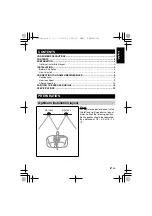
Page 3: ... 0 m 6 10 ft CONTENTS CONSUMER PRECAUTIONS 1 CONTENTS 2 PREPARATION 2 Optimum installation layout 2 INSTALLATION 5 Before installation 5 How to install 6 CONNECTING YOUR AMPLIFIER RECEIVER 9 Connections 9 How to connect 9 After connecting 10 PAINTING THE SPEAKER GRILLE 10 SPECIFICATIONS 10 PREPARATION Optimum installation layout NS IC400 NS IC400 05 DQQM ࡍ ࠫ 㧞㧜㧝㧜ᐕ㧝㧜 㧞㧞ᣣ ޓ ᦐᣣ ޓ ඦᓟ㧠ᤨ㧟㧥ಽ ...

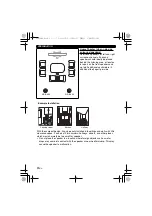
Page 4: ...th the compact design it can be easily installed into ceilings and walls with little clearance space It can also fit into corners hallways closets and other places which would normally be too small for speaker Do not place the speaker in a location where foreign objects such as water drops may come into contact with the speaker or near heat moisture This may cause the speaker to malfunction NS IC4...

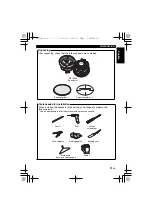
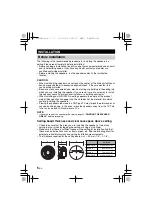
Page 5: ...contained Tools needed for installation When installing the speakers to the ceiling you will need to prepare the following tools Use an appropriate tool for the material of the mounting surface Drill Philips screwdriver Pencil Safety goggles Wire strippers Keyhole saw Gloves Sturdy wire such as a coat hanger 05 DQQM ࡍ ࠫ 㧞㧜㧝㧜ᐕ㧝㧜 㧞㧞ᣣ ޓ ᦐᣣ ޓ ඦᓟ㧠ᤨ㧟㧥ಽ ...

Page 6: ...uct weight See specification page and the sturdiness of the material into which you are installing the speakers Placing the speakers too close to a CRT type TV may impair the picture color or cause a buzzing noise In this case move the speakers away from the TV This is not an issue with LCD and plasma TVs NOTE If you wish to paint the speaker grille refer to page 10 PAINTING THE SPEAKER GRILLE bef...

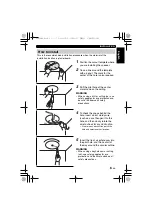
Page 7: ... cutting tool use safety goggles for eye protection and be sure to observe all safety precautions 4 To check the space behind the hole insert a bent sturdy wire such as a coat hanger into the hole and then slowly rotate the wire to check for any obstruction If there is any obstruction patch the hole and select another location 5 Insert the tip of a keyhole saw into the pilot hole and then cut all ...

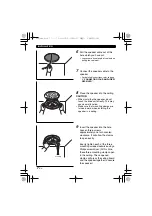
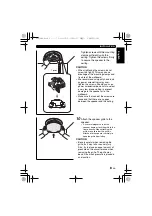
Page 8: ...nit directly This may cause a malfunction Make sure that mounting clamps are turned inward when installing the speaker in a ceiling 9 Insert the speaker into the hole Loosen three screws approximately one turn counter clockwise It will allow the clamps to open easily Evenly tighten each of the three mounting screws clockwise using a Philips screwdriver At this time these three mounting clamps open...

Page 9: ...age to the speaker or to the wallboard Make sure that none of the screws are loose and that there are no gaps between the speaker and the ceiling 10 Attach the speaker grille to the speaker As several magnets are on the speaker frame attach the grille to the frame directly When attaching the grille make sure that the grille is attached to the speaker securely to keep the grille from falling CAUTIO...

Page 10: ...IER RECEIVER Connections How to connect 1 Remove approximately 10 mm 3 8 of insulation from the end of each speaker cable using wire strippers and then twist the exposed wires of the cable together to prevent short circuits 2 Press and hold down the speaker terminal 3 Insert the bare wire into the hole in the side of each terminal 4 Release the terminal Test the firmness of the connection by pulli...

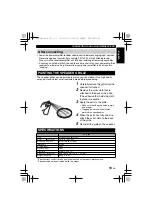
Page 11: ...es are not included with this model After connecting PAINTING THE SPEAKER GRILLE 1 Carefully remove the grille from the speaker if attached 2 Remove the scrim cloth that is attached to the back of the grille The adhesive that holds the cloth in place is reusable 3 Apply the paint to the grille Make sure that the grille holes remain free of paint Clogging the holes with paint may diminish the sound...

Reviews: