background image

18

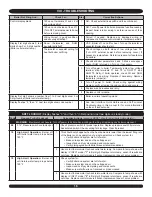
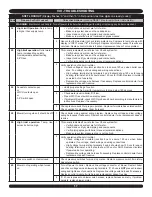
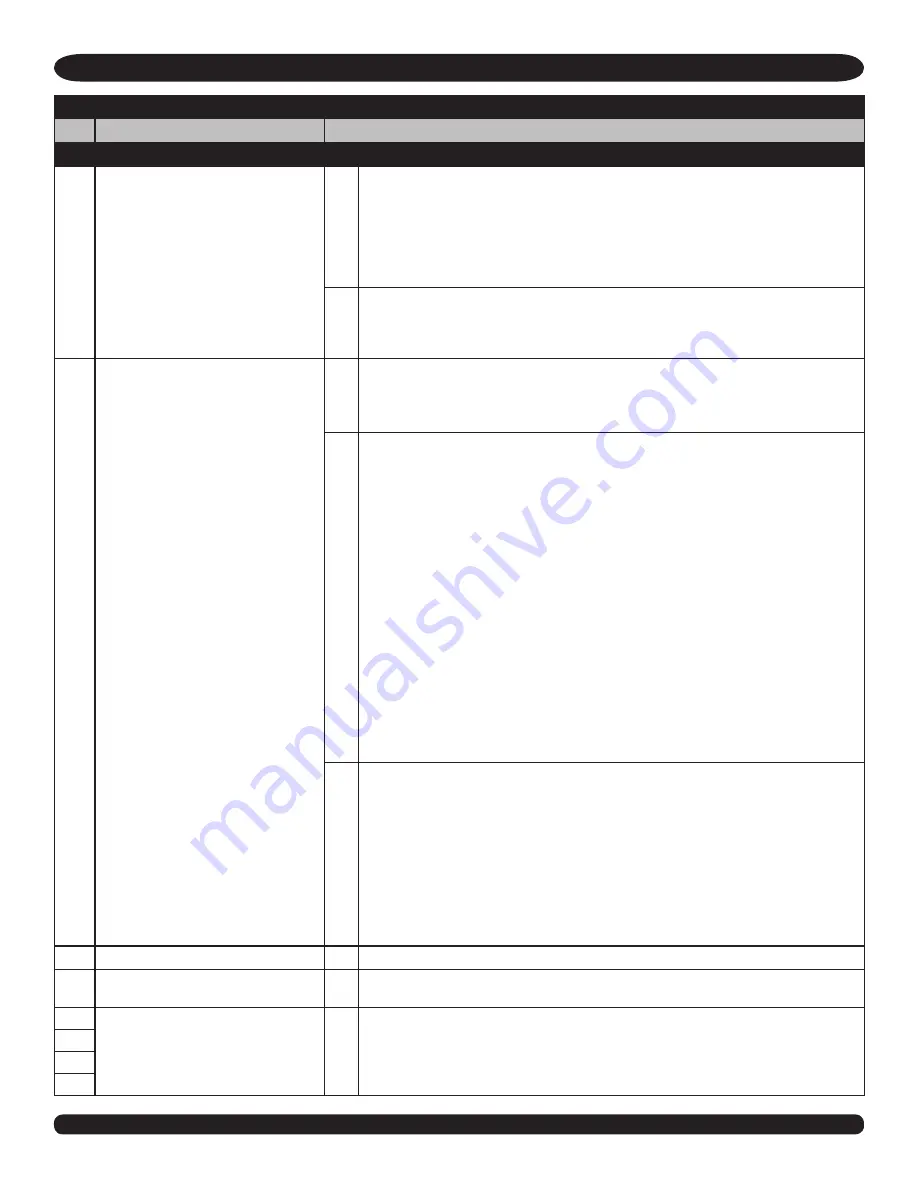
VIII - TROUBLESHOOTING

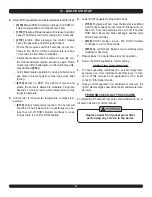
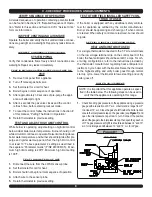
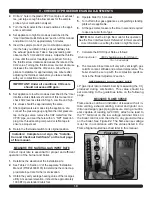
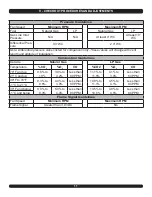
HARD LOCKOUT

 (Display flashes first digit “E” and last two digits (code))

Code

Reason For Hard Lockout

Corrective Actions 

(pressing RESET should restart boiler immediately):

WARNING:

 Electrical shock hazard. Turn off power to boiler when working with wiring or replacing any boiler component.

00

Flame detected on startup.

1

Burner may be operating too hot due to incorrect combustion. Inspect flame during 

operation following the procedure in this manual. If flame is acceptable at both high 

and low fire, go to step 2. If flame is not acceptable:

For propane boilers, verify propane orifice is correct and properly installed. 

• 

Obtain and install propane orifice if necessary.

For correctly orificed propane or natural gas boilers, replace gas valve if 

• 

burner glows excessively.

2

Look into the burner inspection window after the boiler shuts down. If flame is still 

present, gas valve may be leaking. Replace gas valve. BEFORE replacing valve, 

check gas line pressure coming to boiler. Pressure must not exceed 13” w.c. or 

valve damage could occur.

02

Ignition failed through 5 attempts.

1

If no ignition spark occurs:

Check ignition electrode cable, electrode connector, and connections.

• 

Inspect ignition electrode cable and electrode for insulation damage.

• 

Check ground lead from ground terminal strip to heat exchanger access cover.

• 

2

If spark occurs, but no flame:

Verify manual gas valve in boiler is open.

• 

Verify plastic line from gas valve to air inlet elbow is connected to gas valve 

• 

and elbow, and line is unobstructed with no kinks.

Check incoming gas pressure.

• 

Verify  gas  lines  are  free  of  obstruction  and  purge  gas  lines  of  air  if 

• 

necessary.

Verify  flue  gas  vent  and  air  supply  piping  are  correctly  installed,  in  good 

• 

condition, and free of obstructions.

Check voltage to gas valve (it should be approx. 19-21 vdc (24 vrac) during 

• 

ignition attempt).

Check gas meter to verify gas flows when gas valve is activated.

• 

Remove and inspect/clean ignition electrode. Clean white oxides if necessary 

• 

and replace ignition electrode if in poor condition or unable to be cleaned.

Disconnect gas valve from Venturi. Inspect Venturi gas line to verify there are 

• 

no obstructions. Replace gas valve.

Check  for  possible  flue  gas  recirculation  at  vent/air  terminations  or  inside 

• 

boiler housing.

If  gas  valve  is  powered,  gas  flows  when  activated,  and  above  steps  have 

• 

been verified, replace gas valve and retry.

3

Flame occurs but flame signal too low (less than 3 vdc between X1-5 and ground):

Inspect  flame  at  both  low  and  high  fire  rates.  Inspect  and  clean  burner  if 

• 

necessary. Replace burner if not in good condition.

Check gas flow rate at gas meter with boiler at high fire. If input is not within 

• 

about 10% of boiler rating, replace gas valve. (Length of the vent/air piping will 

affect boiler firing rate, with longer piping causing lower inputs.)

Check ground wire and connections from ground terminal screw to X1-6 terminal 

• 

on wiring harness. Use ground continuity meter to verify good ground path.

Follow  procedure  to  inspect  and  clean  ignition  electrode.  replace  ignition 

• 

electrode if necessary.

If above does not correct problem, replace control module.

• 

03

gas Valve disconnected.

1

Verify gas valve connection.

04

Voltage lost after lockout occurred.

1

Control module will only restart with manual reset, even after power loss (but the 

error code information is lost).

05

internal control failure.

1

Reset control and retry. If problem persists, replace control module.

06

07

08

Summary of Contents for 95M-200

Page 1: ...instructions including the Installation Manual P N 240006103 the Parameter Guide P N 240006105 the User s Information Manual P N 240006106 and this Control Manual and Oper ating Instructions before attempting to program the control and be sure to perform all steps in the order specified Failure to comply could re sult in severe personal injury death or substan tial property damage Revise boiler co...

Page 2: ...2 ...

Page 3: ...ntial property damage DANGER Indicates a potentially hazardous situation which if not avoided could result in death serious in jury or substantial property damage WARNING Indicates a potential hazardous situation which if not avoided may result in minor or moderate injury It may also be used to alert against unsafe practices CAUTION IMPORTANT Read the following instructions completely before insta...

Page 4: ...rature is too high the control shuts the boiler down This ensures boiler shut down in the event of low water or low flow conditions Some codes and jurisdictions may accept these integral 2 features of the control in lieu of requiring an additional limit control or low water cutoff Consult your local jurisdiction for more information on low water cutoff requirements This boiler is controlled by a m...

Page 5: ...used Target temperature with outdoor reset All boilers are shipped with an outdoor temperature sensor When this sen sor is installed low voltage terminal strip terminals A1 and A2 the boiler control regulates target outlet water temper ature based on outside temperature Set the temperature curve by setting Parameter 4 to ODT outdoor design temperature for the area For ODT of 0 F or lower set Param...

Page 6: ...grammed into the con troller Display user interface By means of the display user interface the installer and home owner can scroll through the control settings and customize the boiler to the heat delivery system used in the location of installation See the User Interface Quick Reference in Section X of this manual for more information on using and programming the boiler control immediately sets t...

Page 7: ...eed will increase to igni tion speed The blower will run in prepurge for 10 sec onds 2180 Ignition After prepurge the control module opens the gas valve and starts ignition spark If burner flame proves within 4 5 seconds burner con tinues to fire Burner will fire at startup rate for about 10 seconds to allow flame to stabilize If burner flame does not prove within 4 5 seconds con trol module attem...

Page 8: ...re 6150 Target temperature reached The burner will shut down The blower will run in postpurge see be low then turn off DHW circulator continues to run as long as there is a call for DHW heating Lower DHW aquastat to stop call for heat 6 1150 Postpurge When room thermostat is satisfied call for heat ended burner turns off Blower will con tinue for 15 second postpurge then turn off If another DHW he...

Page 9: ...s 100 F Test Low Water Cut Off Disconnect the wire from the LWCO sensor probe 1 Set thermostat for call for heat 2 Boiler should not begin normal sequence of operation 3 Attach wire to the sensor probe 4 Return thermostat to previous setting 5 Test other field installed safety con trols if used If the boiler is equipped with any additional safety controls test for operation as outlined by the cont...

Page 10: ...ast page of this manual Measure the natural gas input rate Correct input rate is essential for proper and efficient operation of the burner and boiler Determine the elevation at the installation site 1 See Table 2 in Section IV of the separate Installation 2 Manual P N 240006103 to determine the correct ap proximate input rate for the local elevation Obtain the yearly average heating value of the ...

Page 11: ...ngth and altitude of installation Combustion Guidelines Outside Natural Gas LP Gas Temperature CO2 O2 CO CO2 O2 CO 70 F and up 9 6 to 10 3 9 to 3 2 Less than 80 PPM 11 1 to 11 5 4 1 to 3 4 Less than 80 PPM 21 C and up 30 F to 70 F 9 3 to 9 6 4 4 to 3 9 Less than 80 PPM 10 8 to 11 1 4 5 to 4 1 Less than 80 PPM 1 C to 21 C 30 F and below 9 0 to 9 3 5 0 to 4 4 Less than 80 PPM 10 5 to 10 8 4 9 to 4 5...

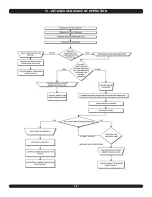
Page 12: ...12 VI Detailed Sequence of Operation ...

Page 13: ...ntinuity Tester Contact Thermometer Inclined Manometer or Pressure Gauge with 0 6 0 range 0 01 scale for measuring suction pressures at pres sure switch U Tube Manometer or Differential Pressure Gauge with 0 14 range 0 1 scale for measuring inlet and manifold gas pressures INITIAL SERVICE CHECKS Prior to troubleshooting Make sure that circuit breaker is on or fuse is okay at 1 electrical panel Mak...

Page 14: ...t exchanger or vent blockage To check the differential air pressure Turn off service switch or lower thermostat setting 1 Remove vinyl caps from tee 2 Install testing lines as shown to inclined manometer or 3 differential pressure gauge with the ability to read 0 01 increments to at least 6 0 w c Turn on service switch and set thermostat to call for 4 heat Boiler Status Diff Pressure Switch Contac...

Page 15: ...nal line switch and verify 8 boiler operation after completing boiler service Checking temperature sensors The boiler temperature sensors outdoor return water and 1 supply water are all resistance type devices The table below shows the correct resistance value for 2 the sensor at various temperatures Temp F Sensor Ohms Temp F Sensor Ohms Min Max Min Max 32 34 265 37 871 130 3 698 4 088 40 27 834 3...

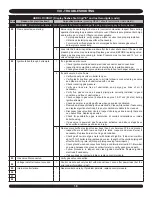
Page 16: ... mode Display flashes 9 then b Last two digits show code number 1 See User Interface Quick Reference and Soft Lockout Troubleshooting in this manual for for more information on the soft lockout code SOFT LOCKOUT Display flashes 9 and then b in first position last two digits on steady code Code Reason For Soft Lockout Corrective Actions pressing RESET should restart boiler immediately WARNING Elect...

Page 17: ... wait for temperature to drop below 180 degrees 2 Check water level in boiler fill if low Press LWCO reset switch on display panel If problem still exists check LWCO probe and board according to manufacturer s instructions Replace if necessary 3 Check pressure switch for proper operation Replace if moisture has entered switch Check venting for blockage Clear if present 29 Blower turning when it sh...

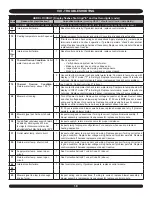
Page 18: ... lines of air if necessary Verify flue gas vent and air supply piping are correctly installed in good condition and free of obstructions Check voltage to gas valve it should be approx 19 21 vdc 24 vrac during ignition attempt Check gas meter to verify gas flows when gas valve is activated Remove and inspect clean ignition electrode Clean white oxides if necessary and replace ignition electrode if ...

Page 19: ...e problem 28 Blower not running 1 Turn off power to boiler Remove line voltage connector at blower Restart boiler and check voltage across blower plug terminals If 120 vac is NOT present inspect wiring and tightness of connections Replace line voltage wire harness if necessary Replace control module if wire harness replacement doesn t resolve 2 If 120 vac is present on blower wire harness replace ...

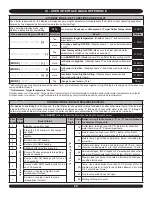
Page 20: ...e first character shows boiler status followed by boiler outlet water temp If the burner is being held off due to a soft lockout the display alternates between showing 9 followed by boiler outlet water temp and b followed by the two digit codes below Soft lockout means the boiler will start again automatically if the condition is corrected or timed out Press RESET button to restart boiler without ...

Page 21: ...ys 1 After the STORE button is pressed the set value will flash twice to confirm the change Change will take effect after you leave Parameter Mode IX user interface quick reference INFORMATION MODE Press MODE button 2 times from Standby Mode Display shows Info until a key is pressed Info then displays Parameter Flashing Dot and Current Status 1 190 Press and Hold Key s in BLACK 1 Duration Result D...

Page 22: ...ries 19 Return water temperature higher than 190 F 03 Gas valve disconnected 25 Outlet temperature increased too fast 04 Power lost after lockout 28 No signal from blower blower not running or defective blower motor 05 Internal control failure 29 Blower signal not 0 when it should be 06 Internal control failure 30 Max difference b30 was too large for 20 successive times Non adjustable default max ...

Page 23: ......

Page 24: ...echnical assistance with this product in the United States call toll free 1 800 325 5479 and in Canada call toll free 1 888 270 8324 ECR International PO Box 4729 Utica NY 13504 4729 www ecrinternational com ...

Reviews: