background image


Rocket


Access Point


V1.0


User Guide 


June 2011


Summary of Contents for ROCKET V1.0

Page 1: ...Rocket Access Point V1 0 User Guide June 2011...

Page 2: ...tility Associates The software as described in this document is furnished under a license agreement or non disclosure agreement The software may be used or copied only in accordance with the terms of...

Page 3: ...the RAP s Enclosure 2 Connecting cables outside the RAP s Enclosure 7 Configuring your RAP Overview 9 Basic Setup 9 Main Page 10 Wireless Page 11 Setting up your wireless configuration 12 Network Mod...

Page 4: ...within its own housing The unit has been factory setup with its default configuration however you should familiarize yourself with each connection as a reference for any possible maintenance and or tr...

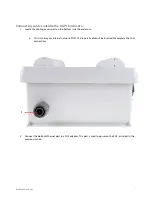
Page 5: ...d by removing the barrel connector on the cable with the RED tag on it please insure this connector does not come in connect with any metallic objects i Additionally ensure that NO RJ45 external cable...

Page 6: ...respective ports located on the inside front enclosures housing a Ensure that the long rubber duck barrel antenna is attached to the 2 4 GHz port located directly next to the DB9 connection on the sam...

Page 7: ...ve been attached correctly attach the barrel connector to the RAP power access port located directly above the console port Note Please make sure that these connections are made properly and tightened...

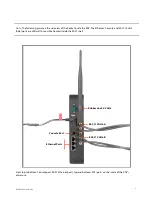
Page 8: ...he Ethernet Console and 802 11 5GHz A B ports are diificult to see while housed inside the RAP s shell From top to bottom Console port RAP s Ethernet ports top and bottoms WiFi ports on the inside of...

Page 9: ...RAP s enclosure Note Make sure that you do not connect the network cable into the console port located directly above the Ethernet LAN ports 6 Connect your POE network patch cable into the POE Switch...

Page 10: ...ing access port on the bottom side the enclosure a This is where your internal network POE CAT 5 6 patch cable will be inserted to complete the LAN connections 2 Connect the bottom Ethernet port to a...

Page 11: ...Rocket Access Point 8 3 Connect this end to the top Ethernet port of the RAP s enclosure 4 Connect the bottom Ethernet port to a POE adapter This port is used to power on the RAP 4...

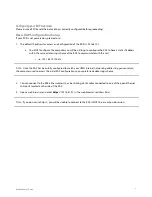
Page 12: ...ing schema of the RAP to communicate with the unit i i e 192 168 10 100 etc Note Once the RAP has been fully configured to match your OWN internal networking addressing you can return the computer use...

Page 13: ...password is admin 5 Login to the RAP Note The User MUST check and select the save button on EACH of the RAP s configuration pages they make changes too prior to moving onto the next configuration page...

Page 14: ...your device internally Network Mode As an access point this should display bridge Wireless Mode This should display Access Point SSID Name used to identify your wireless network Security Your wireless...

Page 15: ...ess Mode Displays that your RAP is acting as an Access Point 2 SSID Your wireless network name 3 The Channel The channel of your wireless network 4 UA Channel channel option for connected Rockets 5 Hi...

Page 16: ...et speed optimization Optional 4 The default is preferred unless you are running more than a couple RAPs within close proximity 5 You may hide your SSID by checking the Hide SSID box 6 Choose your sec...

Page 17: ...ess displayed on the Main page This MAC should also be located on the outside of your device If Static is selected please enter a valid IP address for your network This IP address should not already b...

Page 18: ...which is port 443 2 By default the webpage session timeout is set to 20 minutes You may change this as well 3 Enable Https Displays whether the RAP web pages are using SSL 4 Server Port Displays the...

Page 19: ...our RAP will be configured to use SSL Secure Socket Layers Checking this option will fill the Server Port field with 443 which is the port number for https 2 To change the session length of the RAP we...

Page 20: ...s 2 By default the password for logging into the RAP s webpage is admin It is highly suggested that you change this Make sure to remember this or write it down since this password will be required to...

Page 21: ...pages by selecting the Change Password field then entering your password twice in the Password fields 3 To reboot your RAP click on the reboot button 4 If your settings have changed please submit the...

Page 22: ...ddress of your default gateway If this issue is still unresolved reboot the RAP as you may have saved your settings but they have yet to be applied Q Why is my Rocket unable to connect to the RAP A1 E...

Page 23: ...2011 Utility Inc 1484 Brockett Road Tucker Georgia 30084 404 816 0300...

Reviews: