34
Übersicht Steckverbindungen / Overview of connections
Montageplatte
Montageplatte
Montageplatte
Montageplatte
Nr. 1 Steuerung
Nr. 2 Liege
Nr. 3 Fluter
Nr. 4 Fluter
Board No.1
Board No. 2
Board No.3
Board No.4
Control
Bed
Canopy face tanner
Canopy
Montageplatte Nr. 2 Liege /
Board No. 2 Bed
X1, 18-pol. /
pin
Montageplatte Nr. 3 Fluter GB
X4, 18-pol.
Board No. 3 Canopy face tanner
X4, 18-pin
Montageplatte Nr. 4 Fluter /
Board No. 4 Canopy
X7, 18-pol. /
pin
Fußgestell /
Base
X10, 18-pol. /
pin
Warmluftrückführung (Zubehör)
X14, 9-pol. /
pin
Warm air recirculation (accessories)
Klimagerät (Option) /
Air conditioning unit (optional)
X12
Liege /
Bed
X2, 18-pol. /
pin
Liege /
Bed
X3, 18-pol. /
pin
Fluter /
Canopy
X5, 18-pol. /
pin
Fluter /
Canopy
X6, 18-pol. /
pin
X8, 18-pol. /
pin
(nur LOTUS CPS)
(only LOTUS CPS)
Fluter /
Canopy
X9, 18-pol. /
pin
53
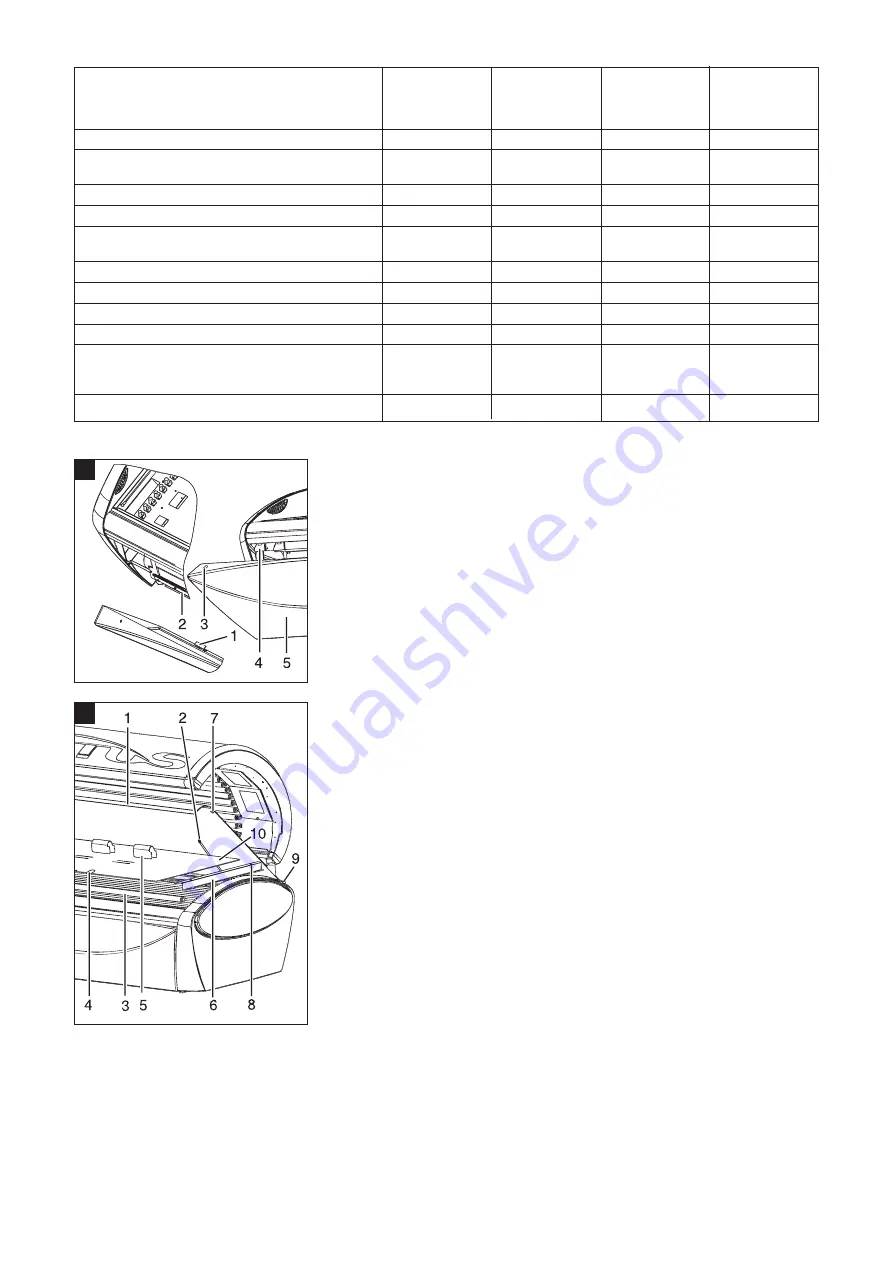
Fitting the Large Covering Panel in Front of
the Base
1.
Push the large covering panel (53/5) onto
the base casing from the front parallel to
the base casing.
2.
First hang the bottom hooks (53/1) of the
covering panel over the holders (53/2) of
the base and tilt the covering panel fully
against the base at the top.
The top elongated holes (53/3) in the
covering panel snap into the lugs (53/4)
of the base.
9.3.1 Assembling the Bed
Assembling the Bed
1.
Place both lamp covers (54/6) on the
holder.
The heads of the M 6 x 10 screws of the
holder plate fit into the holes
(diameter 12 mm) of the lamp cover
(54/6).
Unit without an air conditioning unit:
Place the lamp cover with the filter mat
at the head side.
2.
Place the flat acrylic panel (54/10) with the
gripping hole at the front between the
limiting screws (54/8) of the lamp cover.
3.
Thread in the two U-bars (54/5) under the
flat bed panel and set them upright.
Warning! Don´t forget the U-Bars.
4.
Two people, one at either end, should lift
up the bed panel (54/1) and hold it over
the bed so that its front long side is lifted
up.
5.
Insert the rear aluminium profile (54/9) of
the bed panel in the longitudinal aluminium
profile of the bed.
6.
Tilt the bed panel down at the front until it
is lying on the bed.
7.
Turn the slots in the bolts (54/7) to the
horizontal position.
Grosse Abdeckhaube vor dem Fußgestell
montieren
1.
Führen Sie die grosse Abdeckhaube
(53/5) von vorne her parallel zum Fußge-
häuse an das Fußgehäuse heran.
2.
Hängen Sie zuerst die unteren Haken
(53/1) der Abdeckhaube über die
Halterungen (53/2) des Fußgestells und
kippen Sie die Abdeckhaube oben gegen
das Fußgestell. Die oberen Langlöcher
(53/3) der Abdeckhaube rasten in die Auf-
nahmen (53/4) des Fußgestells ein.
9.3.1 Montage Liege
Liege montieren
1.
Stellen Sie beide Lampenabdeckungen
(54/6) auf den Fassungsträger. Die Schrau-
benköpfe M 6 x 10 des Fassungsträger-
blechs tauchen dabei in die Bohrungen
(Durchmesser 12 mm) der Lampenab-
deckung (54/6) ein.
Gerät ohne Klimagerät:
Stellen Sie die Lampenabdeckung mit
Filtermatte kopfseitig auf.
2.
Legen Sie die flache Acrylglasscheibe
(54/10) mit dem Griffloch nach vorne
zwischen die Schrauben (54/8) der
Lampenabdeckung.
3.
Führen Sie beide U-förmigen Stege (54/5)
unter die flache Liegenplatte ein und
stellen Sie diese auf.
Achtung! U-förmige Stege nicht
vergessen!
4.
Nehmen Sie zu zweit, jeder auf einer Stirn-
seite, die Liegenplatte (54/1) auf und halten
Sie diese so über die Liege, dass ihre
vordere Längsseite nach oben geklappt ist.
5.
Führen Sie die Liegenplatte mit ihrem
hinteren Aluprofil (54/9) in das Alu-Längs-
profil der Liege ein.
6.
Kippen Sie die Liegenplatte vorne nach
unten bis sie auf der Liege liegt.
7.
Drehen Sie die Schlitze der Riegel (54/7)
horizontal.
54


