background image


Version 09.02.2012


VL2-MBN45 

P

a

g

e

10


Note:

 If only one AV-source shall be connected, it is possible to connect the video output of 

the AV-source to video IN1 of the video-interface and the audio output of the AV-source 
direct to the audio-insertion. 
 

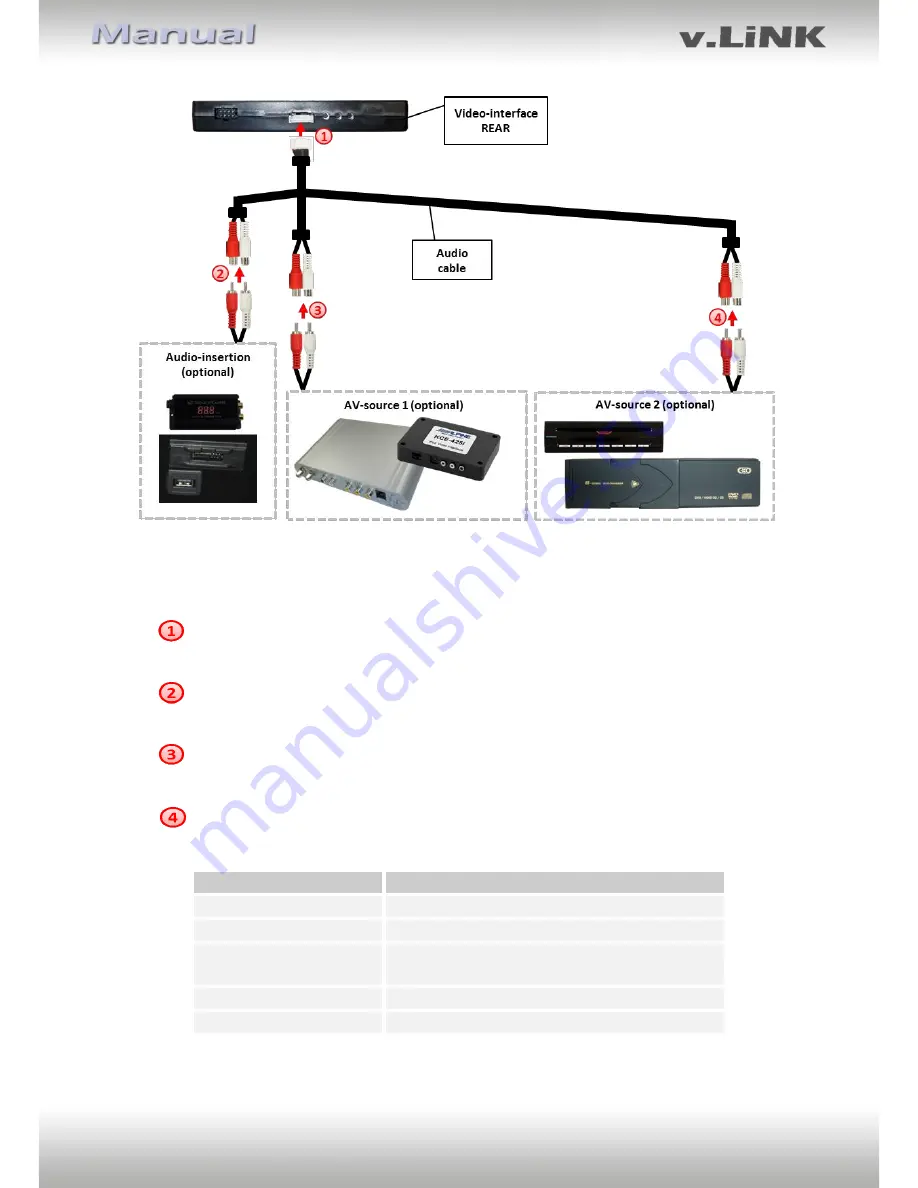
Connect female 8pin connector of the audio cable to male 8pin connector of the 
video-interface. 
 
Connect the audio-RCA of the possibly existing factory AUX-input or the FM-
modulator to the female RCA port AV-Out of the audio cable.  
 
Connect the audio-RCA of the AV-source 1 to the female RCA port AV1 of the audio 
cable.  
 
Connect the audio-RCA of the AV-source 2 to the female RCA port AV2 of the audio 
cable.  
 

Audio pins 

Definition 

1/2 

Audio input signal R/L of source IN2 

3/4 

Audio input signal R/L of source IN1 

5/6 

Audio output signal R/L of factory audio AUX 
or FM-modulator 

Ground 

No function 


Note:

 When switching the video interface from video-IN1 to video-IN2, the audio will also 

automatically be switched. 

Summary of Contents for VL2-MBN45

Page 1: ...AN control Product features Video inserter for factory infotainment monitors 2 video inputs for after market devices e g DVD Player DVB T tuner Built in audio switch no audio insertion Rear view camer...

Page 2: ...ew camera settings dip 5 2 Installation 2 1 Place of installation 2 2 Connection schema 2 3 Connecting video interface and CAN box 2 4 Connection to the factory monitor 2 5 Connecting peripheral devic...

Page 3: ...r DVD upgrades Changes updates of the vehicle s software can cause malfunctions of the interface We offer free software updates for our interfaces for one year after purchase To receive a free update...

Page 4: ...Dip 4 to dis or enable the interfaces inputs dip 1 to 3 and to preselect the type of camera which is to be installed dip 5 Dip position down is ON and position up is OFF 1 3 1 Vehicle selection dip 7...

Page 5: ...cable at the black 8pin connector and connect it to the reverse gear light 12V For this use a relay because the reverse gear light of the vehicle is clocked relay AC RW1230 and AC RS5 optional availa...

Page 6: ...Version 09 02 2012 VL2 MBN45 Page 6 2 2 Connection schema...

Page 7: ...ite female 6pin Molex connector of the 6pin to 8pin cable to the male 6pin Molex connector of the video interface Connect black female 8pin Micro Fit connector of the 6pin to 8pin cable to male 8pin M...

Page 8: ...of the factory monitor and connect it to the male 4pin HSD LVDS connector of the 4pin HSD LVDS cable Connect female 4pin connector of the 4pin HSD LVDS cable to the male 4pin HSD LVDS connector of th...

Page 9: ...2 Connect video RCA of the AV source 1 to the female RCA connector IN1 of the video interface Connect video RCA of the AV source 2 to the female RCA connector IN2 of the video interface 2 5 2 Audio sw...

Page 10: ...y existing factory AUX input or the FM modulator to the female RCA port AV Out of the audio cable Connect the audio RCA of the AV source 1 to the female RCA port AV1 of the audio cable Connect the aud...

Page 11: ...ther the automatic switching to camera inputs work Later connect green wire to reverse gear light using a relay relay AC RW1230 and AC RS5 optional available Note Set Dip 5 to ON 2 5 4 After Market na...

Page 12: ...rface 2 7 Picture settings After installing the sources the picture settings can be changed using a pen on the buttons of the video interface Press the MENU button to open settings menu on the OSD and...

Page 13: ...s which are not enabled are skipped If the audio cable is connected when switching from video IN1 to video IN2 also the sound will be switched 3 2 By keypad Alternatively or additionally to the factor...

Page 14: ...s video interface 6 Technical Support NavLinkz GmbH Caraudio Systems Vertriebs GmbH distribution tech dealer support distribution Eurotec Ring 45 Rheinhorststr 22 D 47445 Moers D 67071 Ludwigshafen am...

Reviews: