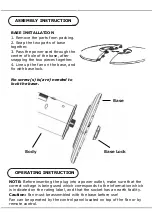
BASE INSTALLATION
1. Remove the parts from packing.
2. Snap the two parts of base
together.
3. Pass the power cord through the
centre of hole of the base, after
snapping the two pieces together.
4. Line up the fan on the base, and
fix with base lock.
No screw(s) is(are) needed to
lock the base.
ASSEMBLY INSTRUCTION
NOTE:
Before inserting the plug into a power outlet, make sure that the
correct voltage is being used which corresponds to the information which
is indicated on the rating label, and that the socket has an earth facility.
Caution:
Fan must be assembled with the base before use!
Fan can be operated by the control panel located on top of the Fan or by
remote control.
OPERATING INSTRUCTION
Base Lock
Body
Base
Summary of Contents for VT-5566
Page 43: ...1 2 3 4 5 6 7 8 9 10 8 11 12 BULGARIAN...
Page 44: ...V TAC V TAC 2 10 12 24 BULGARIAN 1 2 3 4...
Page 45: ...1 220 240V AC LED 2 3 LED 4 LED a b c 5 6 15 1 15 7 30 8 1 2 3 1 2 3 4 5 BULGARIAN...
Page 48: ...Fig 6 Fig 7 Fig 8 Fig 9 Fig 10 Fig 11 10 9 11 12 BULGARIAN...
Page 50: ...6 V TAC Smart Light Link Now 7 Link Now Authorize 8 5 BULGARIAN...
Page 54: ...7 a b b 8 9 Google Home Account is now Linked a b BULGARIAN...
Page 121: ...1 2 3 4 5 6 7 8 9 10 8 11 12 GREEK...
Page 122: ...V TAC V TAC 2 10 12 24 GREEK 1 2 3 4...
Page 123: ...1 220 240 V LED 2 3 LED 4 LED 5 6 15 1 15 7 30 8 1 2 3 1 2 3 4 5 GREEK...
Page 126: ...Fig 6 Fig 7 Fig 8 Fig 9 Fig 10 Fig 11 10 9 11 12 GREEK...
Page 128: ...5 6 V TAC Smart Light Link Now 7 Link Now Authorize 8 account GREEK...
Page 132: ...Account is now Linked a b 7 a b b 8 9 Google Home GREEK...


