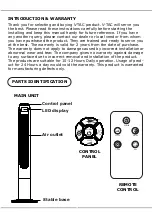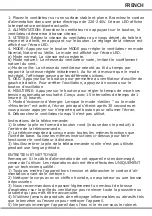
1. Place the Fan on a stable and flat surface. Plug the Power Cord into an
AC:220-240V electrical outlet. The LED screen will display the current room
temperature.
2.
POWER:
Turn the Fan ON by pressing the button, the Fan will start at
low speed.
3.
SPEED:
Adjust the Fan speed to the desired level from Low to Medium to
high by pressing the button. The speed setting is displayed on the LED
screen.
4.
MODE:
Press the MODE button to set the Fan as Normal, Natural or Sleep
mode.
The mode is displayed on the LED screen.
a)
Normal mode:
Speed is constant.
b)
Natural mode:
Fan speed varies, mimicking natural wind blowing.
c)
Sleep mode:
Fan speed slows down over time from the original set
speed.
As the mode is adjusted, the display cycles through the different icons.
5.
OSC:
Press the button to allow the Fan to oscillate from left to right. To
stop the oscillation, press the oscillation button again
6.
TIMER:
Press the button to set desired auto power-off time. Designed
with 15 time intervals from 1-hour to 15-hour.
7.
Power Saving Mode:
When the 'Sleep' mode or the 'Timer' is on, the main
display will be off after 30 seconds, and you can press any keys to turn on
the display again.
8.
Unplug the Fan when not in use.
Remote Control Instructions:
1) Insert the round button shape battery (included in the product) into the
back of the remote control.
2) The remote control is designed with all the functions same as the base
unit. Follow the same instructions above to operate the fan remotely.
3) Please remove the battery from the remote control if it is not in use for
long time.
Note: If the power cord set of this appliance becomes damaged,
discontinue use. Repairs should be undertaken by qualified technician
ONLY.
1) Always switch power OFF and then unplug power chord before cleaning.
2) Clean the housing with a damp cloth, a vacuum cleaner or a dusting brush.
3) We recommend lightly running a vacuum cleaner brush nozzle over the fan
grill to remove any dust or dirt that may have accumulated.
4) Never use flammable or abrasive cleaning agents such as benzene or
spirits to clean the appliance.
5) Never immerse the appliance in water or rinse under the tap.
CARE & CLEANING
ENGLISH
ENGLISH
Summary of Contents for VT-5566
Page 43: ...1 2 3 4 5 6 7 8 9 10 8 11 12 BULGARIAN...
Page 44: ...V TAC V TAC 2 10 12 24 BULGARIAN 1 2 3 4...
Page 45: ...1 220 240V AC LED 2 3 LED 4 LED a b c 5 6 15 1 15 7 30 8 1 2 3 1 2 3 4 5 BULGARIAN...
Page 48: ...Fig 6 Fig 7 Fig 8 Fig 9 Fig 10 Fig 11 10 9 11 12 BULGARIAN...
Page 50: ...6 V TAC Smart Light Link Now 7 Link Now Authorize 8 5 BULGARIAN...
Page 54: ...7 a b b 8 9 Google Home Account is now Linked a b BULGARIAN...
Page 121: ...1 2 3 4 5 6 7 8 9 10 8 11 12 GREEK...
Page 122: ...V TAC V TAC 2 10 12 24 GREEK 1 2 3 4...
Page 123: ...1 220 240 V LED 2 3 LED 4 LED 5 6 15 1 15 7 30 8 1 2 3 1 2 3 4 5 GREEK...
Page 126: ...Fig 6 Fig 7 Fig 8 Fig 9 Fig 10 Fig 11 10 9 11 12 GREEK...
Page 128: ...5 6 V TAC Smart Light Link Now 7 Link Now Authorize 8 account GREEK...
Page 132: ...Account is now Linked a b 7 a b b 8 9 Google Home GREEK...


