background image

SAFETY INSTRUCTIONS

• Make sure that the mains voltage matches the voltage stated on the rating label of the 

appliance.

• Check the power cord regularly for visible damage. If the cord is damaged, it must be 

replaced by the official Technical Support Service, in order to avoid any type of danger.

WARNING: 

Do not use the appliance if its cord, plug, or housing is damaged, nor after it 

malfunctions or has been dropped or damaged in any way.

• The appliance is not intended to be used by children under the age of 8. It can be used by 

children over the age of 8, as long as they are given continuous supervision.

• This appliance is not intended to be used by persons with reduced physical, sensory, or 

mental capabilities, or lack of experience or knowledge, unless they have been given supervi-

sion or instruction concerning the use of the appliance in a safe way by a person responsible 

for their safety, and understand the hazards involved.

• Supervise young children to make sure that they do not play with the appliance. Close 

supervision is necessary when the appliance is being used by or near children.

• Keep the appliance and its cord out of reach of children under the age of 8. 

• Do not try to repair the appliance by yourself. Contact the official Technical Support Service 

for advice.

• Cleaning and maintenance must be carried out according to this instruction manual to make 

sure the appliance functions properly. Turn off and unplug the appliance before cleaning it.

• Make sure the fan is not placed near drapes, curtains, or any objects that may be drawn into 

the fan.

• The minimum distance between the fan blades and the floor must be 2.3 m. The minimum 

carrying capacity of the outlet box from which the fan is hung must be 45 kg.

Summary of Contents for VT-6052-5

Page 1: ...been given supervi sion or instruction concerning the use of the appliance in a safe way by a person responsible for their safety and understand the hazards involved Supervise young children to make...

Page 2: ...s the more airflow the fan will produce Switch off the power before connecting or repairing the fan The electrical wiring must be in accordance with the local regulations The fan must be properly grou...

Page 3: ...on This will damage the blades and upset the balance of the fan causing the unit to wobble After the fan is completely installed make sure all base and fan blade fixings are secured and tightened to p...

Page 4: ...the prod uct The products are suitable for 10 12 Hours Daily operation Usage of product for 24 Hours a day would void the warranty This product is warranted for manufacturing defects only This markin...

Page 5: ...le languages TECHNICAL DATA 1 52 132CM Decorative ceiling fan 2 With forward and reverse function 3 5 MDF blades double color 4 Powerful Motor 153 15mm 2 3kg 5 Revolutions per minute 190 10 RPM 6 Blad...

Page 6: ...g ball 3 Canopy 4 Fan motor housing 5 Glass shade 6 Blades 7 Screw kit mounting bracket hardware wire nuts rubber washers and attachment hardware 8 Remote control 9 Screwdriver 10 Flat blade screwdriv...

Page 7: ...m flat surface The structure to which it is installed must be able to withstand ten times the static weight of the fan In case of installing the ceiling fan to a wooden joist 2 self tapping screws pro...

Page 8: ...rom the top of the motor all the way through the down rod until they come out the other end Insert the down rod into the motor housing s hole and turn it in order to align the holes on both sides with...

Page 9: ...mounting bracket insert the hanger ball in the mounting bracket through the opening and carefully let it rest Rotate the ball and make sure that the tab located in the mounting bracket is aligned wit...

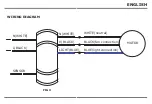
Page 10: ...WIRING DIAGRAM MOTOR N WHITE N WHITE WHITE neutral BLACK fan connection BLUE light connection V BLACK LIGHT BLUE L BLACK SENSOR ENGLISH FIG 9...

Page 11: ...nd ensure that the 3 blade screws are tightened properly Do not over tighten the screws as this can damage the blades Repeat this process for all blades NOTE if installing more than 1 fan be careful n...

Page 12: ...the blades to move warm air near the ceiling around Summer function press the switch DOWN for blades to create breeze and improve air circulation Carefully install the glass shade into the main body a...

Page 13: ...d off and to change speed LIGHT ON OFF Fan Speed H Highest speed M Medium speed L Lowest speed FAN STOP Timer 1H Fan auto turn off after 1 hour 2H Fan auto turn off after 2 hours 4H Fan auto turn off...

Page 14: ...the power is turned off at the main fuse or circuit panel before you attempt any repairs Do not immerse then fan in water Never use scouring pads abrasive or chemical cleaners Clean your fan periodica...

Page 15: ...at least once a year because they may loosen slowly over time and cause a clicking noise 3 Make sure the light kit is securely fastened to the fan and all glass screws are finger tight ened only Do n...

Page 16: ...ble is considered acceptable and should not be considered a defect 1 Make sure the mounting bracket is fixed tightly to the ceiling with no movement at all Tighten screws if necessary 2 Make sure all...

Page 17: ...l est utilis par des enfants ou proximit Gardez l appareil et son cordon d alimentation hors de port e des enfants de moins de 8 ans N essayez pas de r parer l appareil par vous m me Contactez le serv...

Page 18: ...i vous constatez un mouvement oscillant inhabituel arr tez imm diatement d utiliser le ventilateur de plafond et contactez le fabricant son agent de service ou des personnes qualifi es Le remplacement...

Page 19: ...t e des enfants et des animaux elles pourraient causer des dommages si elles sont aval es Si elles ont t aval es contactez imm diatement votre m decin Si vous constatez des signes visibles de dommages...

Page 20: ...AVERTISSEMENT Toutes les t ches lectriques ne doivent tre entreprises qu apr s avoir coup l lectricit en retirant les fusibles ou en fermant le disjoncteur pour viter les risques de chocs lectriques T...

Page 21: ...pince en pingle cheveux travers l axe d assemblage de mani re ce qu elle soit solidement x e FIG 5 Serrez toutes les vis r gl es jusqu au moment Ceci r duira au minimum le risque de culbutage de la t...

Page 22: ...rrez pas trop les vis lors de l installation de l abat jour en verre 3 FONCTIONNEMENT Le commutateur de direction sur le corps du ventilateur contr le le d bit d air Fonction hiver mettez l interrupte...

Page 23: ...le feu cela pourrait provoquer une explosion 4 NETTOYAGE ET ENTRETIEN 1 D branchez toujours le ventilateur de l alimentation lectrique et laissez le s arr ter avant de le nettoyer 2 Nettoyez la surfac...

Page 24: ...rrez pas avec une pince ou un tournevis 4 Assurez vous que le support de montage est bien install sur la bo te de jonction 5 Veillez ce que les crous du bo tier de l interrupteur ou du pavillon ne se...

Page 25: ...u erhalb der Reichweite von Kindern unter 8 Jahren auf Versuchen Sie nicht das Ger t selbst zu reparieren Wenden Sie sich an eine zugelassene Kundendienststelle Die Reinigung und Wartung muss gem dies...

Page 26: ...Servicevertreter oder von entsprechend qualifizierten Personen durchgef hrt werden Die Montage des Aufh ngungssystems muss vom Hersteller seinem Servicevertreter oder einer entsprechend qualifizierte...

Page 27: ...hrung kommen sp len Sie sie sofort mit reichlich Wasser aus Wenden Sie sich sofort an Ihren Arzt Bitte stellen Sie sicher dass das Ger t ausgeschaltet ist bevor Sie mit der Installation beginnen Die...

Page 28: ...he angeschraubt werden Die Struktur an der es installiert wird muss dem zehnfachen statischen Gewicht des Ventilators standhalten Bei Installation des Deckenventilators auf einem Holzbalken sollten di...

Page 29: ...n mit dem angegebenen Drehmoment an Dies minimiert das Risiko dass die Deckenstange und der Ventilator herunterfallen ABB 5 Wenn die Schrauben nicht fest angezogen sind k nnen Vibrationen am Motor auf...

Page 30: ...ARNUNG Bei der Installation des Glasschirms nicht zu fest anziehen 3 BETRIEB Der Richtungsschalter am Ventilatork rper steuert den Luftstrom Winterfunktion Dr cken Sie den Schalter nach OBEN damit die...

Page 31: ...ine Batterien ins Feuer da dies eine Explosion verursachen kann 4 REINIGUNG UND WARTUNG 1 Trennen Sie den Ventilator immer vom Stromnetz und warten Sie bis er zum Stillstand gekommen ist bevor Sie ihn...

Page 32: ...ner Zange oder einem Schraubendreher festziehen 4 Stellen Sie sicher dass die Montagehalterung fest mit der Anschlussdose verbunden ist 5 Vergewissern Sie sich dass die Drahtmuttern im Schaltergeh use...

Page 33: ...8 8 8 2 3 m 45 kg 8 3 mm BULGARIAN...

Page 34: ...150 mm 6 BULGARIAN...

Page 35: ...BG V TAC 2 10 12 24 BULGARIAN...

Page 36: ...1 1 2 3 4 5 6 7 8 1 2 2 1 3 3 2 9 10 11 12 13 14 15 BULGARIAN...

Page 37: ...2 2 4 U 4 5 U U 5 5 6 6 2 3 7 7 7 2 4 8 9 BULGARIAN...

Page 38: ...2 5 3 10 3 10 10 2 6 LED 11 3 12 H M L BULGARIAN...

Page 39: ...1H 1 2H 2 4H 4 8H 8 1 2 1 A23 12V 3 4 1 2 BULGARIAN...

Page 40: ...5 1 2 1 2 3 4 5 6 7 1 2 3 1 2 BULGARIAN...

Page 41: ...avanje se moraju obavljati u skladu s ovim priru nikom kako bi se osiguralo pravilno funkcioniranje ure aja Prije i enja isklju ite i iskop ajte ure aj iz napajanja Provjerite nije li ventilator posta...

Page 42: ...e koristite ventilator na otvorenom Proizvod mora biti instaliran na suhom mjestu gdje nije izlo en vodi ili vlazi Ne priklju ujte motor ventilatora na prigu iva To mo e uzrokovati neispravnost ili o...

Page 43: ...instalacije i spremite upute za budu u uporabu Ako imate dodatnih pitanja molimo obratite se na emprodava u ili lokalnom trgovcu gdje ste kupili ovaj proizvod Oni su osposobljeni i spremni vam pomognu...

Page 44: ...r inu Podloga na koju e se montirati mora biti u stanju izdr ati deset puta vi e od stati ne te ine ventilatora Ukoliko montirate ventilator na drveni strop ili podlogu dva samorezna vijka koja su isp...

Page 45: ...gurno u vr eni Slika 6 2 3 OBJE ANJE VENTILATORA NA NOSA I PRI VR IVANJE LOPATICA Podignite ventilator do nosa a ubacite kuglicu za vje anje ball u nosa kroz otvor i pa ljivo ga ostavite Slika 7 Zakre...

Page 46: ...e sprije ile mogu e ozljede i o te enja motora Promijenite smjer pritiskom na prekida gore ili dolje ukoliko ventilator nije uga en DALJINSKI UPRAVLJA Koristite daljinski upravlja da uklju ite i isklj...

Page 47: ...oj plo i to mo e biti vrlo opasno i o tetiti ventilator Dok se proizvod ne koristi provjerite je li isklju en iz napajanja Da biste ga pohranili spremite ga u originalnu kutiju i uvajte na svje em i s...

Page 48: ...e lopatica na motor vrsto stegnuti i da su kori teni predvi eni podlo ci za tu svrhu VENTILATOR NE PROIZVODI PUNO ZRAKA 1 Ventilator mo e raditi u suprotnom smjeru tako da je zrak usmjeren prema gore...

Page 49: ...as Mantenha o aparelho e o cabo de alimenta o fora do alcance de crian as com menos de 8 anos N o tente reparar o aparelho por si s Entre em contato com um servi o de suporte t cnico oficial para obt...

Page 50: ...u uma pessoa devidamente qualificada A montagem do sistema de suspens o deve ser realizada pelo fabricante seu representante de servi o ou uma pessoa devidamente qualificada Para garantir a seguran a...

Page 51: ...mente assist ncia m dica Antes de iniciar a instala o desconecte a fonte de alimenta o A fonte de luz desta ilumina o n o intercambi vel quando atingir o fim de sua vida til toda a lumin ria deve ser...

Page 52: ...uma superf cie s lida e plana A estrutura na qual est instalada deve suportar um peso est tico dez vezes o peso do ventilador Ao instalar o ventilador de teto num a viga de madeira os dois parafusos a...

Page 53: ...er o ocorrer vibra es no motor Isso pode ser perigoso FIG 6 Ap s concluir as etapas indicadas encima instale a esfera de suspens o na barra de suporte coloque o perno de reten o na barra de suporte e...

Page 54: ...uxo de ar Modo de inverno deslize o interruptor para cima para que as aspas possam circular o ar quente ao redor do teto Modo de ver o deslize o interruptor para baixo para que as aspas possam gerar u...

Page 55: ...e desconecte o ventilador e espere que ele pare antes de limpar 2 Limpe a parte externa com um pano macio e h mido ATEN O Antes de iniciar a repara o veri que se a energia est desligada do fus vel pri...

Page 56: ...ou chave de fenda 4 Veri que que o suporte de montagem est rmemente instalado ao lado da caixa de terminais 5 Veri que que as porcas dos condutores no compartimento dos interruptores ou no painel n o...

Page 57: ...o oficial de soporte t cnico para obtener asesoramiento La limpieza y el mantenimiento deben realizarse de acuerdo con estas instrucciones de funcionamiento para garan tizar que el aparato funcione co...

Page 58: ...ra garantizar la seguridad de sus hijos mantenga los materiales de embalaje bolsas de pl stico cajas poliestire no etc fuera de su alcance ADVERTENCIA Desconecte el interruptor principal durante la in...

Page 59: ...zar la instalaci n desconecte la fuente de alimentaci n La fuente de luz de esta iluminaci n no es intercambiable Cuando llega al final de su vida til se debe reemplazar toda la iluminaci n La instala...

Page 60: ...atornillar a una super cie s lida y plana La estructura en la que est montado debe soportar un peso est tico diez veces mayor que el del ventilador Al instalar el ventilador de techo en una viga de ma...

Page 61: ...se caigan FIG 5 Si los tornillos no est n bien apretados pueden producirse vibraciones en el motor Esto puede ser peligroso FIG 6 Despu s de completar los pasos anteriores instale la esfera de suspen...

Page 62: ...El interruptor de la direcci n de la carcasa del ventilador regula el ujo de aire Modo de invierno deslice el interruptor hacia arriba para que las aspas puedan circular aire caliente alrededor del t...

Page 63: ...e de red o el interruptor autom tico est n apagados No sumerja el ventilador en agua Nunca use esponjas met licas limpiadores abrasivos o productos qu micos Limpie el ventilador peri dicamente Use sol...

Page 64: ...Aseg rese de que las tuercas del cable en la caja o panel del interruptor no se golpeen entre s o con la pared de la carcasa Si es necesario envu lvalos con cinta aislante 6 Aseg rese de que el panel...

Page 65: ...vezet k t 8 v alatti gyermekek sz m ra elz rva Ne pr b lja meg saj t maga jav tani a k sz l ket K rjen tan csot a hivatalos m szaki t mogat si szolg latt l A tiszt t st s a karbantart st a haszn lati...

Page 66: ...ggeszt s rendszer nek felszerel s t a gy rt a szervizk pviselet vagy a megfelel k pes t ssel rendelkez szem ly v gezheti A gyermekek biztons ga rdek ben minden csomagol st m anyag zacsk k dobozok pol...

Page 67: ...keressen A telep t s megkezd se el tt felt tlen l kapcsolja ki az ramell t st Ennek a l mpatestnek a f nyforr sa nem cser lhet ki amikor a f nyforr s el ri az lettartam t az eg sz l mpat estet ki kell...

Page 68: ...vagy a megszak t kikapcsol s val t rt n villamosenergia lev laszt s ut n szabad elv gezni SSZESZEREL SI L P SEK 2 1 A SZEREL KONZOL FELSZEREL SE A tart keretet r gz teni kell egy szil rd sima fel letr...

Page 69: ...s t 5 bra Ha a csavarokat nincs megfelel en megh zva akkor a motor rezeghet Ez vesz lyes lehet 6 bra Amint a fenti l p sek befejez dtek helyezze be akaszt g mb t a lefel mutat r dra helyezze be az tk...

Page 70: ...yomja meg a FELFEL gombot hogy a lap tok mozogtass k a meleg leveg t a mennyezet k zel ben Ny ri funkci nyomja meg a LEFEL kapcsol t a peng khez hogy szell legyen s javuljon a l g raml s FIGYELEM Az i...

Page 71: ...ki van e kapcsolva a f biztos t kon vagy az ramk ri panelen Ne mer tse a ventil tort v zbe Soha ne haszn ljon s rol padot s rol szert vagy vegyi tiszt t szereket Rendszeresen tiszt tsa meg a ventil t...

Page 72: ...oz 5 Gy z dj n meg arr l hogy a kapcsol h zban vagy a panelben l v huzal any k nem tk znek egym shoz vagy a h z fal hoz Ha sz ks ges tekerje le elektromos szalaggal 6 gyeljen arra hogy a panel ne rint...

Page 73: ...e il suo cavo fuori dalla portata dei bambini di et inferiore ad 8 anni Non tentare di riparare l apparecchio da soli Contattare il servizio di supporto tecnico ufficiale per un consiglio La pulizia e...

Page 74: ...ita dal produttore dal suo agente di servizio o da persone adeguatamente qualificate Il montaggio del sistema di sospensione deve essere eseguito dal produttore dal suo agente di servizio o da una per...

Page 75: ...amente con abbondante acqua Consultare immediatamente un medico Assicurarsi di disattivare l alimentazione prima di iniziare l installazione La sorgente luminosa di questo apparecchio di illuminazione...

Page 76: ...one deve essere avvitata su una super cie piana e stabile La struttura su cui installata deve essere in grado di supportare un peso statico dieci volte superiore a quello del ventilatore In caso di in...

Page 77: ...be oscillare Questo potrebbe essere pericoloso FIG 6 Una volta terminati tutti i passi precedenti installare la sfera di sospensione sulla barra portante inserire il perno di bloccaggio nella barra po...

Page 78: ...ino al so tto Modalit estiva spostare l interruttore verso il BASSO in modo che le alette possano generare una brezza e migliora re la circolazione dell aria AVVERTIMENTO Prima di utilizzare l interru...

Page 79: ...super ci metalliche sono coperte di vernice per prevenire l appannamento Non bagnare le parti interne del prodotto specialmente il circuito stampato in quanto ci potrebbe essere molto pericoloso e dan...

Page 80: ...curarsi che il pannello non tocchi il so tto 7 Assicurarsi che le viti che ssano gli elementi di ssaggio delle alette al motore siano ben serrate e che siano state utilizzate le rondelle di bloccaggio...

Page 81: ...8 8 8 2 3 45 kg 8 GREEK...

Page 82: ...3 mm 150 mm 6 GREEK...

Page 83: ...EL V TAC V TAC 2 10 12 24 GREEK...

Page 84: ...1 1 2 3 4 5 6 7 8 1 2 2 1 3 3 2 9 10 11 12 13 14 15 GREEK...

Page 85: ...2 2 4 U 4 5 U U 5 5 6 6 2 3 2 4 8 9 2 5 3 10 GREEK...

Page 86: ...3 10 10 2 6 LED 11 3 12 H M L 1H 1 2H 2 4H 4 8H 8 GREEK...

Page 87: ...1 2 A23 12V 3 4 1 2 GREEK...

Page 88: ...5 1 2 1 2 3 4 5 6 7 1 2 3 1 2 GREEK...

Page 89: ...ost pnym dla dzieci w wieku poni ej 8 lat Nie pr buj samodzielnie naprawia urz dzenia Skontaktuj si z oficjalnym centrum serwisowym pomocy technicznej w celu uzyskania porady Czyszczenie i konserwacja...

Page 90: ...alifikowan osob Monta systemu bezpiecznego zawieszenia musi by przeprowadzona przez producenta jego przedstawiciela serwis owego lub wykwalifikowan osob Aby zapewni bezpiecze stwo dzieci przechowuj ma...

Page 91: ...luzowymi Je li ods oni te baterie wejd w kontakt z oczami natych miast przemyj je du ilo ci wody Natychmiast nale y wezwa pomoc medyczn Wy cz zasilanie przed rozpocz ciem monta u r d o wiat a oprawy o...

Page 92: ...U WENTYLATORA 2 1 MONTA WSPORNIKA MONTA OWEGO Wspornik zawieszenia nale y przykr ci do solidnej r wnej powierzchni Konstrukcja na kt rej zostanie on zamon towany musi wytrzyma ci ar statyczny dziesi r...

Page 93: ...z zawleczk i zabezpiecz j jak najpewniej rysunek 6 Dokr wszystkie wkr ty z zastrze eniem okre lonego przez producenta momentu obrotowego Minimalizuje to ryzyko upadku pr ta i wentylatora rysunek 6 Je...

Page 94: ...zablokowa rysunek 11 OSTRZE ENIE Nie dokr caj wkr t w zbyt mocno podczas monta u szklanego klosza 3 FUNKCJONOWANIE Prze cznik kierunku obracania si na obudowie wentylatora reguluje przep yw powietrza...

Page 95: ...mo e to spowodowa wybuch 4 CZYSZCZENIE I KONSERWACJA 1 Zawsze przed tym jak rozpocz czyszczenie urz dzenia od czaj wentylator od zasilania i czekaj a opatki zatrzymaj si ca kowicie 2 Czy zewn trzn pow...

Page 96: ...o klosza s dokr cane wy cznie r cznie Nie dokr caj tych ostatnich szczypcami p askimi ani rubokr tem 4 Upewnij si e wspornik monta owy jest mocno przymocowany do skrzynki przy czeniowej 5 Upewnij si e...

Page 97: ...i cablul de alimentare a acestuia la ndem na copiilor sub 8 ani Nu ncerca i s repara i singur aparatul Contacta i un serviciu oficial de asisten tehnic pentru sfaturi Cur area i ntre inerea trebuie e...

Page 98: ...endare trebuie s fie efectuat de produc tor reprezentantul s u de servicii sau de o persoan calificat corespunz tor Pentru a asigura siguran a copiilor dvs p stra i materialele de ambalare pungi de pl...

Page 99: ...limentarea electric Sursa de lumin a acestui corp de iluminat nu poate fi nlocuit c nd ajunge la sf r itul duratei de func ionare ntregul corp de iluminat trebuie nlocuit Instalarea trebuie efectuat n...

Page 100: ...bat la o suprafa solid i plan Structura pe care va fi montat trebuie s reziste la o greutate static de zece ori mai mare dec t a ventilatorului La instalare a ventilatorului de tavan pe o grind de lem...

Page 101: ...ui FIG 5 Dac uruburile nu sunt str nse corespunz tor motorul ar putea oscila Acest lucru poate periculos FIG 6 Dup nalizarea etapelor de mai sus monta i capacul pe bara de suspendare introduce i tiftu...

Page 102: ...acest comutator trebuie inversat pentru a impinge aerul curat n sus Mod de var n timpul verii acest comutator trebuie sa e n jos pentru a impinge aerul curat n jos AVERTIZARE nainte de a utiliza comut...

Page 103: ...ea este oprit la siguran a principal sau panoul circuitului nainte de a ncerca orice repa ra ii Nu scufunda i ventilatorul n ap Nu folosi i niciodat bure i metalici produse de cur at abrazive sau subs...

Page 104: ...nc iune 5 Asigura i v c piuli ele cablului din carcasa comutatorului sau panoul nu se lovesc reciproc sau n peretele carcasei Dac este necesar nf ura i le cu band izolatoare 6 Asigura i v c panoul nu...

Page 105: ...jich bl zkosti je nutn p sn kontrola Uchov vejte spot ebi a jeho nap jec kabel mimo dosah d t mlad ch 8 let Nepokou ejte se opravovat spot ebi sami Po dejte o radu ofici ln technickou podporu Po dejte...

Page 106: ...ho z stupce nebo p slu n kvalifikovanou osobu V m na st syst mu odpru en mus b t provedena v robcem jeho servisn m z stupcem nebo vhodn kvalifikova nou osobou Mont syst mu odpru en mus b t provedena v...

Page 107: ...cemi Pokud baterie vyt kaj a dostanou se do kontaktu s o ima okam it je vypl chn te velk m mno stv m vody Ihned vyhledejte l ka skou pomoc P ed zah jen m instalace vypn te nap jen Sv teln zdroj tohoto...

Page 108: ...u Konstrukce na kterou je nainstalov n mus odolat statickou hmotnost desetkr t vy ne je hmotnost ventil toru V p pad instalace stropn ho ventil toru do tr mu by m ly sta it 2 samo ezn rouby kter jsou...

Page 109: ...u rouby pevn uta eny m e doj t k vibrac m motoru To m e b t nebezpe n Obr 6 Po dokon en v e uveden ch krok namontujte z v snou kouli na nosnou ty vlo te pojistn kol k do nosn ty e a zvedn te kouli Pot...

Page 110: ...duchu Zimn re im stiskem p ep na e NAHORU se lopatky pohybuj tepl m vzduchem pobl stropu Letn re im stisknut m sp na e DOL vytvo te v tr a zlep te cirkulaci vzduchu VAROV N P ed pou it m sm rov ho sp...

Page 111: ...opravy se ujist te e je vypnut s ov pojistka nebo jisti Ventil tor nepono ujte do vody Nikdy nepou vejte kovov houby abrazivn istic prost edky nebo chemik lie Pravideln ist te ventil tor Pou vejte pou...

Page 112: ...krytu V p pad pot eby zabalte elektrickou p skou 6 Ujist te se e se panel nedot k stropu 7 Ujist te se e rouby upev uj c dr ky lopatek k motoru jsou uta eny a byly pou ity k tomu ur en pojistn podlo k...

Reviews: