background image

Installation instructions

CombiCooler/Cooler/WineCooler/Freezer
V6000 Supreme, integrated

1091916-R01

07/05/2020

1091916-R01

21

Fitting the water filter (depending on model)

If the appliance is equipped with an ice-maker, before switching it on make sure that the water filter cartridge is installed and the hy-
draulic circuit is filled with water. The water filter ensures optimal water quality for making ice cubes from up to 3,000 l of water and for
up to 12 months. When the filter is almost exhausted a corresponding message appears in the display.

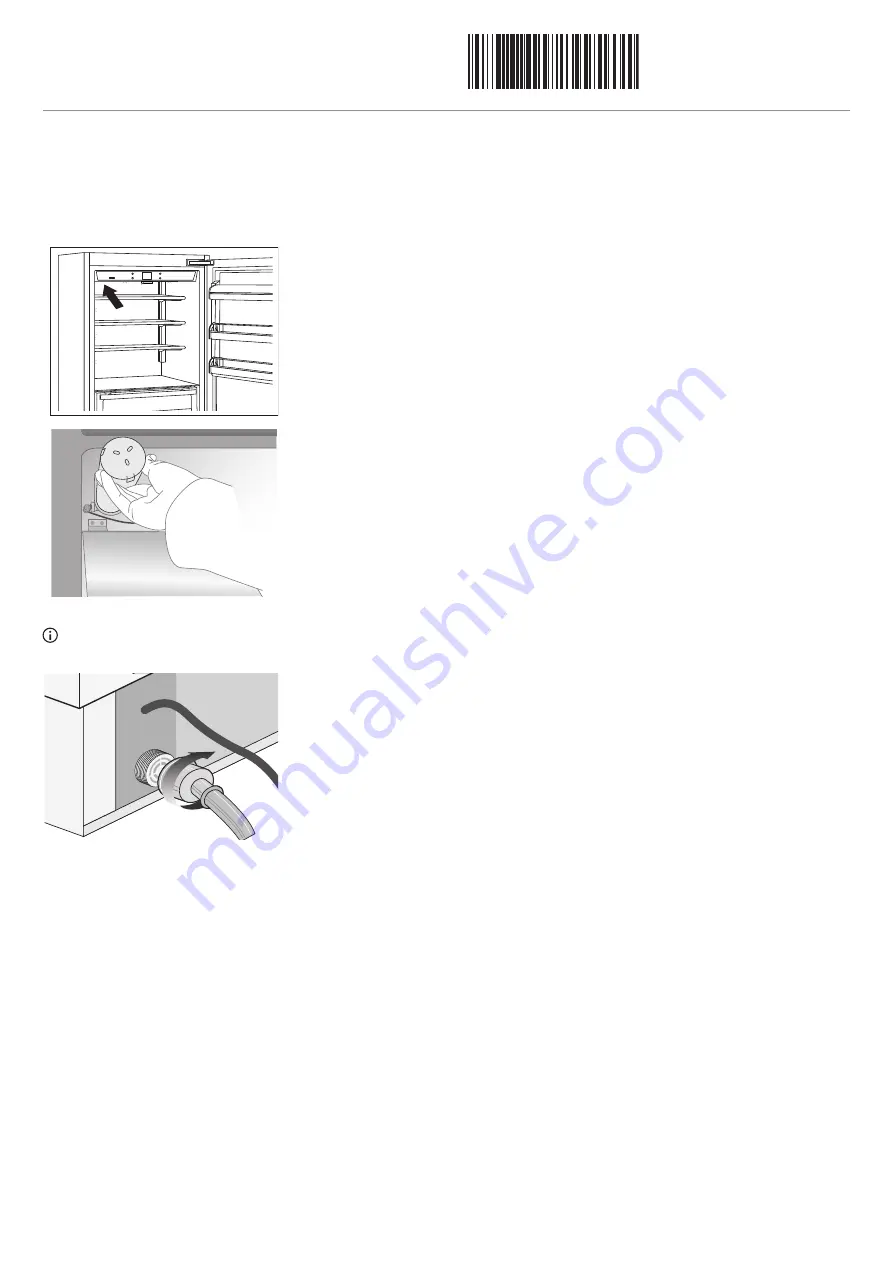
Procedure for the CombiCooler V6000 Supreme (51096)

The filter is located behind the glass panel in the top of the refrigerator compartment.

Pull both catches at the front of the glass panel to release it.

Carefully pull out the glass panel.

Take the end cap off the cartridge, set the cartridge in the holder and turn clockwise one
quarter turn until it clicks into place.

Connect the water hose to the tap using the seals included in the scope of delivery.

Procedure for the Freezer V6000 Supreme (51099)

 Depending on the water quality, the use of a water filter is also recommended for the Freezer V6000 Supreme (51099); a water filter

is not strictly necessary if the water quality is high.

The scope of delivery includes an externally mounted water filter set. The water filter manifold
and water connections must be prepared before the freezer is finally installed; the water con-
nection at the back of the appliance to the water filter set must be in place before installing
the appliance. Install the water filter set in a position where it can be easily accessed (such as
in or below an adjacent cabinet) in order to be able to replace the water filter cartridge every
12 months.

Checking the completed installation

Make sure the feet have been installed and adjusted correctly.

Make sure there are no leaks in the water connection system (depending on model) and that the stopcock is easily accessible.

Make sure the electrical connection has been carried out correctly and that the plug with all-pole switch is easily accessible.

Make sure the appliance is perfectly aligned with the adjacent cabinets.

Make sure all adhesive tape and temporary protection – both inside and on the outside of the appliance – has been removed.

Make sure the doors seal tightly and that the drawers and drawer bottoms slide smoothly.

Summary of Contents for CombiCooler V6000 Supreme

Page 1: ...e specifications of the local electricity supply companies A plug in appliance may only be connected to a socket outlet with earthing contact installed according to specifications An all pole mains is...

Page 2: ...have to be provided Electrical connection cable 2 m OT MT View without door panel OT view with door panel MT Gross weight Max permissible weight of door panel 212 kg 23 kg top 11 kg bottom Mains volta...

Page 3: ...itchen cabinet front Details Completing the installation see page 20 Electrical connection cable 2 m OT MT View without door panel OT view with door panel MT Gross weight Max permissible weight of doo...

Page 4: ...placed by kitchen cabinet front Details Completing the installation see page 20 Electrical connection cable 2 m OT MT View without door panel OT view with door panel MT Gross weight Max permissible we...

Page 5: ...op does not have to be provided Electrical connection cable 2 m OT MT View without door panel OT view with door panel MT Gross weight Max permissible weight of door panel 153 kg 34 kg Mains voltage Fu...

Page 6: ...his is not possible care fully tilt the appliance onto its back or side hinge side to transport it At the installation site remove the packaging and take the appli ance off the pallet Procedure 1 4 1...

Page 7: ...ter cartridge supplied be installed as explained in the instructions provided The water hose can be shaped by heating max temperature 120 C 248 F without the risk of causing throttle points max bendin...

Page 8: ...y by mounting brackets and can be adjusted where necessary Brackets mounting brackets and corresponding mounting screws are included in the scope of delivery of the appliance and are fastened to the d...

Page 9: ...o the drawer in the CombiCooler V6000 Supreme 51096 The procedure for fitting the door panel to the drawer is the same as that for fitting the door panel to the door except that measurements are taken...

Page 10: ...10 Door panel for the CombiCooler V6000 Supreme 51096 894 417 417 894 417 417 354 5 354 5 13 34 6 5 1 6 6 5 34 1268 1163 660 157 1320 540 635 507 5 382 100 2 4 894 23 kg 11 kg 540 635 92 187 3 1320 18...

Page 11: ...05 2020 1091916 R01 11 Door panel for the Cooler V6000 Supreme 51098 1 8 1 13 1863 1960 95 1201 5 620 5 1727 47 418 418 34 34 894 92 187 18 28 1863 1960 894 34 kg 2050 0 25 B A For niche height 2064...

Page 12: ...01 12 Door panel for the WineCooler V6000 Supreme 51097 1 8 92 187 18 28 1863 1960 2050 0 25 B A 1 1572 135 327 135 13 1863 1960 95 1201 5 620 5 1727 47 276 5 276 5 34 34 594 594 161 258 130 34 kg For...

Page 13: ...5 2020 1091916 R01 13 Door panel for the Freezer V6000 Supreme 51099 1 8 92 187 18 28 1863 1960 2050 0 25 B A 1 13 1863 1960 95 1201 5 620 5 1727 47 276 5 276 5 34 34 594 594 34 kg For niche height 20...

Page 14: ...a long All Set also includes Art no Designation For appliance 1087155 Chrome steel door panel set right CombiCooler V6000 Supreme 51096 1090119 Chrome steel door panel set left CombiCooler V6000 Supre...

Page 15: ...rting from the bottom 3 Align the door panel with the adjacent cabinets using the brackets and mount ing brackets By tightening or loosening the screw in the bracket move the door panel up or down or...

Page 16: ...the bracket Move the door panel up down accordingly 8 Depth alignment From the inside of the drawer door lift up the seal The top hole is for adjusting the door panel closer or further away and the bo...

Page 17: ...appliance duct of at least 40 mm widthwise and connected to the outside to avoid overheating The door panels for the door and drawer should be fitted before the appliance is pushed into its installati...

Page 18: ...ances in front of the opening leaving enough space to work around the back of the appliances 2 Fasten the mounting brackets on the back of the appli ances to connect them together Fasten one side of t...

Page 19: ...anels for the door and drawer should be fitted before the appliance is pushed into its installation position Check that the adjustable feet and the back rollers are cor rectly aligned before installin...

Page 20: ...with the appliance in order to achieve adequate ventilation The ventilation grille is held in place with magnetic strips and is easy to remove for regular cleaning removing any build up of dust Do no...

Page 21: ...lity the use of a water filter is also recommended for the Freezer V6000 Supreme 51099 a water filter is not strictly necessary if the water quality is high The scope of delivery includes an externall...

Page 22: ...f the appliance is equipped with an ice maker depending on model before switching it on make sure that the water filter cartridge is installed and the hydraulic circuit is filled with water Next press...

Reviews: